

Whats happening?
Matt
2 meter Orinoco basin tank setting up...
-
Kostas

- Posts: 791
- Joined: 23 Apr 2003, 10:57
- I've donated: $256.00!
- My images: 19
- My cats species list: 14 (i:0, k:0)
- My aquaria list: 3 (i:3)
- Spotted: 6
- Location 1: Greece,Athens
- Location 2: Greece,Athens
- Interests: Fishkeeping,diving,skiing,r/c modeling,growing Palm trees,ferns and tropical plants
- Contact:
Thank you very much all for your replys  I am very sorry for not posting for so long but i am changing internet providers and some time now i dont have fast internet access from home
  I can only connect with dial up at home and uploading photos that way is very time consuming...This,coupled with beeing extreemly bussy this period and having very little free time are responsible for me not posting for so long...Sorry
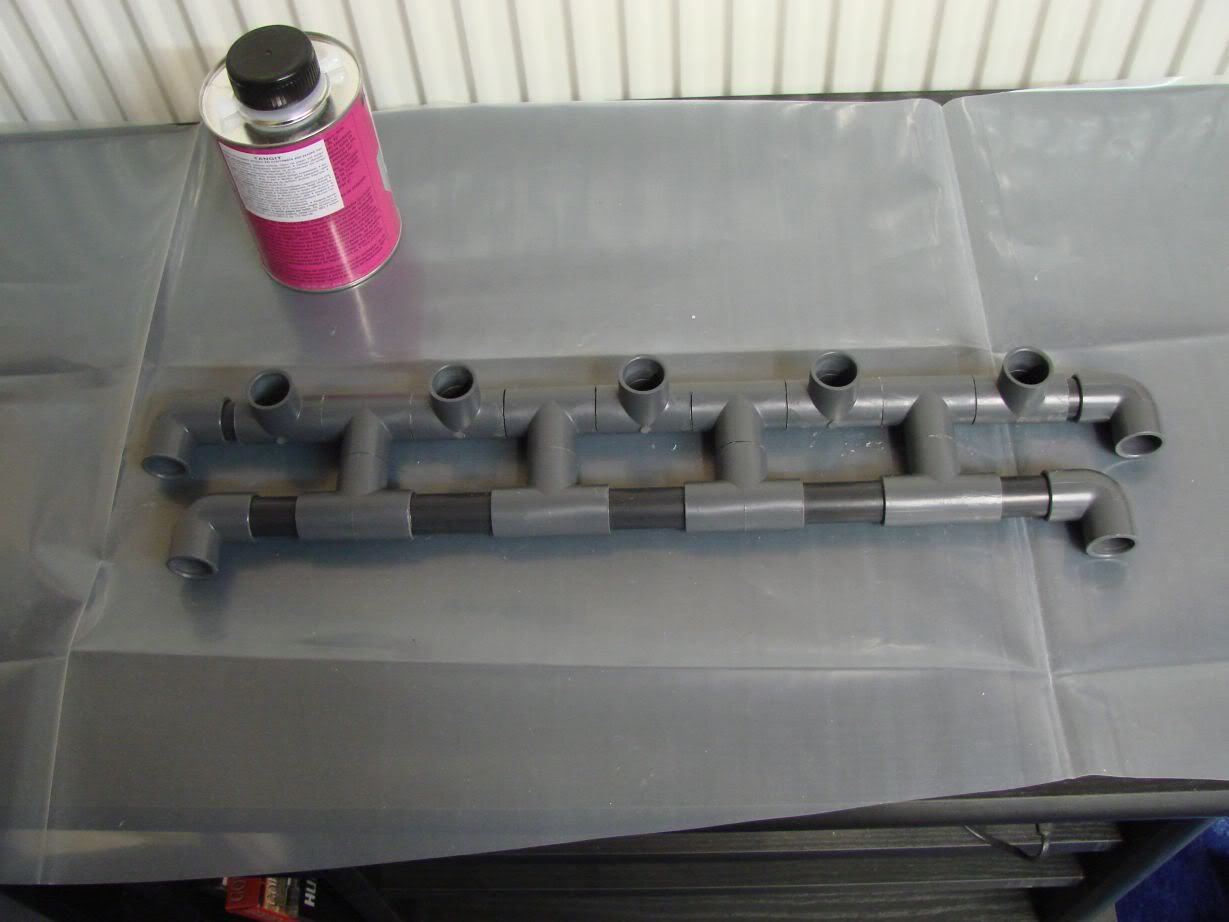
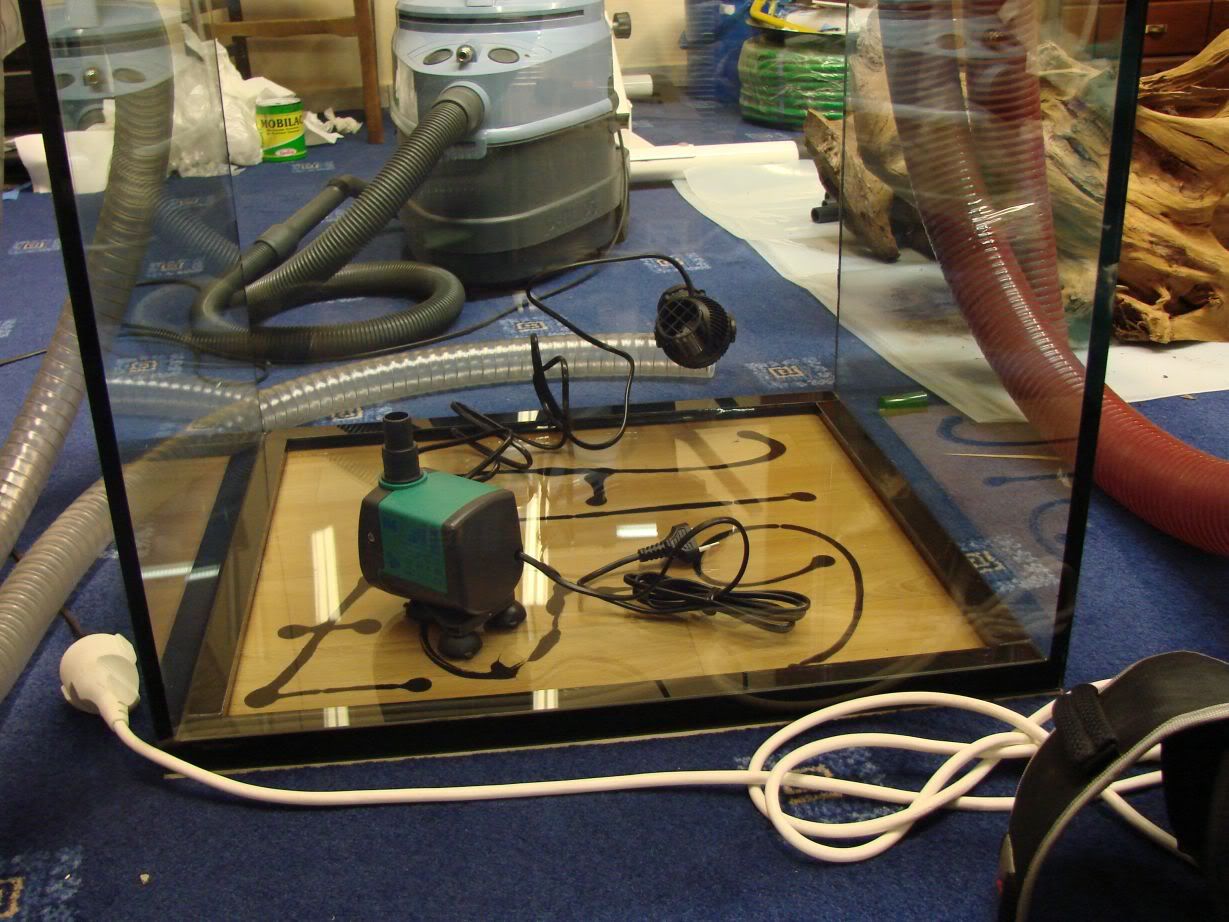
Thank you very much Mats and Bas I hadnt replyed all this time wishing to install the pumps first and then reply together with a photo of them but...i still havent finished the installation of the pumps as there are some other things that need to be made before i can install them...But,i have cut the piping that will connect them to the pvc network at 12cm,which will make the pumps sit at 10-11cm  And i have completely finished the intakes,the are 13cm or a bit more above where the sand level will be I will also put sponge prefilters on them to further reduce the possibility of sand getting in there...
Matt,
Here is a photo update!
The tank is starting to come along nicely but slowly unfortunately...During the past time,i have almost finished with the returns of the sump pumps and once completely finished i will take and post photos of them.I have also glued the pvc network for the pumps and have taken out of the tank all woods but the big one...Will take it out too as soon as i find people to help me with that Its too heavy!
I have also progressed with the slate caves and the Saturday before last Saturday,i had some slate pieces i needed to make the caves and cave network cut by at a workshop and at Sunday i glued the ''feet'' of the caves and cave network together without smoothening them first.I thought i will have a better,more natural looking result if i glued them first and then carve them as needed with the dremmel...So,soon,the carving will begin!
I have also bought some more of the things i need,2 300W Eheim-Jager heaters(the only ones he had,i wanted 4 of them... along with Tronic heater guards,which he didnt had in stock either...) and a 500 Bio chem stars pack.Also bought a Tunze nanostream...Yesterday,i went shopping again and bought a Newjet 2300 as the return pump from the holding tank...On Monday,the Lifeguard fluidized bed filter i had ordered finaly arrived and in good condition and today will be setting it up in my 1meter tank to cycle so as to be able to not wait much for my 2meter to cycle...
And now the photos!!!
Firstly,here are some photos of the things i returned home with from the first shopping...
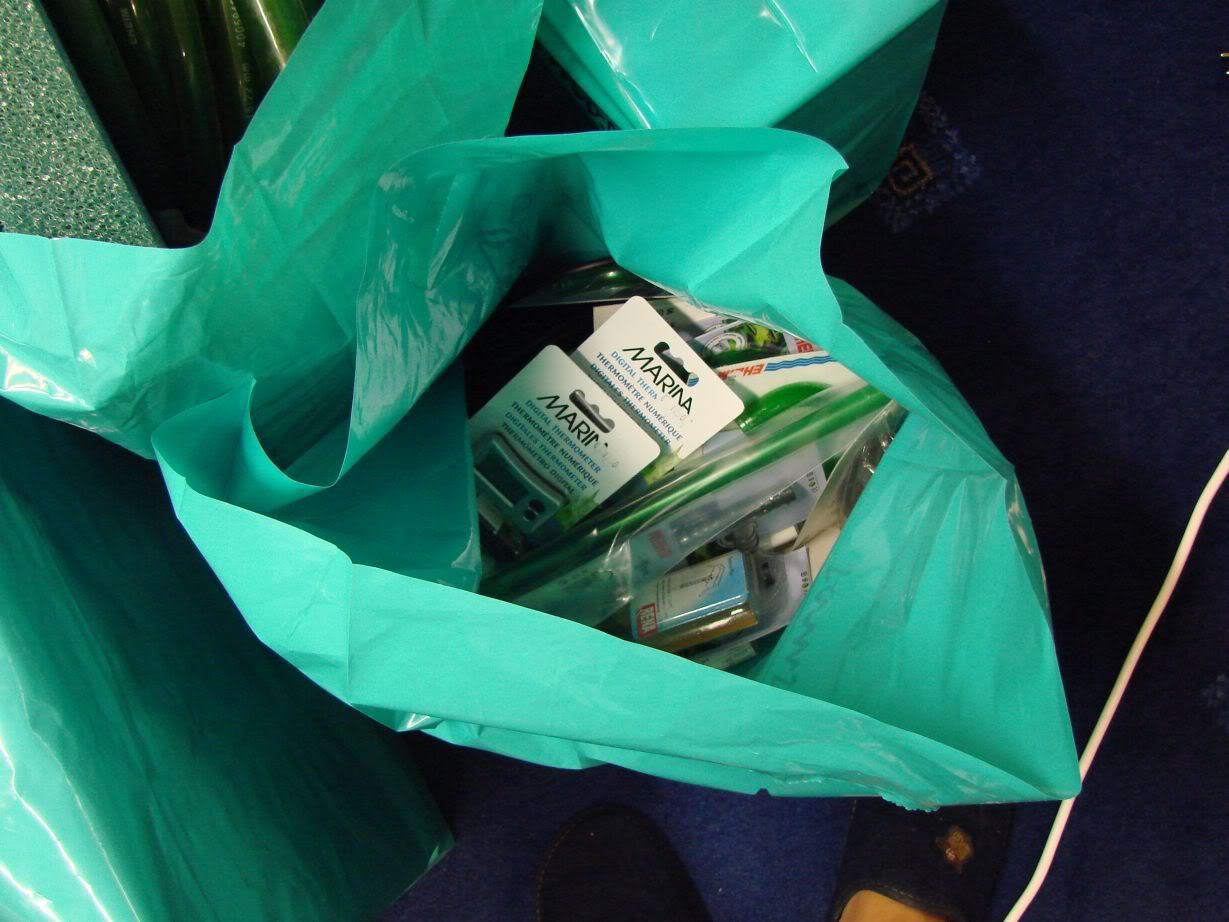
Lets have a look in the bags...
One large pore and one small pore thick sponge for mechanical filtration...
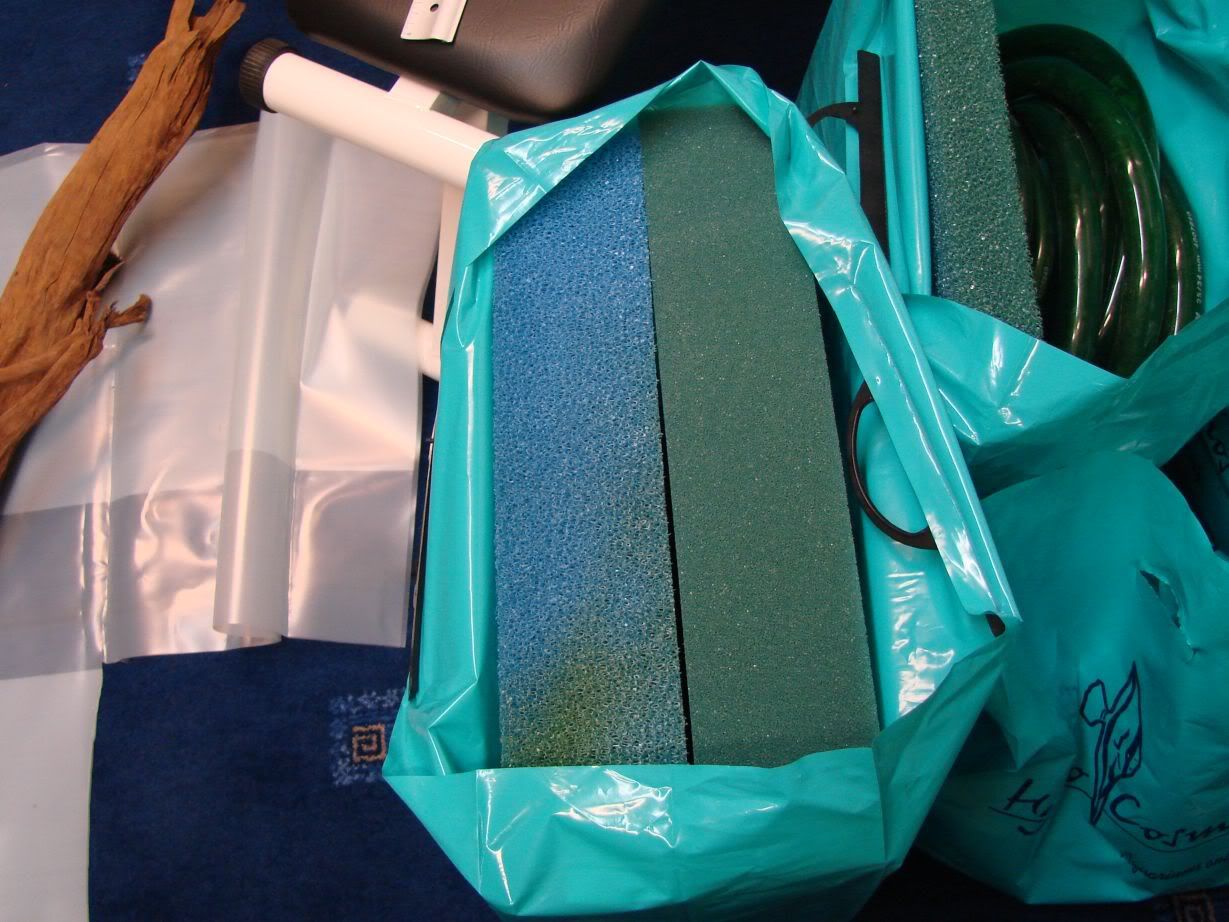
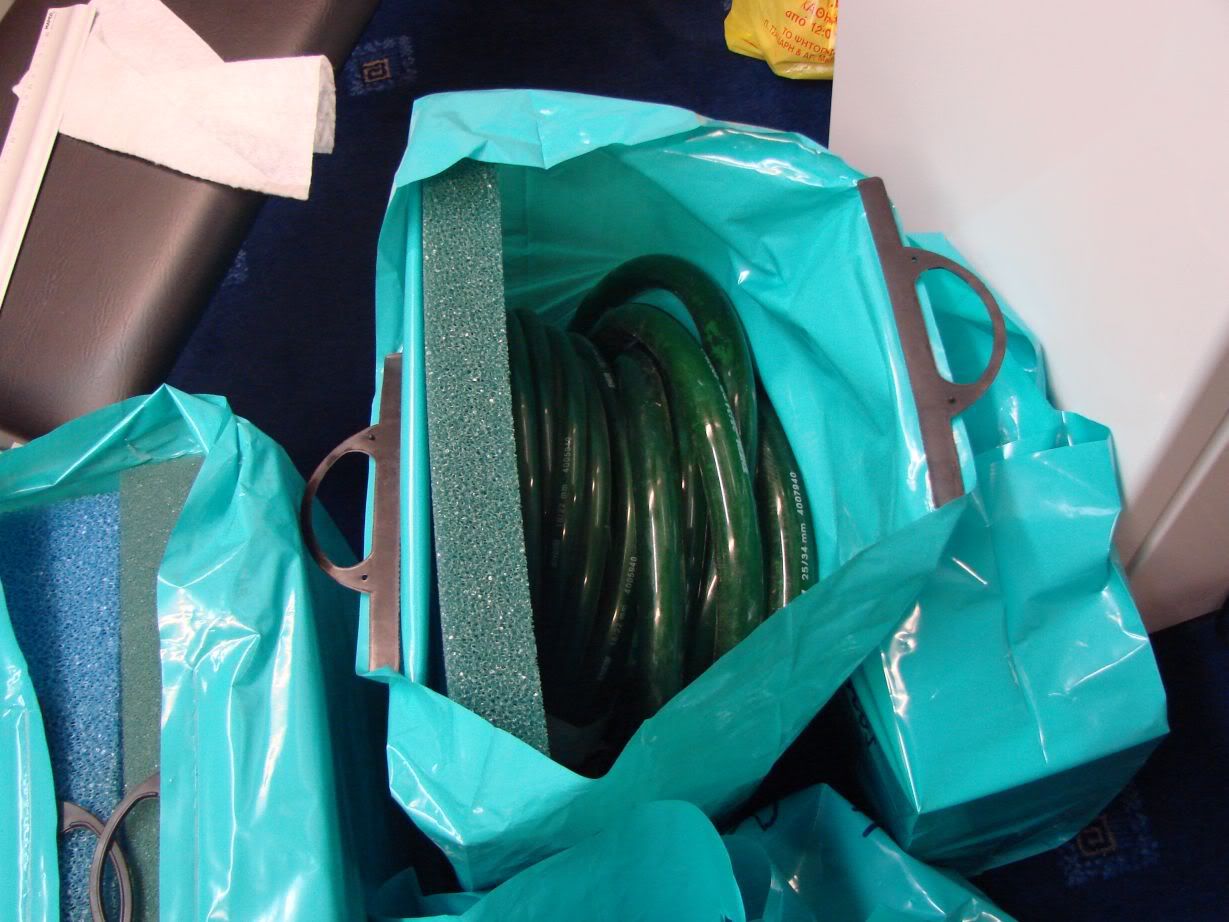
...and one thinner large pore sponge for mechanical filtration too along with the piping i bought...
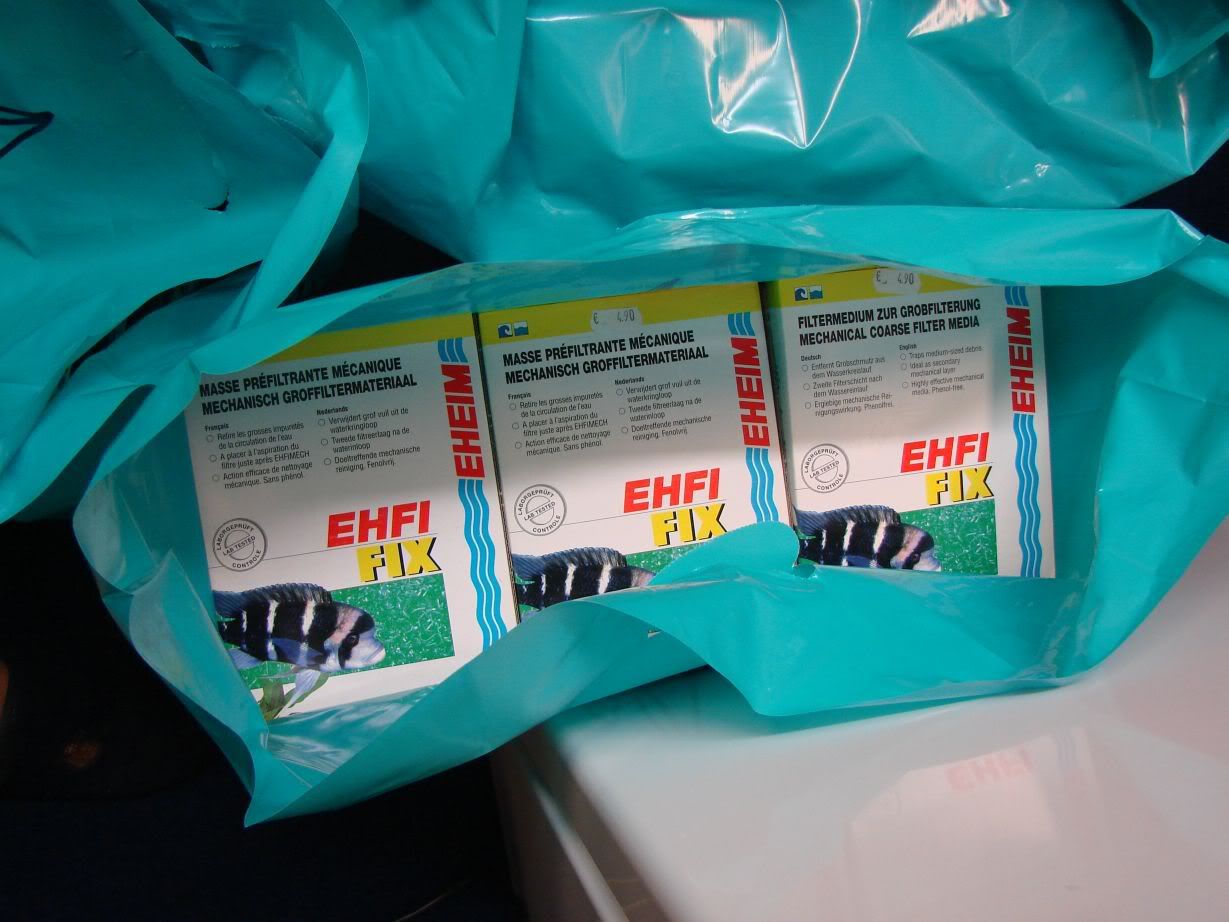
..and a bag full of Ehfi Fix,double row,for the large dirt particles and to clean the sump less often...
...and the various thingies i told you about...
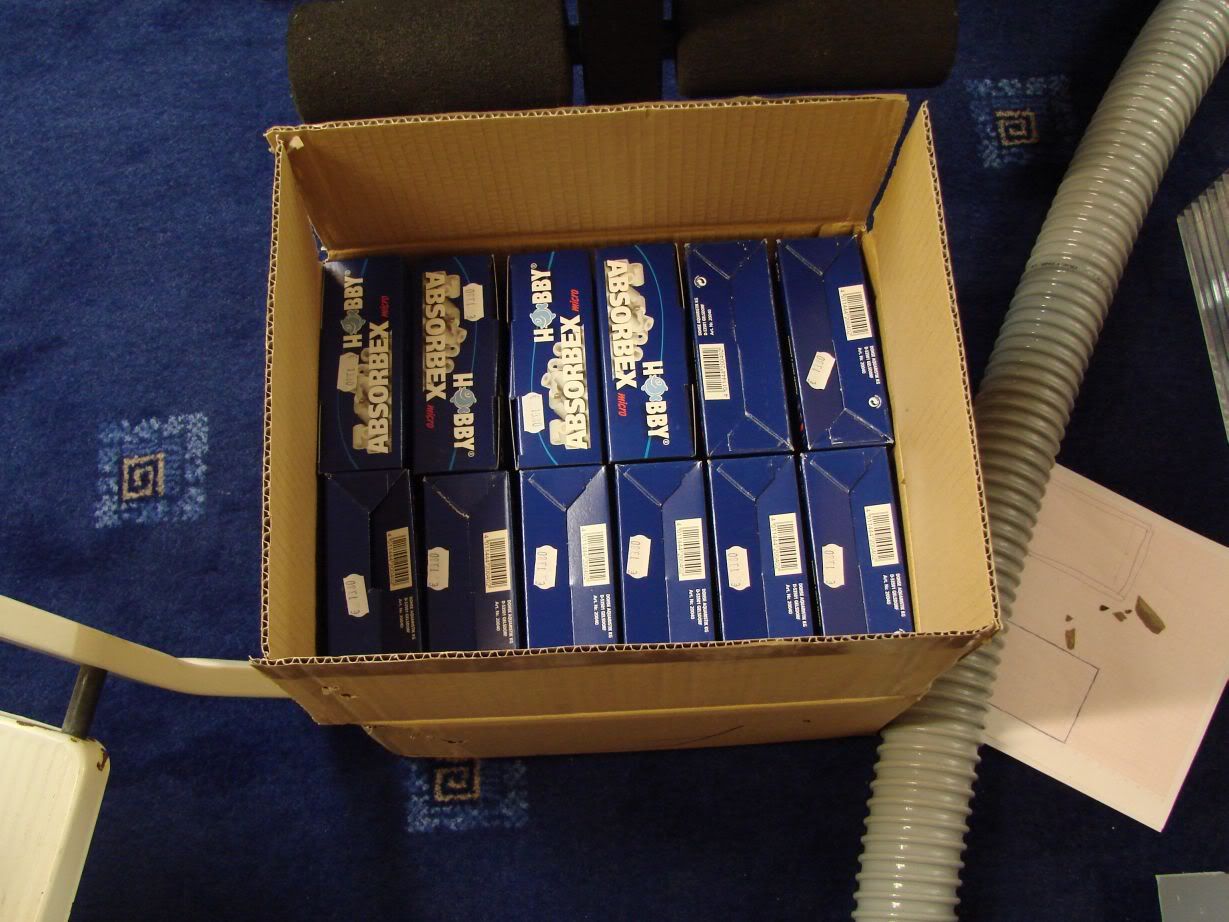
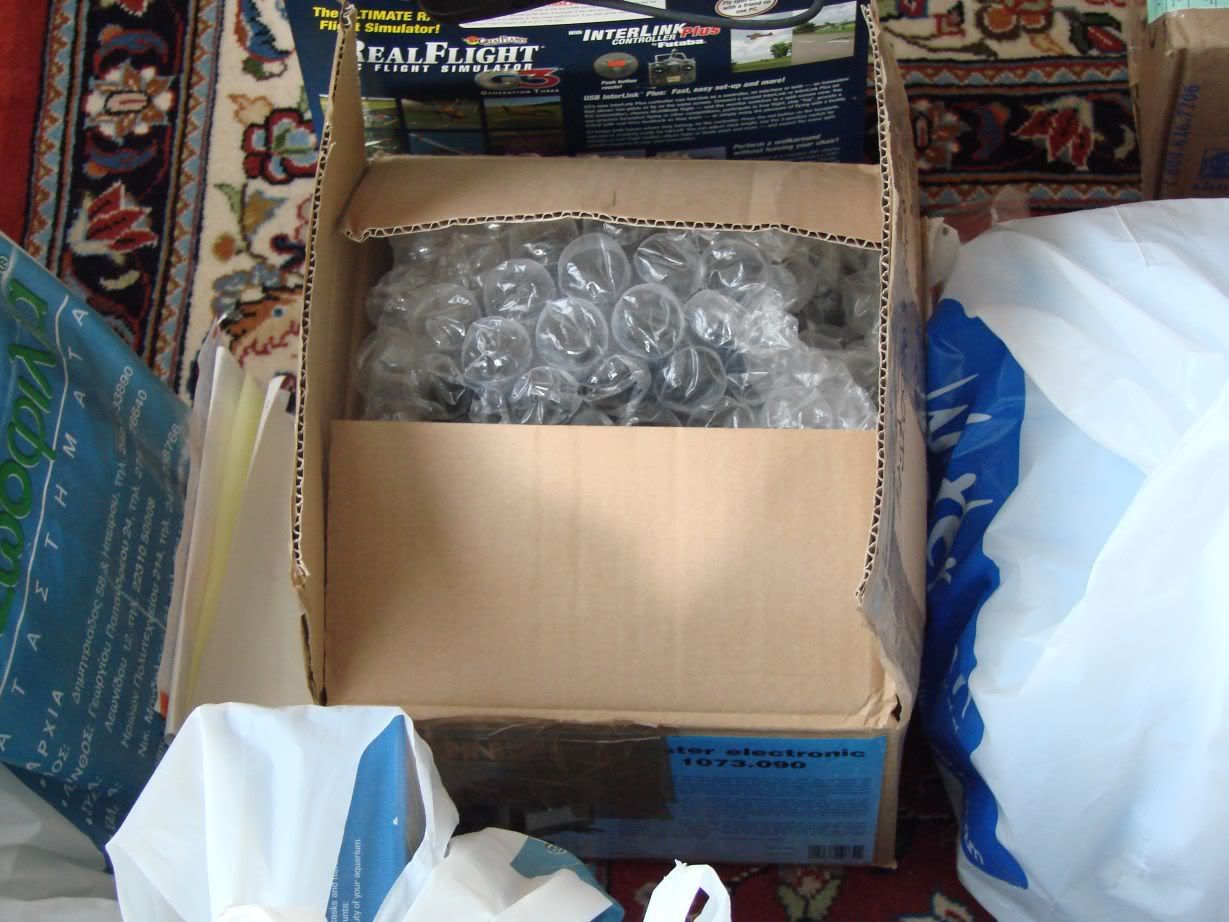
..and last,a box of Absorbex...(well,it seems i bought 14 boxes
and not 13...)
I also took home the wooden side box of the tank which i they had taken to cut it...Here is how it is now...
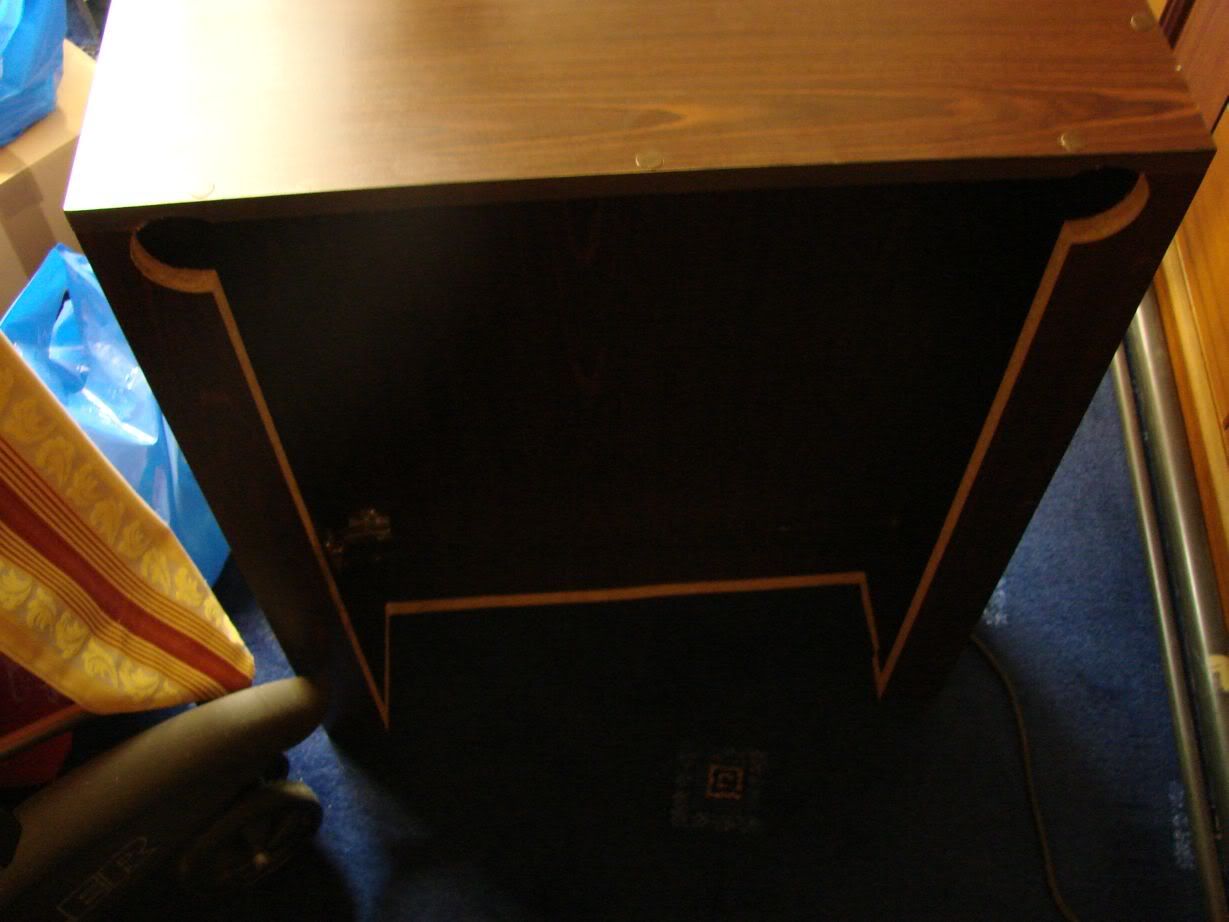
It needs more cutting though as they should had cutted it at the outer side of the holes,not the inner and as a result it cant fit where it should...
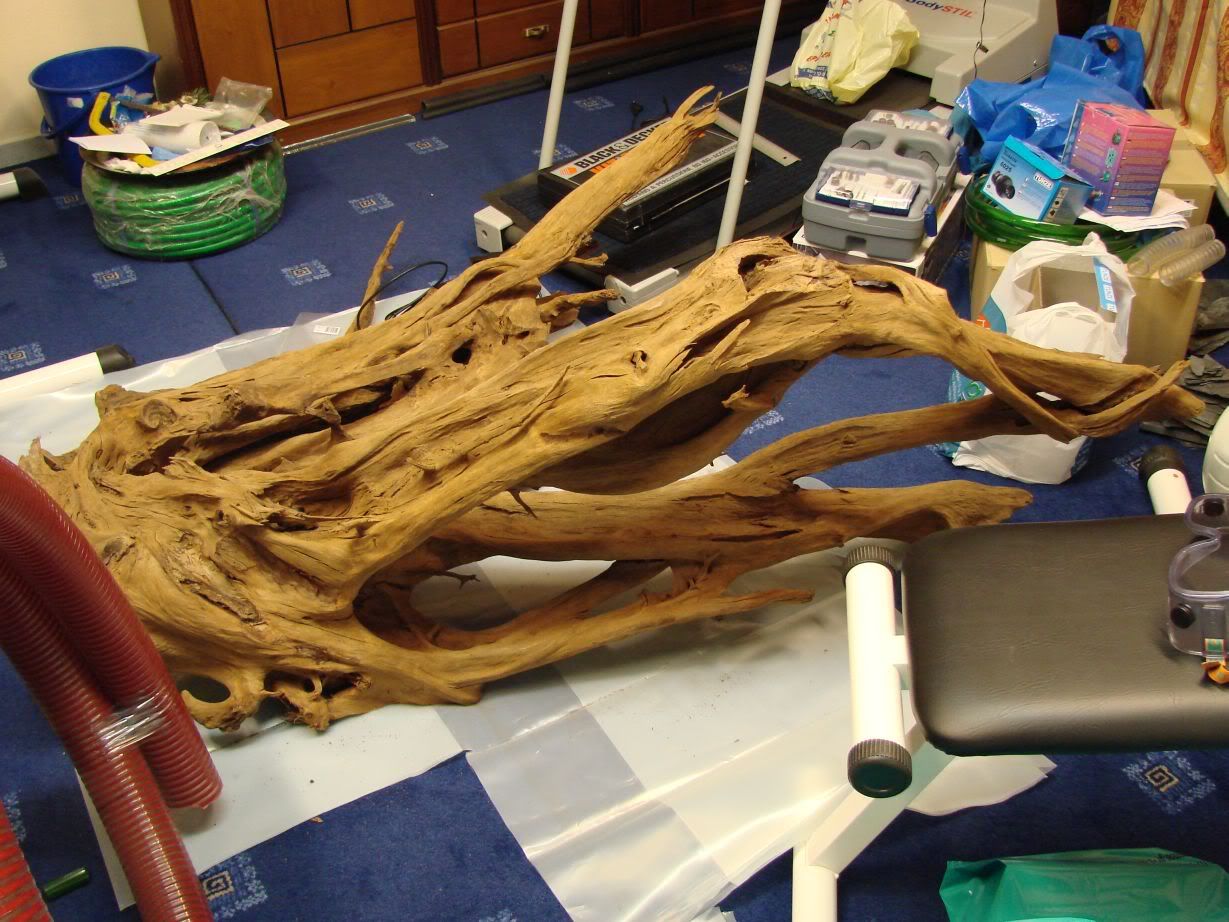
And now some pictures of the woods again As i told you,i took most woods out so it was a chance for photos...Again...
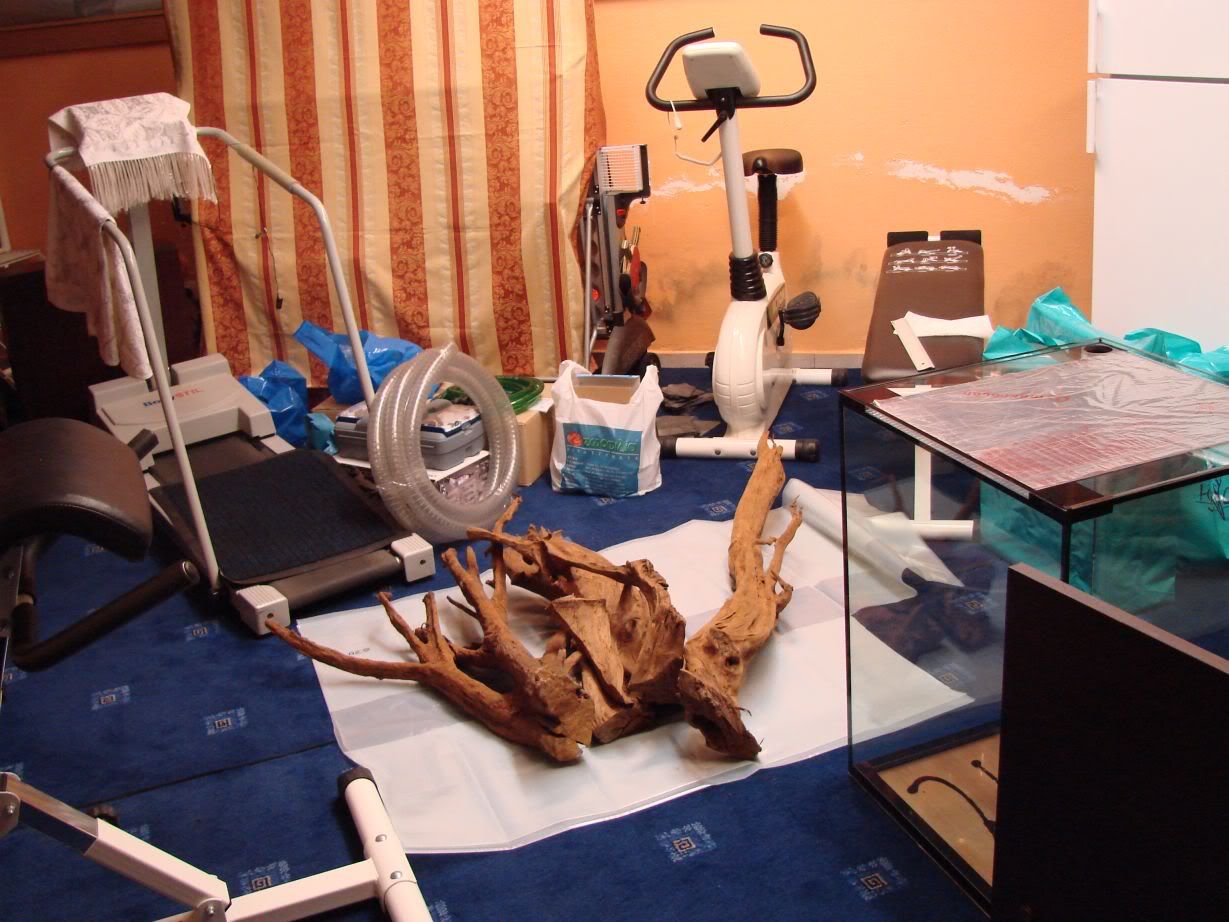
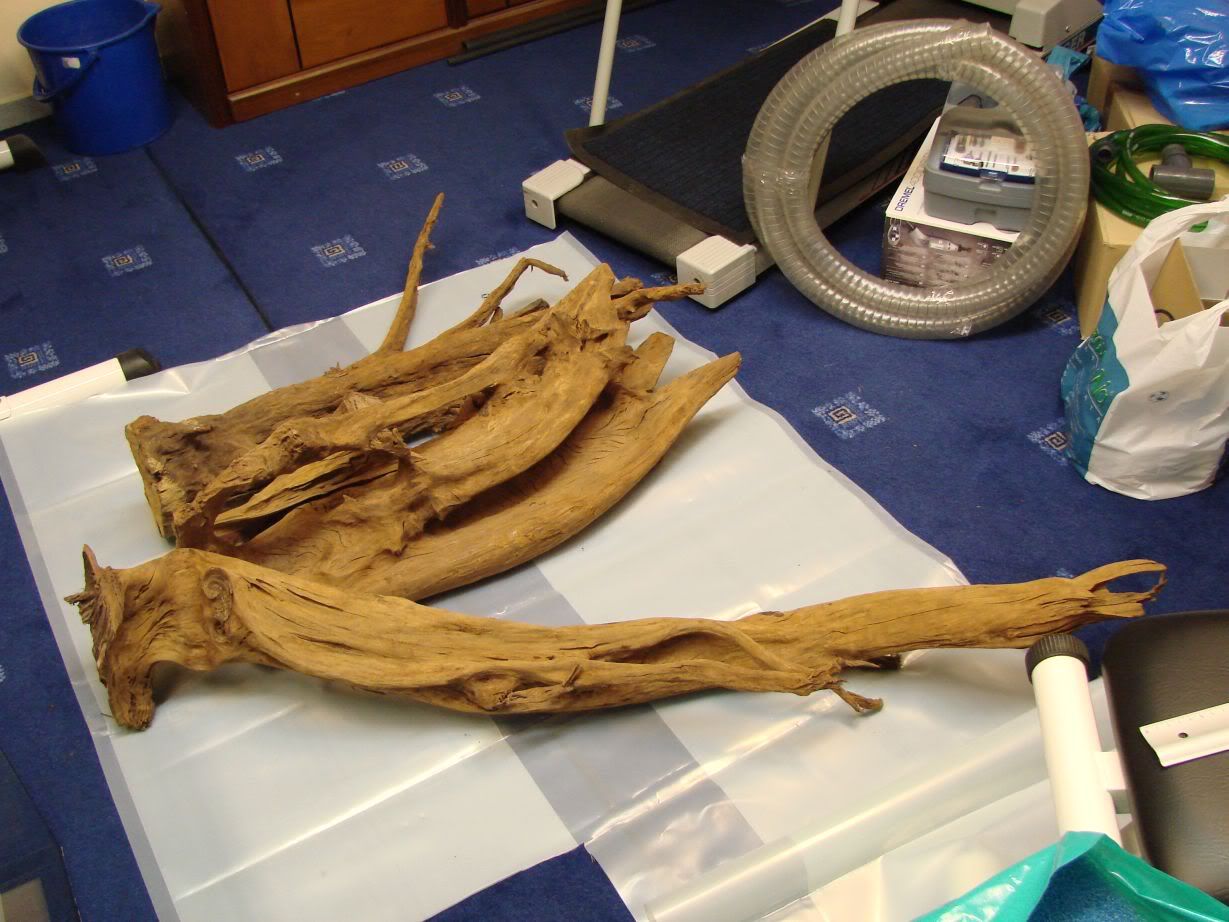
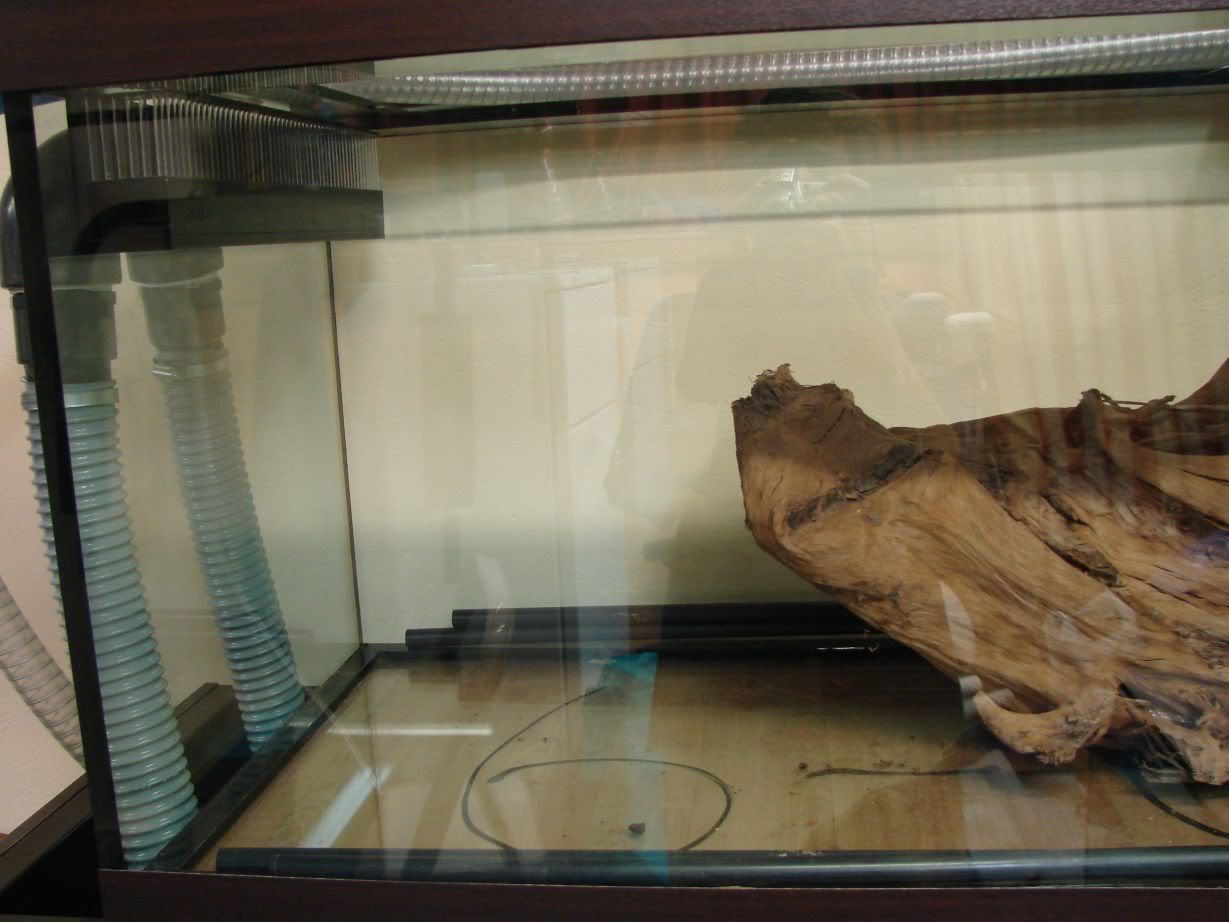
And the last wood left in the tank...I still hadnt removed it although i want to because its very large and heavy and will be a nightmare to take it out...
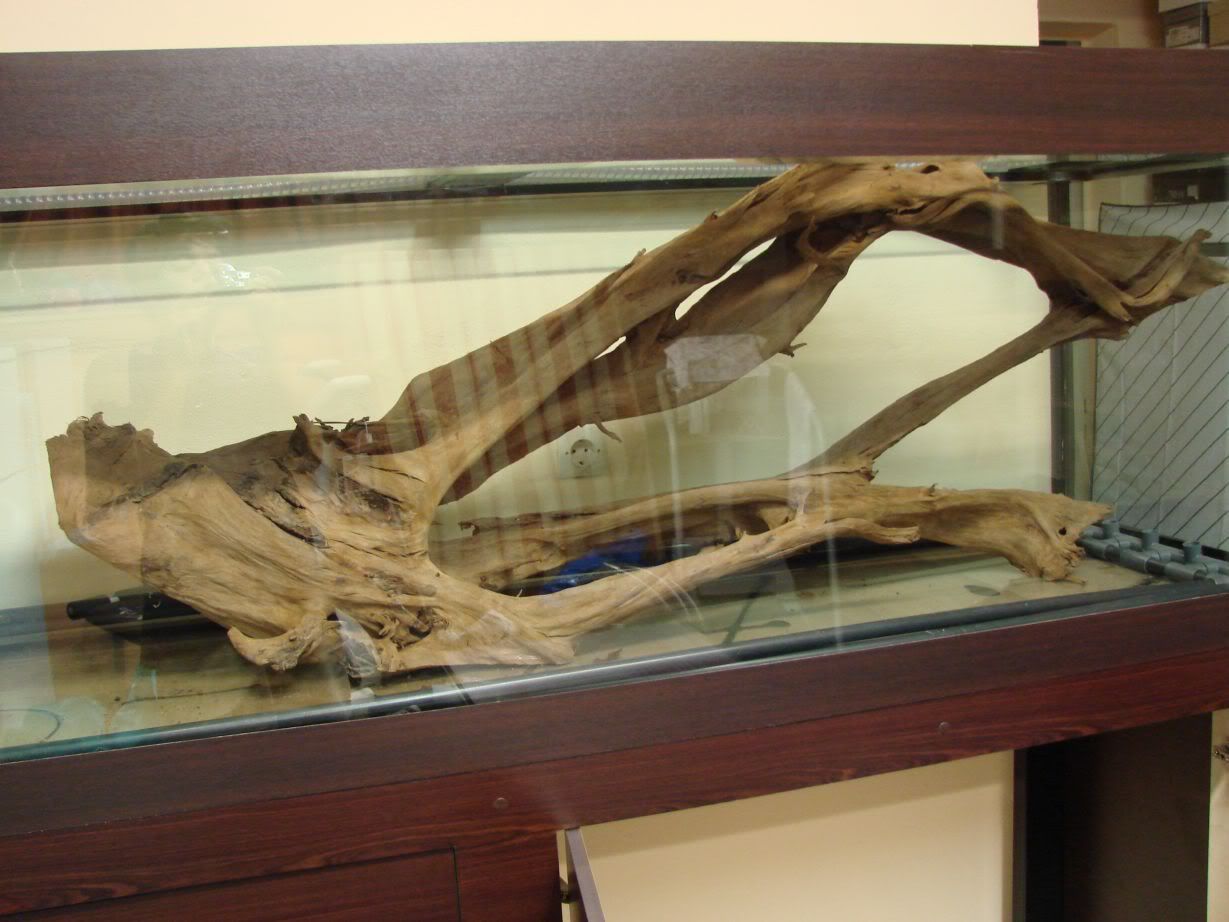
The other side of the tank...You take an idea of size...
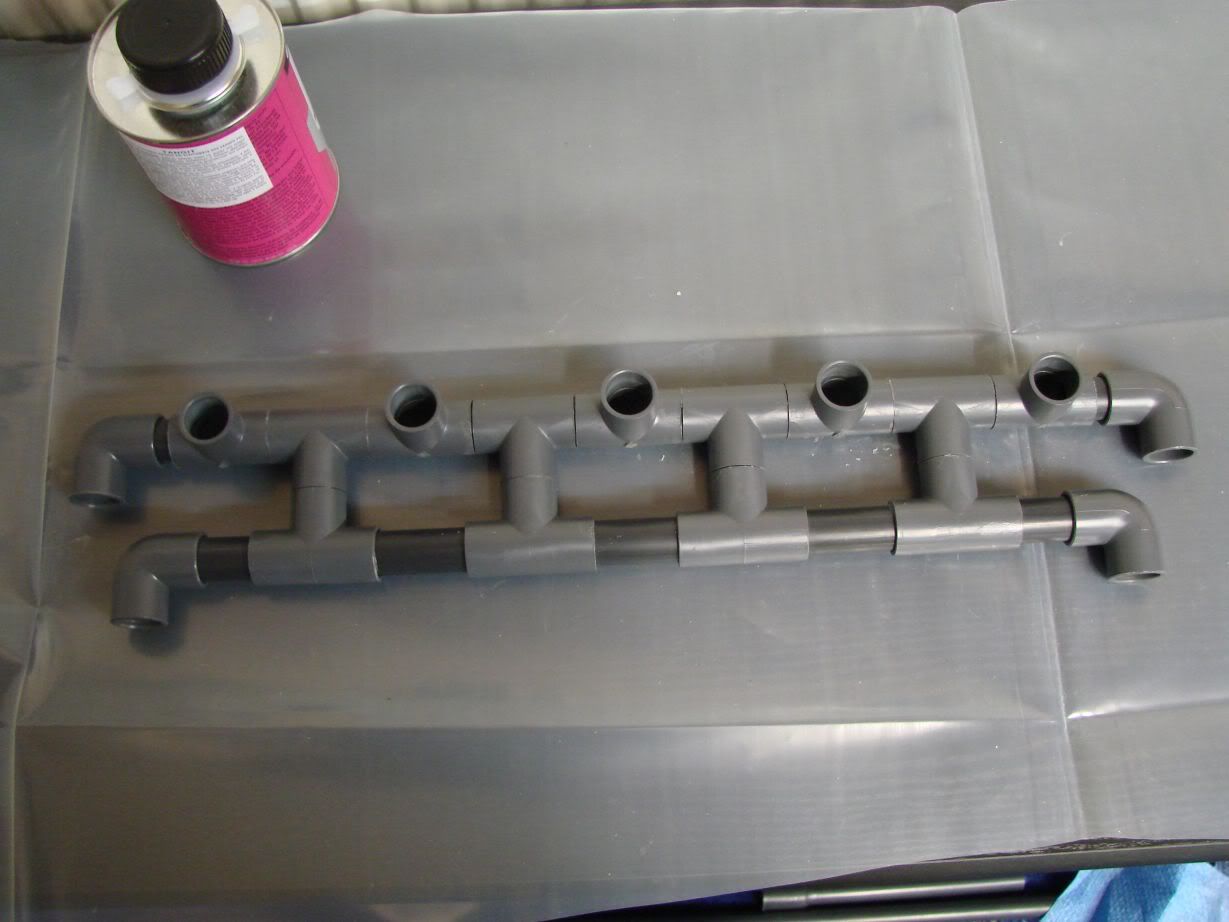
And now 2 photos of the left side pvc's glued...
Hope you liked it!
Thank you very much Mats and Bas
Matt,
Here is a photo update!
The tank is starting to come along nicely but slowly unfortunately...During the past time,i have almost finished with the returns of the sump pumps and once completely finished i will take and post photos of them.I have also glued the pvc network for the pumps and have taken out of the tank all woods but the big one...Will take it out too as soon as i find people to help me with that
I have also progressed with the slate caves and the Saturday before last Saturday,i had some slate pieces i needed to make the caves and cave network cut by at a workshop and at Sunday i glued the ''feet'' of the caves and cave network together without smoothening them first.I thought i will have a better,more natural looking result if i glued them first and then carve them as needed with the dremmel...So,soon,the carving will begin!
I have also bought some more of the things i need,2 300W Eheim-Jager heaters(the only ones he had,i wanted 4 of them... along with Tronic heater guards,which he didnt had in stock either...) and a 500 Bio chem stars pack.Also bought a Tunze nanostream...Yesterday,i went shopping again and bought a Newjet 2300 as the return pump from the holding tank...On Monday,the Lifeguard fluidized bed filter i had ordered finaly arrived and in good condition and today will be setting it up in my 1meter tank to cycle so as to be able to not wait much for my 2meter to cycle...
And now the photos!!!
Firstly,here are some photos of the things i returned home with from the first shopping...
Lets have a look in the bags...
One large pore and one small pore thick sponge for mechanical filtration...
...and one thinner large pore sponge for mechanical filtration too along with the piping i bought...
..and a bag full of Ehfi Fix,double row,for the large dirt particles and to clean the sump less often...
...and the various thingies i told you about...
..and last,a box of Absorbex...(well,it seems i bought 14 boxes
and not 13...)
I also took home the wooden side box of the tank which i they had taken to cut it...Here is how it is now...
It needs more cutting though as they should had cutted it at the outer side of the holes,not the inner and as a result it cant fit where it should...
And now some pictures of the woods again As i told you,i took most woods out so it was a chance for photos...Again...
And the last wood left in the tank...I still hadnt removed it although i want to because its very large and heavy and will be a nightmare to take it out...
The other side of the tank...You take an idea of size...
And now 2 photos of the left side pvc's glued...
Hope you liked it!
-
Kostas
- Posts: 791
- Joined: 23 Apr 2003, 10:57
- I've donated: $256.00!
- My images: 19
- My cats species list: 14 (i:0, k:0)
- My aquaria list: 3 (i:3)
- Spotted: 6
- Location 1: Greece,Athens
- Location 2: Greece,Athens
- Interests: Fishkeeping,diving,skiing,r/c modeling,growing Palm trees,ferns and tropical plants
- Contact:
Thank you very much for your comments Seedy
Yeah it was real fun but spendy too...
Unfortunately its not ready yet due to severe lack of time... But i hope to be able to finish it this weekend
I have not uploaded any more photos of the proccess as i still dont have fast internet access and also some days now i cant even connect with dial up connection from home so its On Telecoms who to blame for me not having uploaded any more photos
Hope to be done by Sunday!!!
Yeah it was real fun but spendy too...
Unfortunately its not ready yet due to severe lack of time...
I have not uploaded any more photos of the proccess as i still dont have fast internet access and also some days now i cant even connect with dial up connection from home so its On Telecoms who to blame for me not having uploaded any more photos
Hope to be done by Sunday!!!
-
Kostas
- Posts: 791
- Joined: 23 Apr 2003, 10:57
- I've donated: $256.00!
- My images: 19
- My cats species list: 14 (i:0, k:0)
- My aquaria list: 3 (i:3)
- Spotted: 6
- Location 1: Greece,Athens
- Location 2: Greece,Athens
- Interests: Fishkeeping,diving,skiing,r/c modeling,growing Palm trees,ferns and tropical plants
- Contact:
Hi,
Good news,I have just managed to connect with my new internet provider...And i thought i would do an update for you!!!
The bad news is that i am still far from done I have finished with the installation of all absolutely neccessary tubing and now only the tubes neccesary for easier water changes are left which i will install as soon as i go buy them and some fittings needed for their installation...
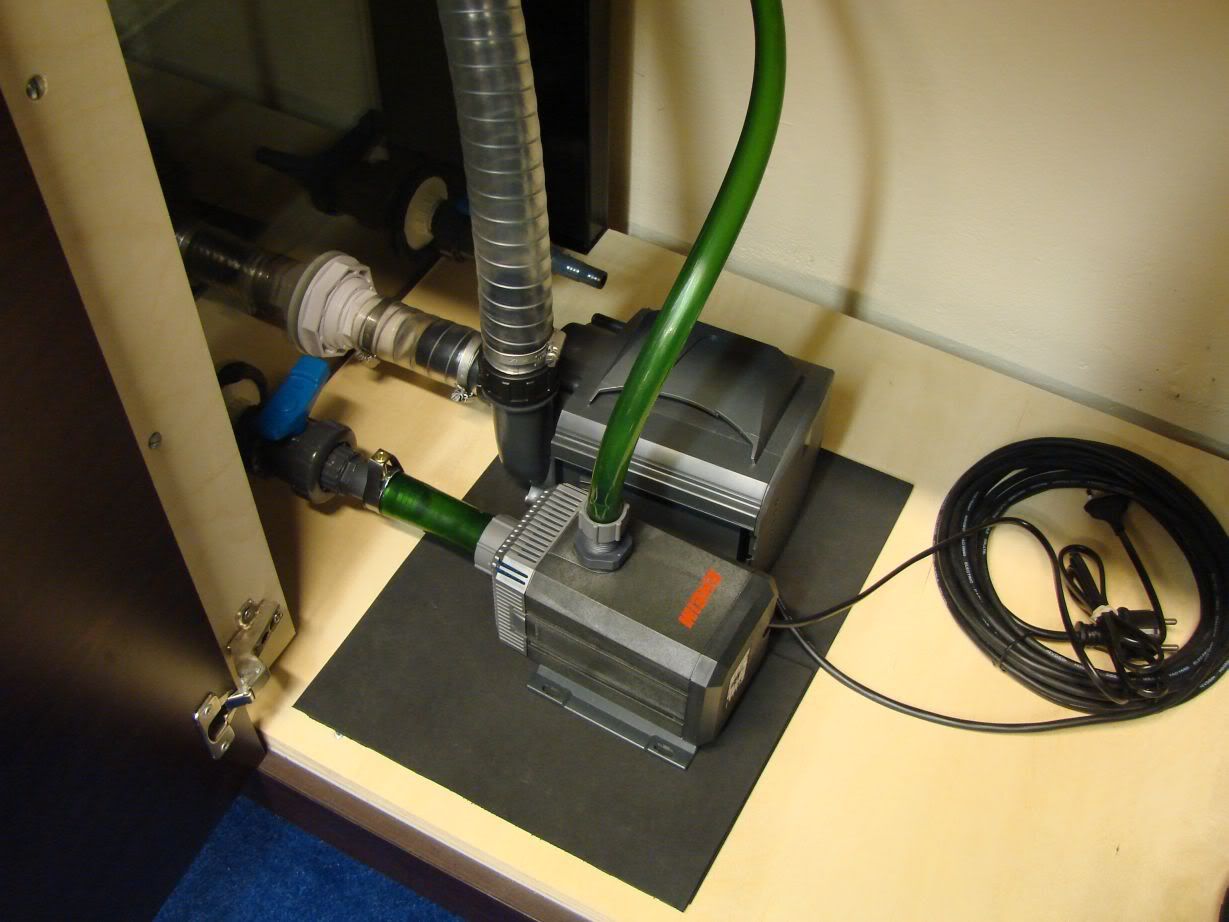
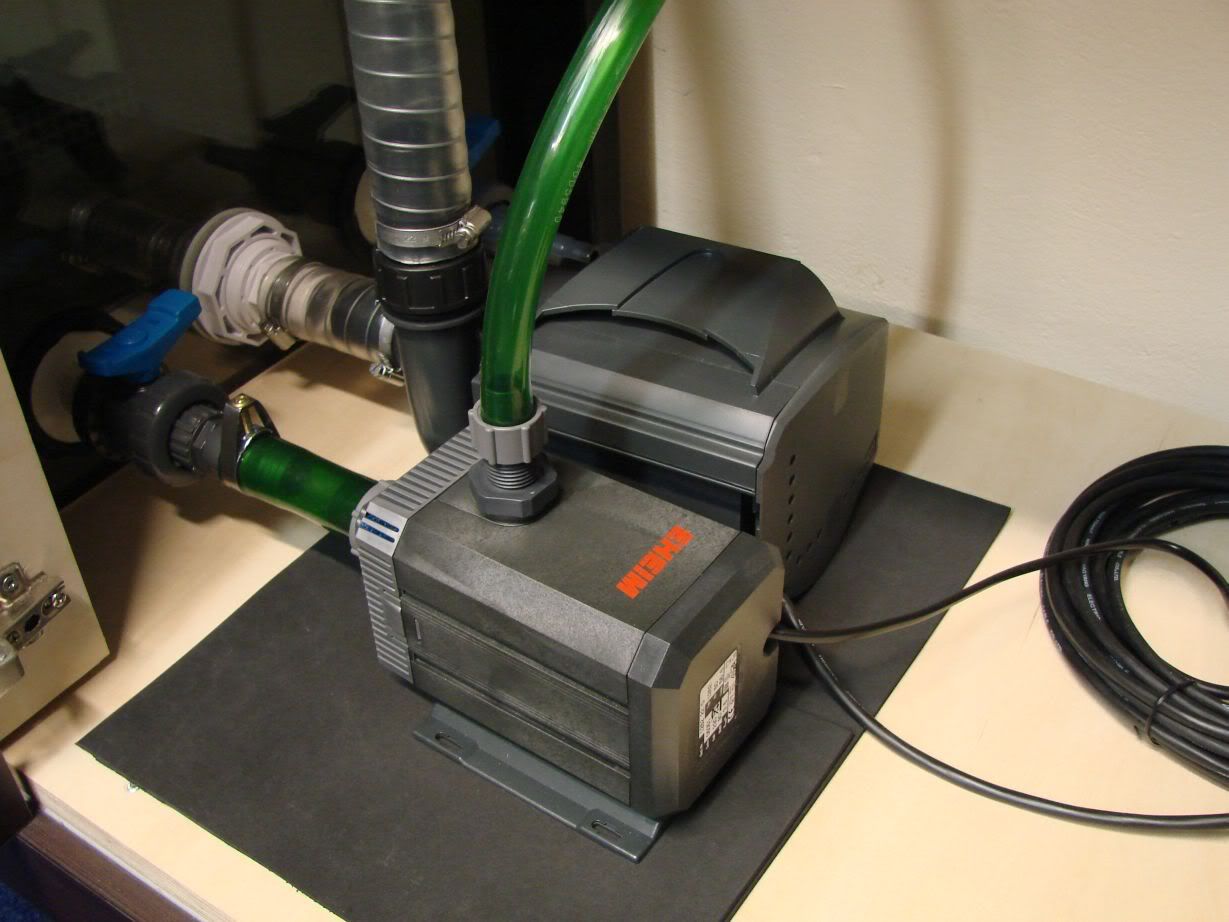
On the up side now,i have installed the sump pumps(well,the big one,to completely install the small one i am missing a hose clamp...)and have glued the pvc network together and to the bottom of the tank.I have also siliconed most of the slate i planned to put to cover part of the tank's bottom...I have bought and added the holing tank's pumps and have fully installed one of them(for the other i am missing the tubing i told you about...)
The Lifeguard FB600 filter i told you before came on time but i was unable to run it on my tank because it was missing the barb elbows...I didnt knew they were sold separately and didnt ordered them and the Greek distributor doesnt carry them...He in fact said that he has 2 years to sell such a filter So i will have to order them from US again along with the Solar 1000 dimmer and the Icecap balasts i will use for lighting on this tank.I havent done it yet due to lack of $$ at this point.
I have also siliconed together the ''feet'' of the stale building and have also grinded them to the shape...Now it remains for me to cut the back pieces for the building and smoothen them and also to build a base for the buiding as the pvc pipes mess with its positioning...Also,i have glued in 2 pairs all bottom parts of one of the two slate caves i will make so as to be able to do the internal grinding i want and then glue it all together and with the top.
What i will do now soon is to cut the last remaining slate piece i will use to cover the tank's bottom and then after i let it completely dry for some days(about a week,will it be enough when you glue a 30x30cm piece on the bottom and putting enough silicone on the center to cover all the area underneath it after sitting and hopping on it?)i will wash the tank and put the large wood in and then glue the slate building on it as the wood determines its positioning...Same with the other caves...
Now listen my complete bad luck,i was bored to go shopping the past weekend and worked all Friday afternoon and Saturday with the slates and other things for the tank and the result was to finish almost all my silicone on Friday and my diamond wheel to loose its diamond covering on its cutting edge while cutting the last slate piece for the bottom So i was unable to do anything for the tank from then on as all things had to do with the slates and involved cutting slates I had planned to continue working on the tank all Sunday but after that and having taken care to have no other thing to do on Sunday,i was left just doing nothing other than a simple and quick siliconing of the bottom parts of one cave...
Anyway,its time to stop tiring you with words and let the photos speak for themselves The photos are all the latest i have from the tank but still they are missing a lot of the things i did as there has been a while since i took them...Will do another update soon showing the progress
The Lifeguard filter in its travelling packing Lots of stickers!!!
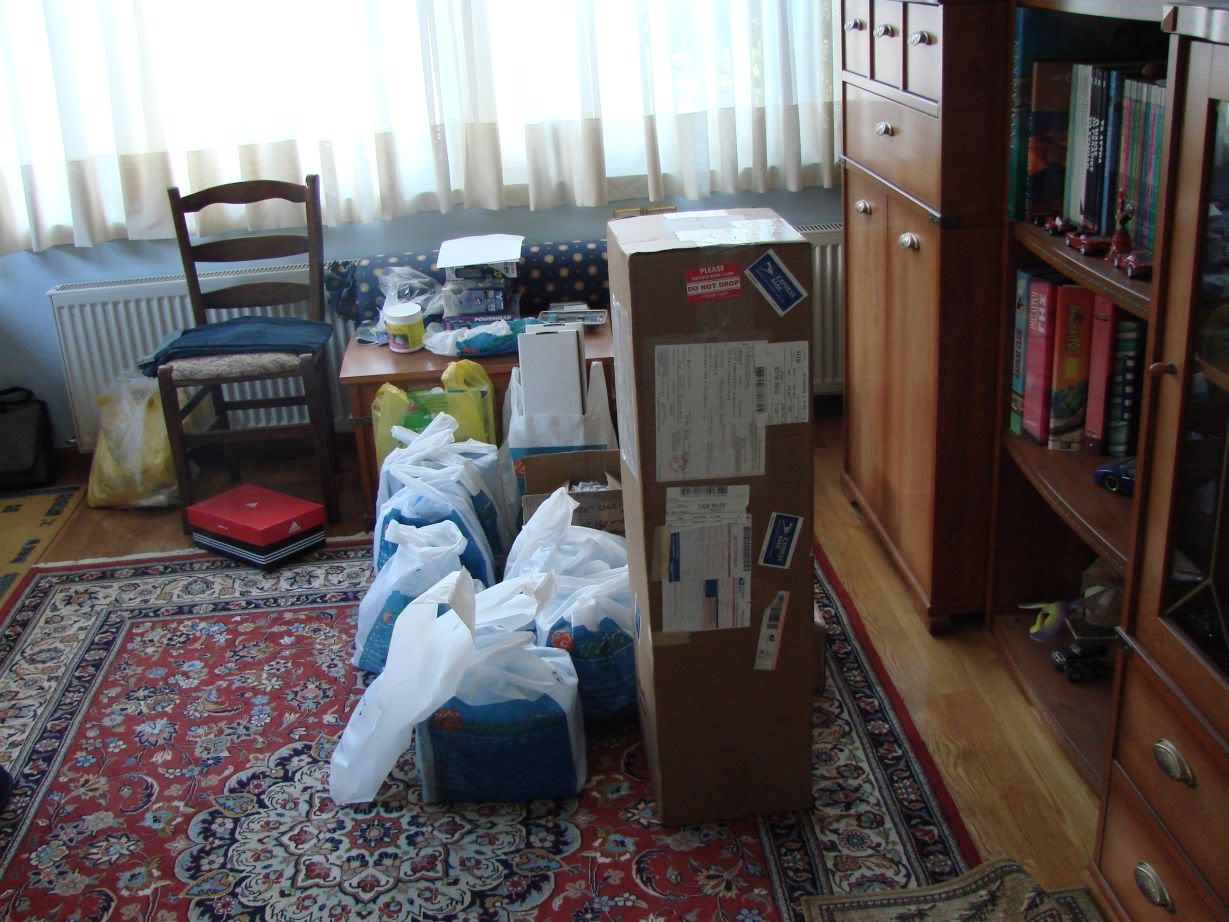
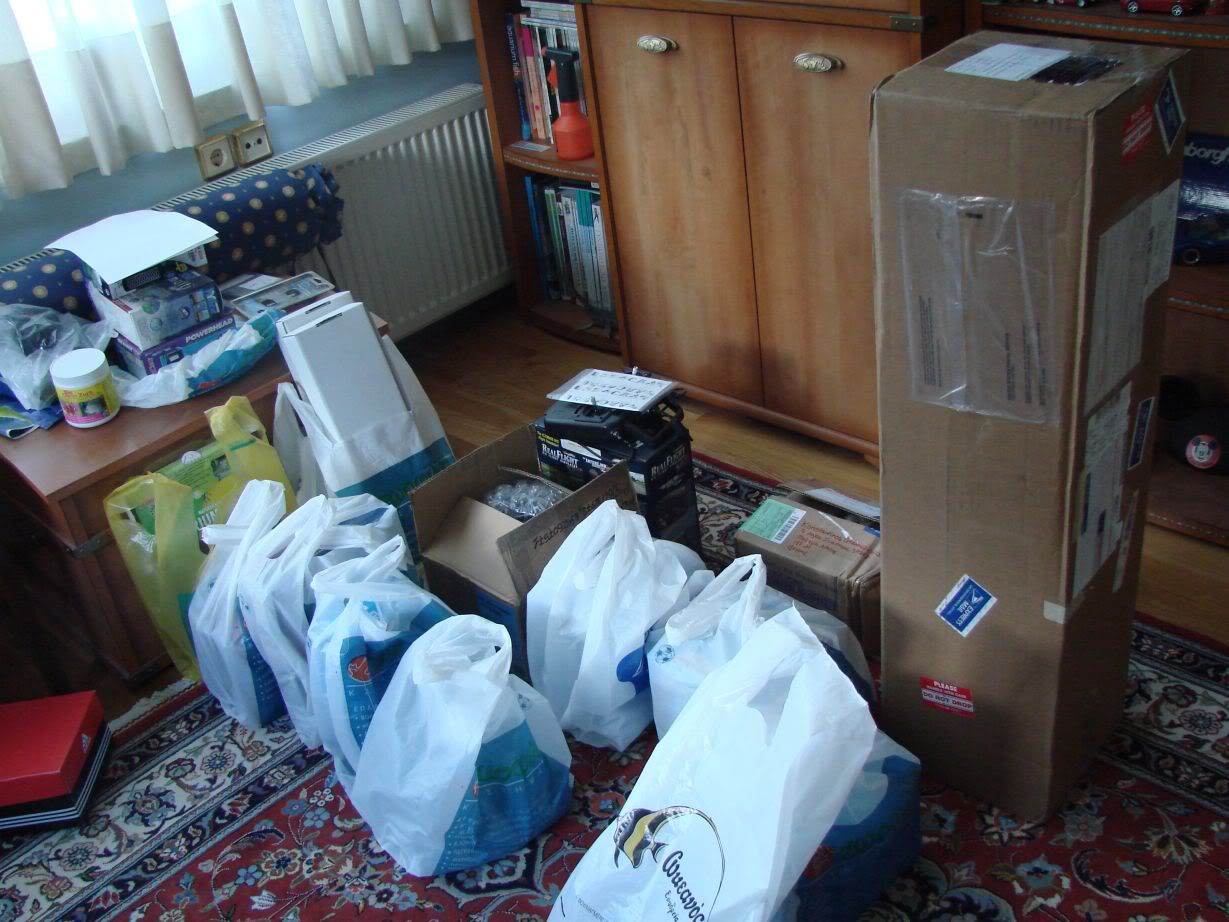
A photo of the bags with equipment i have in my room waiting some months now to install them on the 2meter tank...
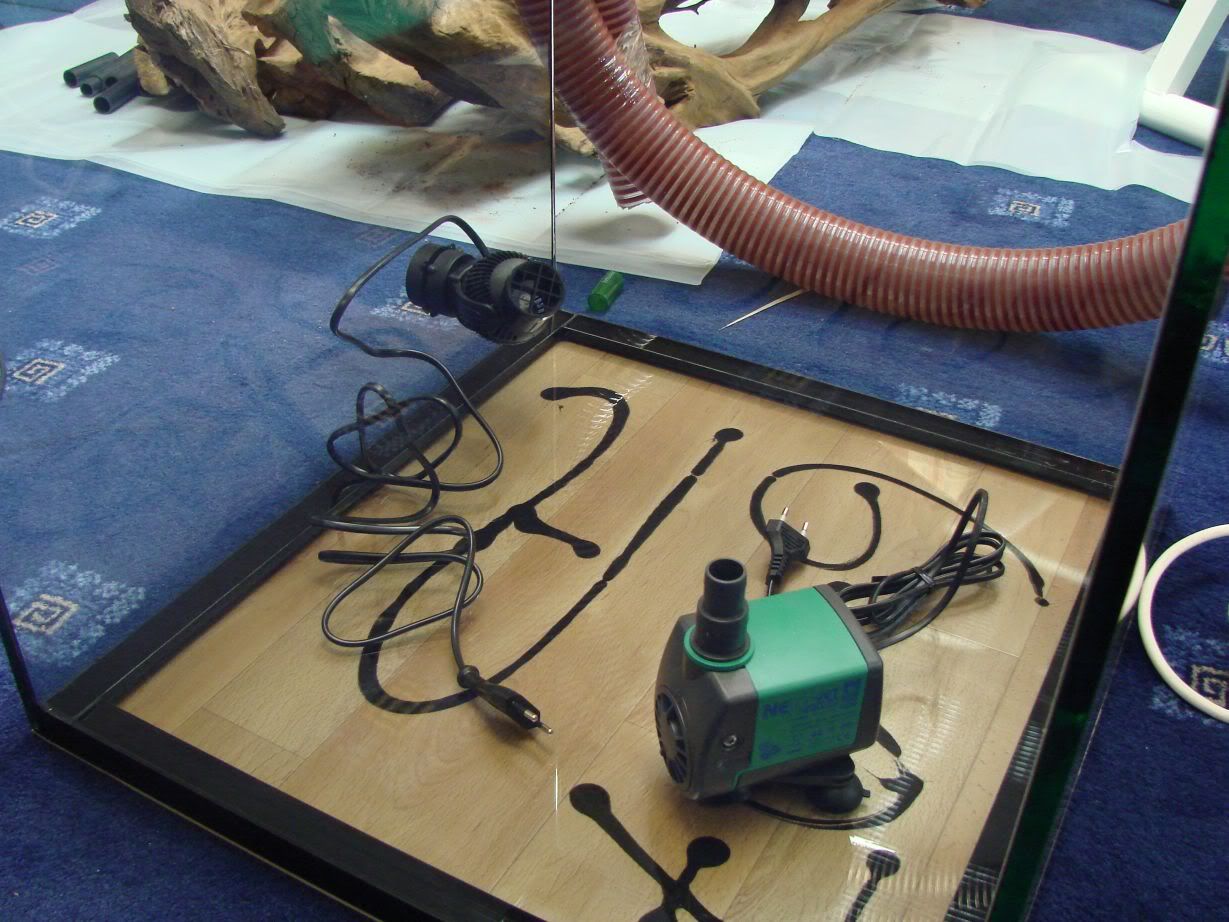
The holding tank as its now...
I finally took the big wood out and thought i would take a new photo of how the ''wood tangle'' in the room is now
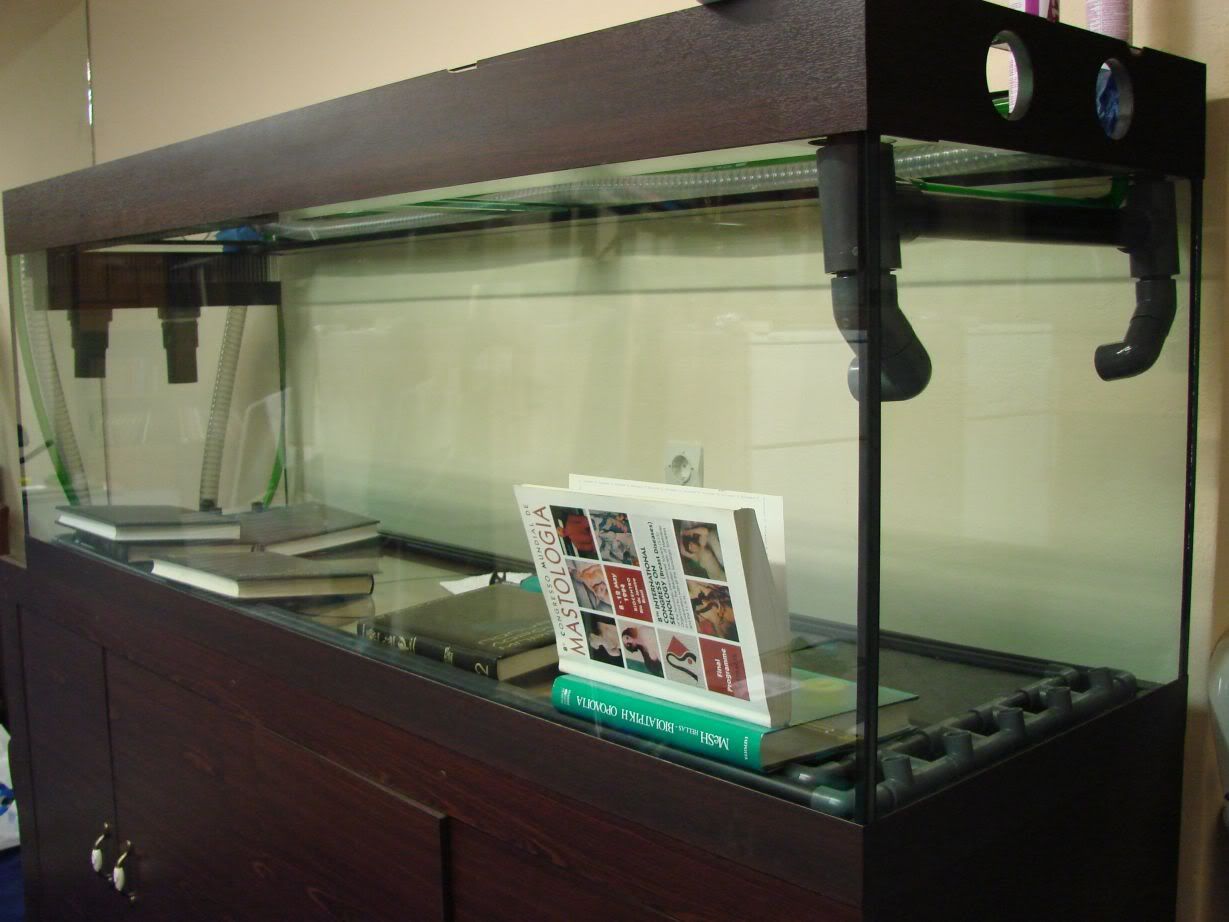
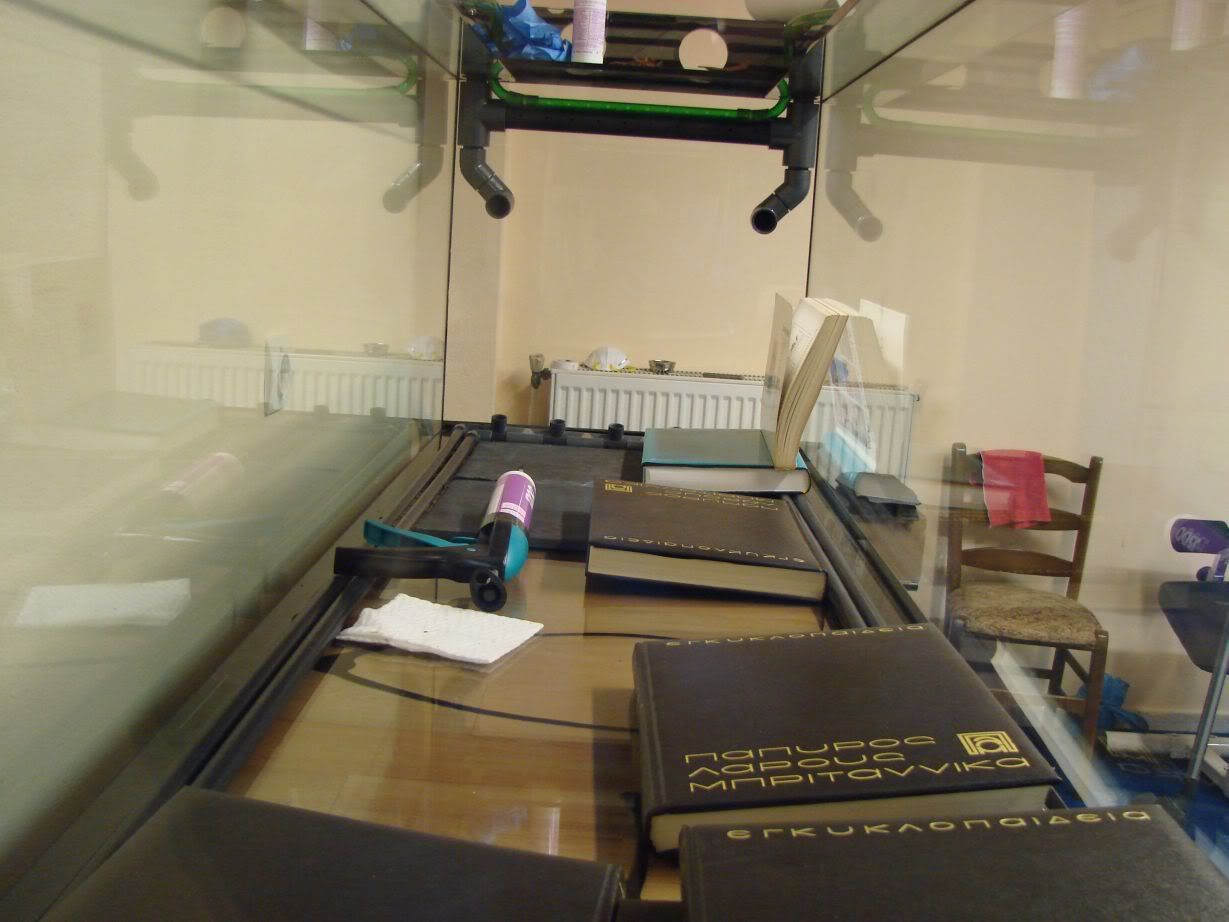
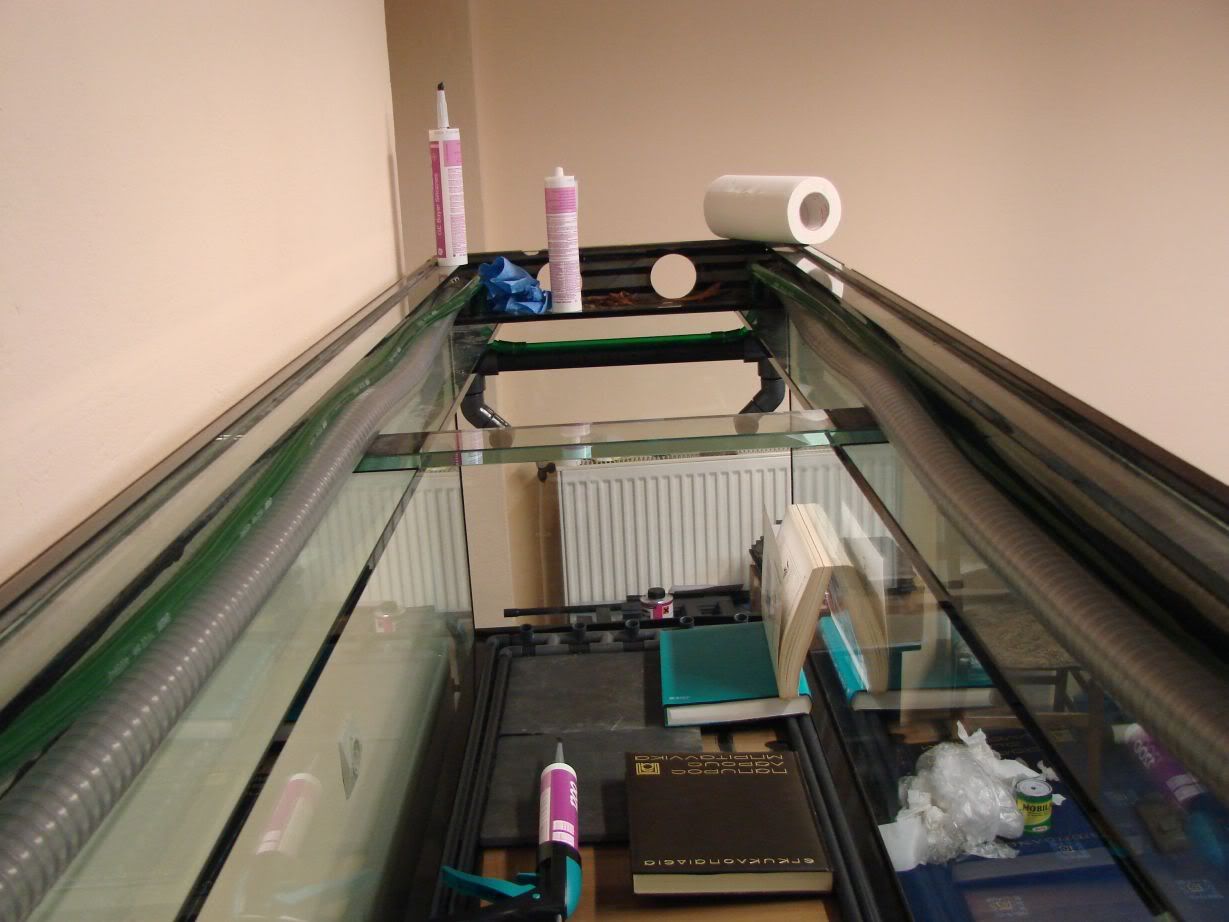
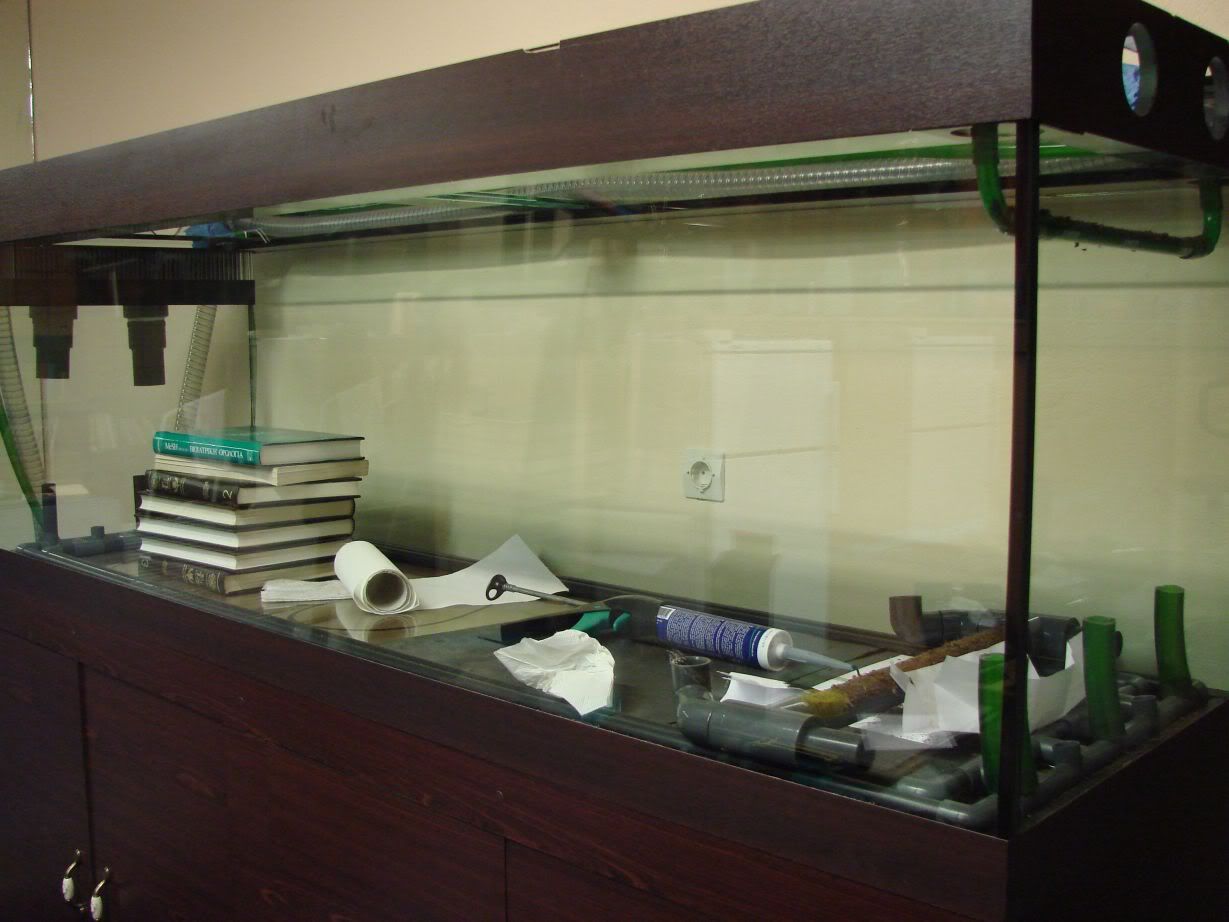
The tank with the pvc network just partially siliconed to the bottom and with encyclopedias to keep the pipes where i wanted the be...You can also see in these photos the returns from the sump...
The box of the Tunze Master electronic 1073.090 pump i have as a main pump for the sump...This is its original box and not just an external shipping box.
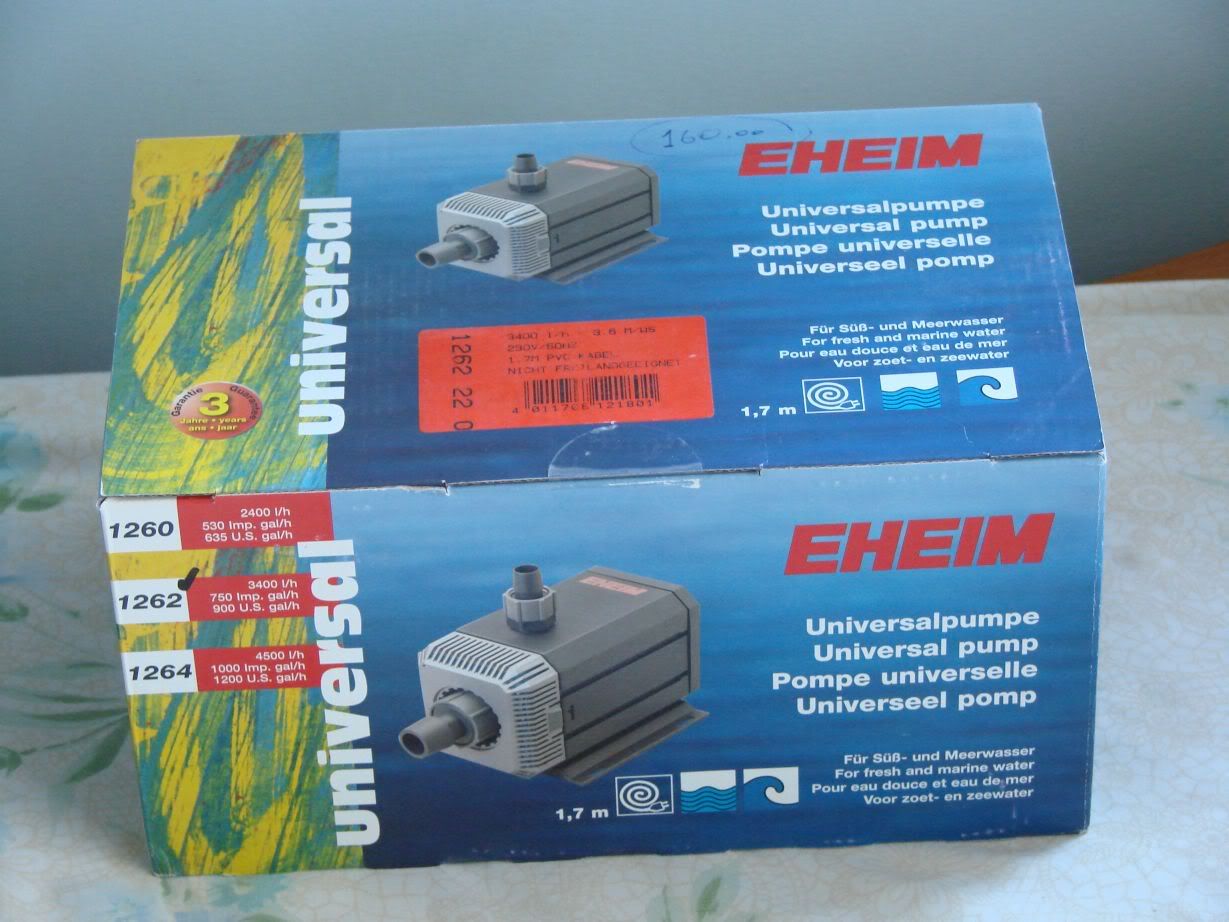
The box of the Eheim uinversal 1262 pump i have as a second pump for the sump...
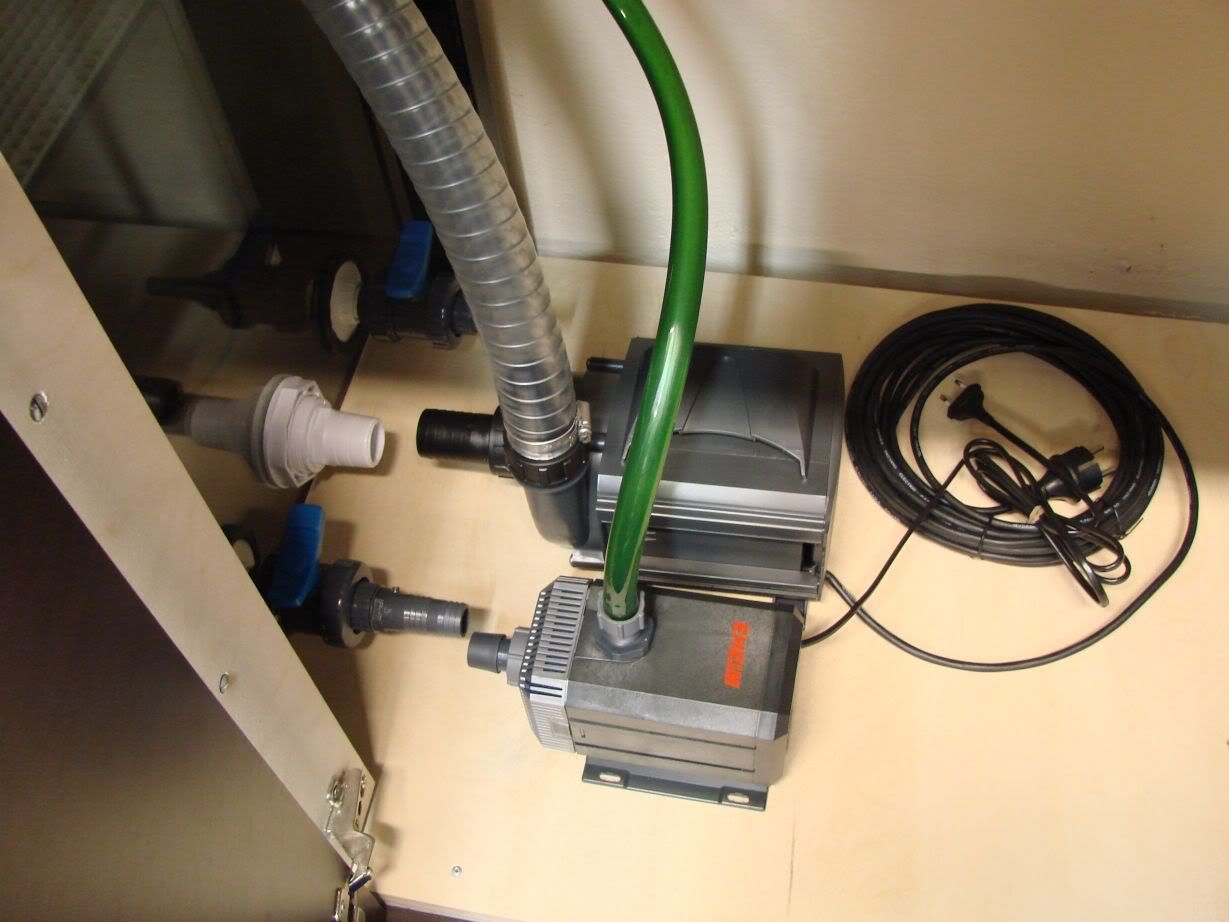
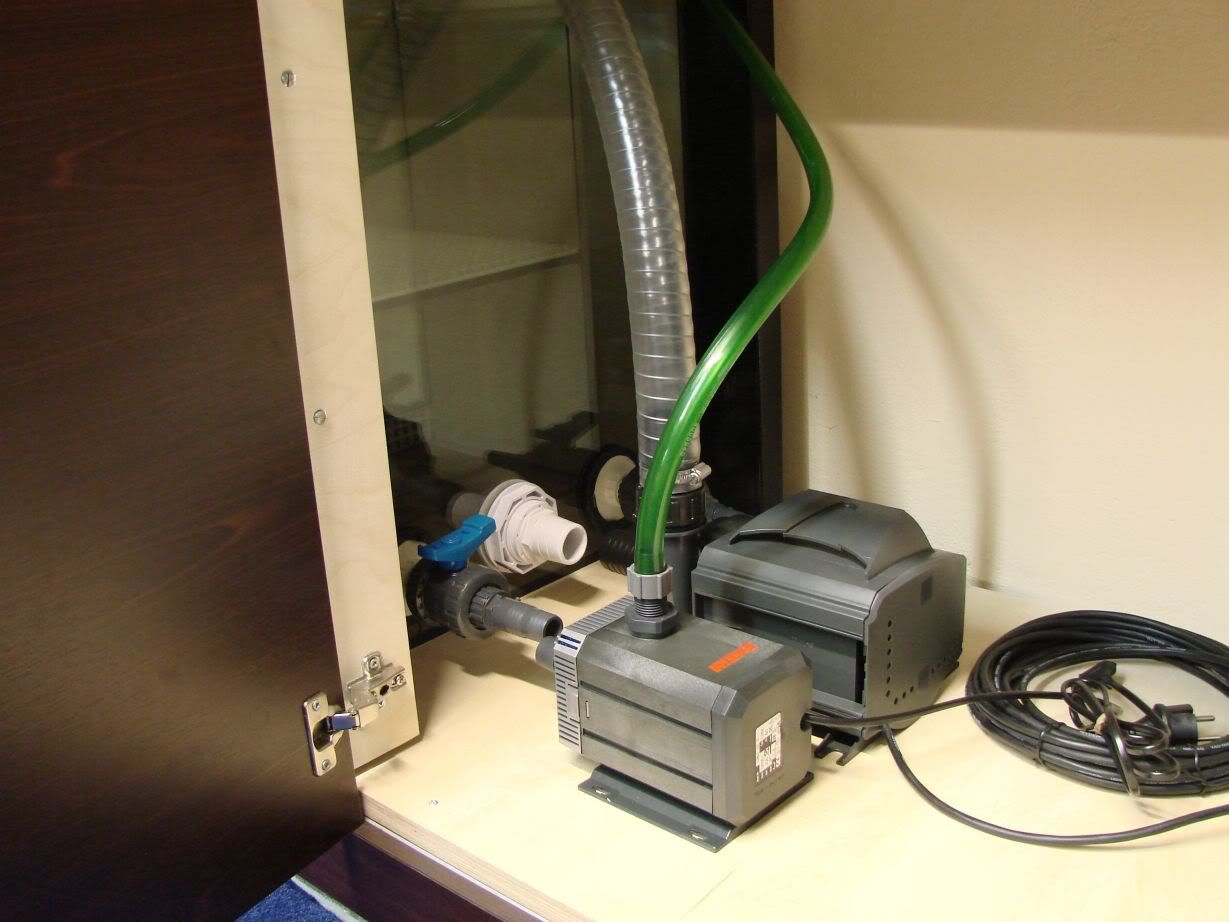
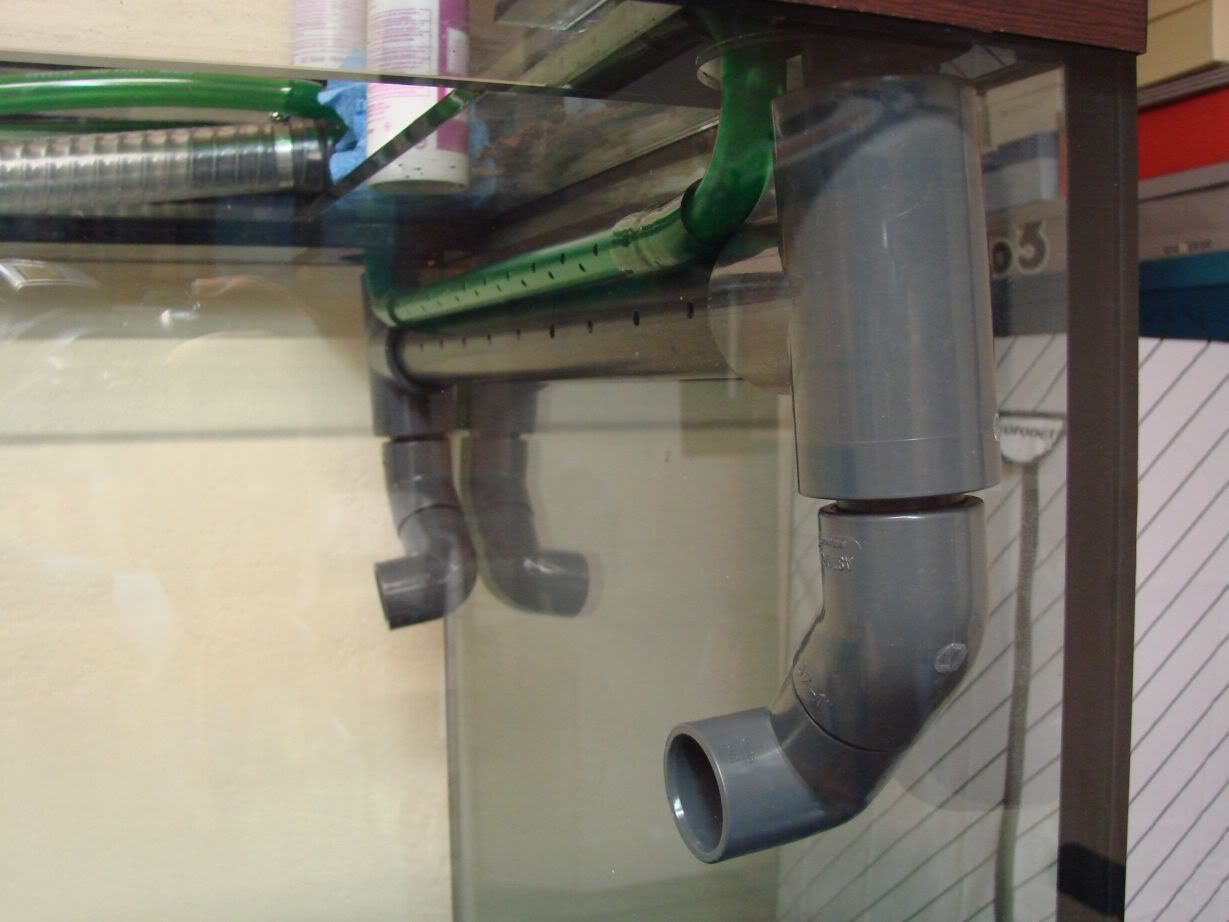
The sump pumps partially installed and with sump fittings in place...
Following the returns on their way up...
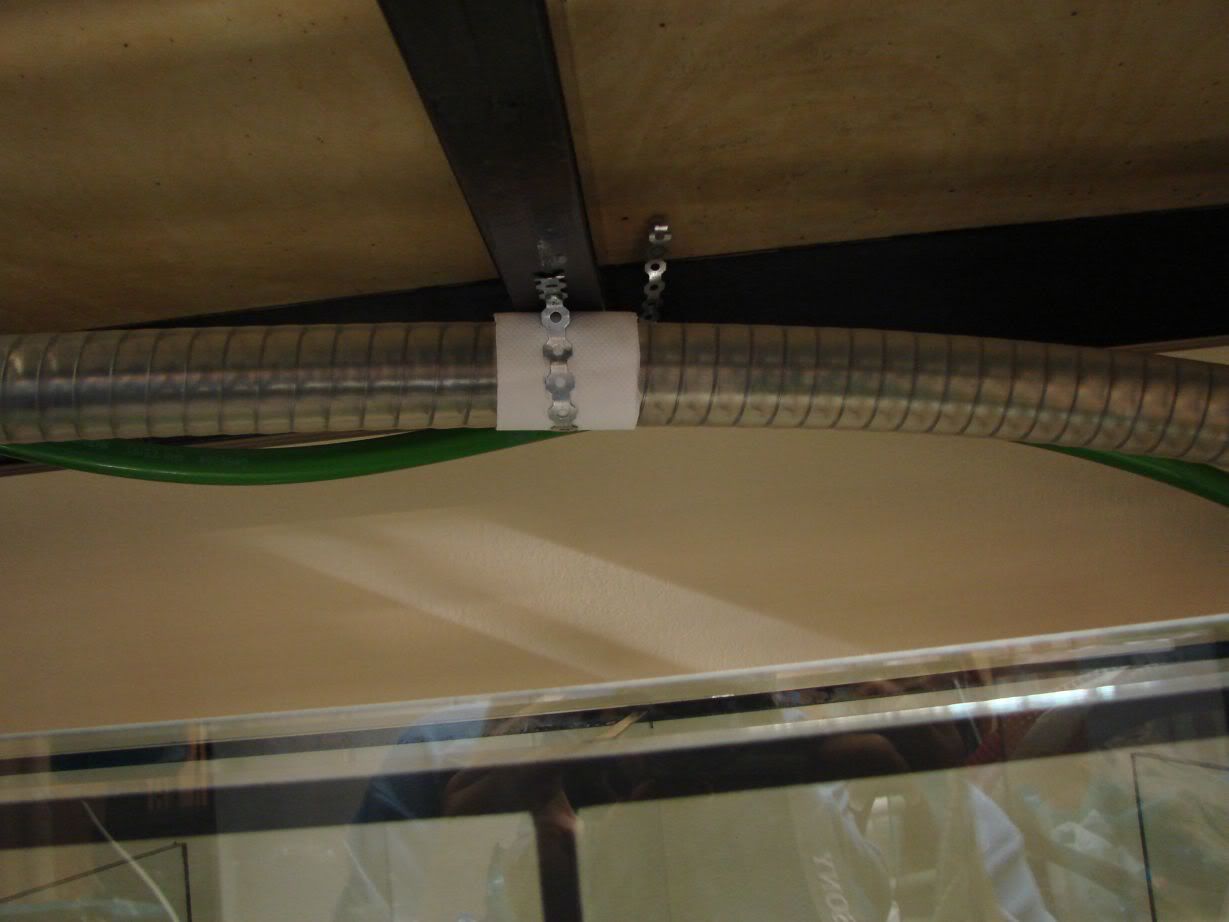
A 1 1/2inch Helisteel food safe tube runs the full lenth of the tank stand...
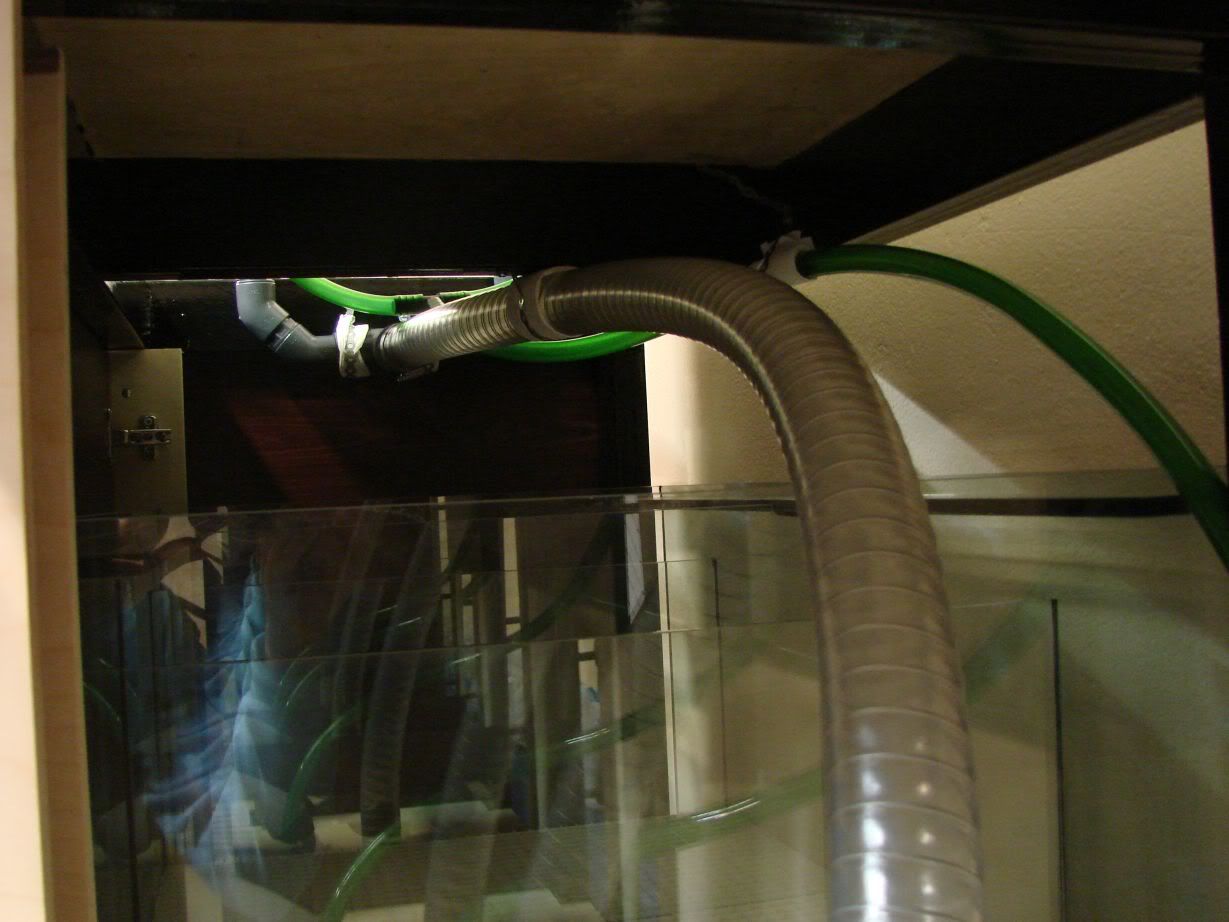
...being supported above the sump...
...and then its flow is spread through a T...
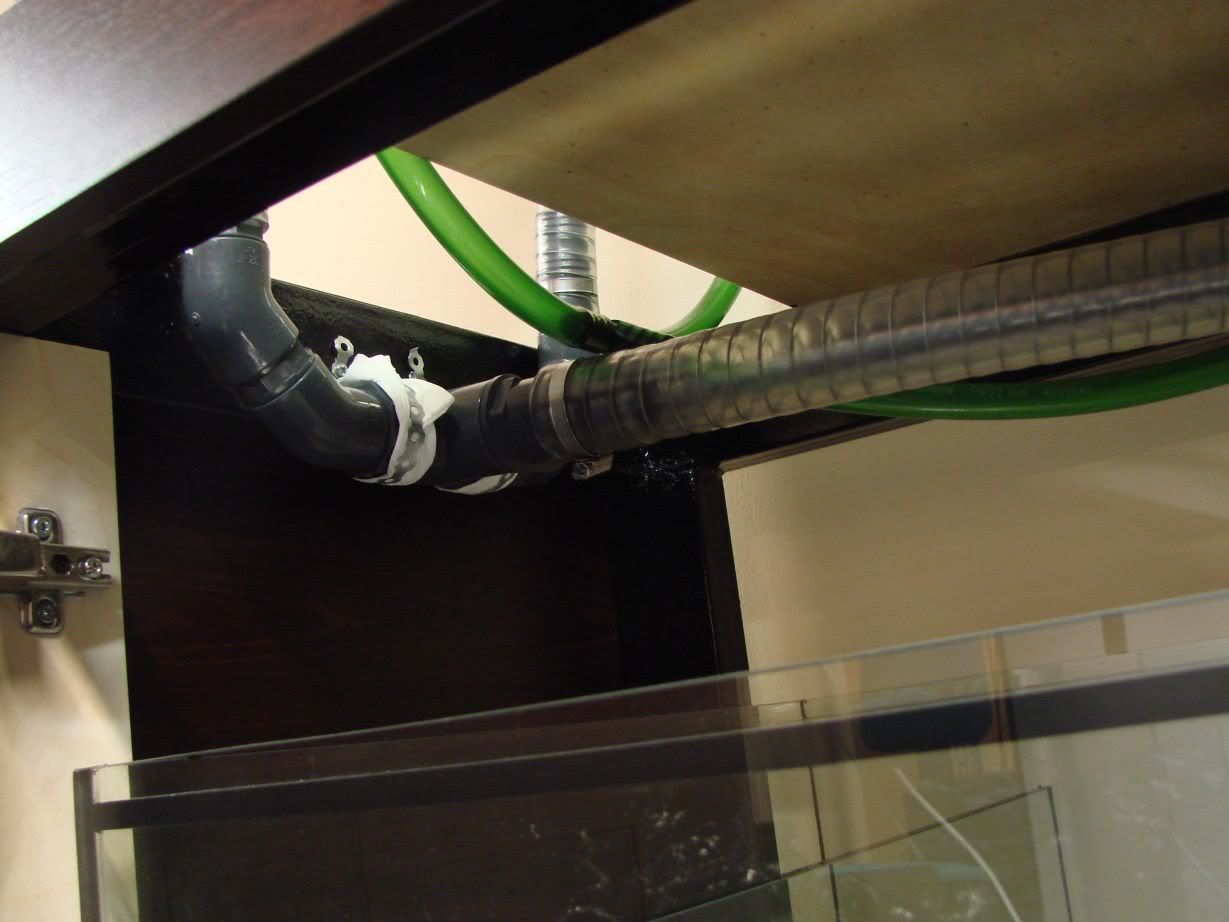
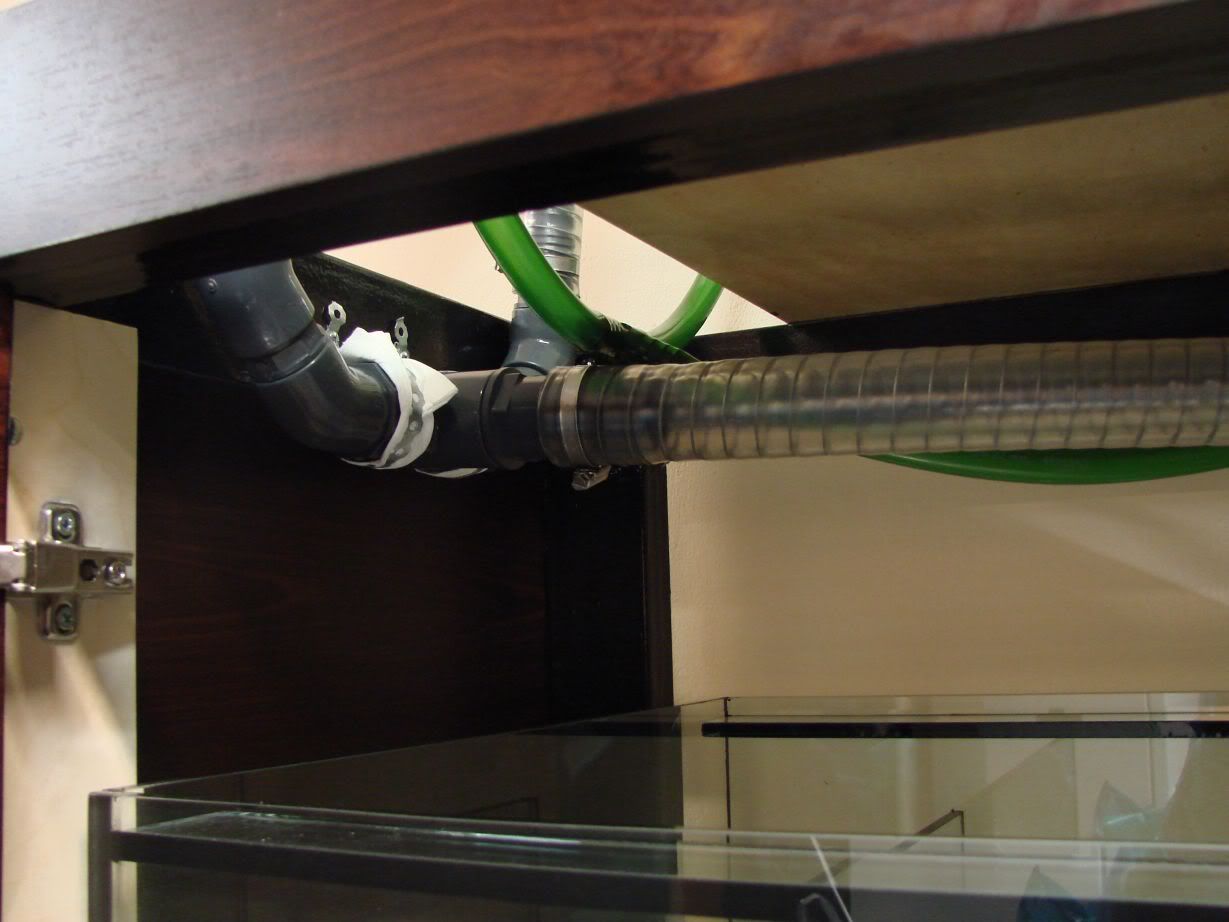
... to two 1 1/4inch Helisteel food safe tubes that enter the aquarium through two holes specially made for them...
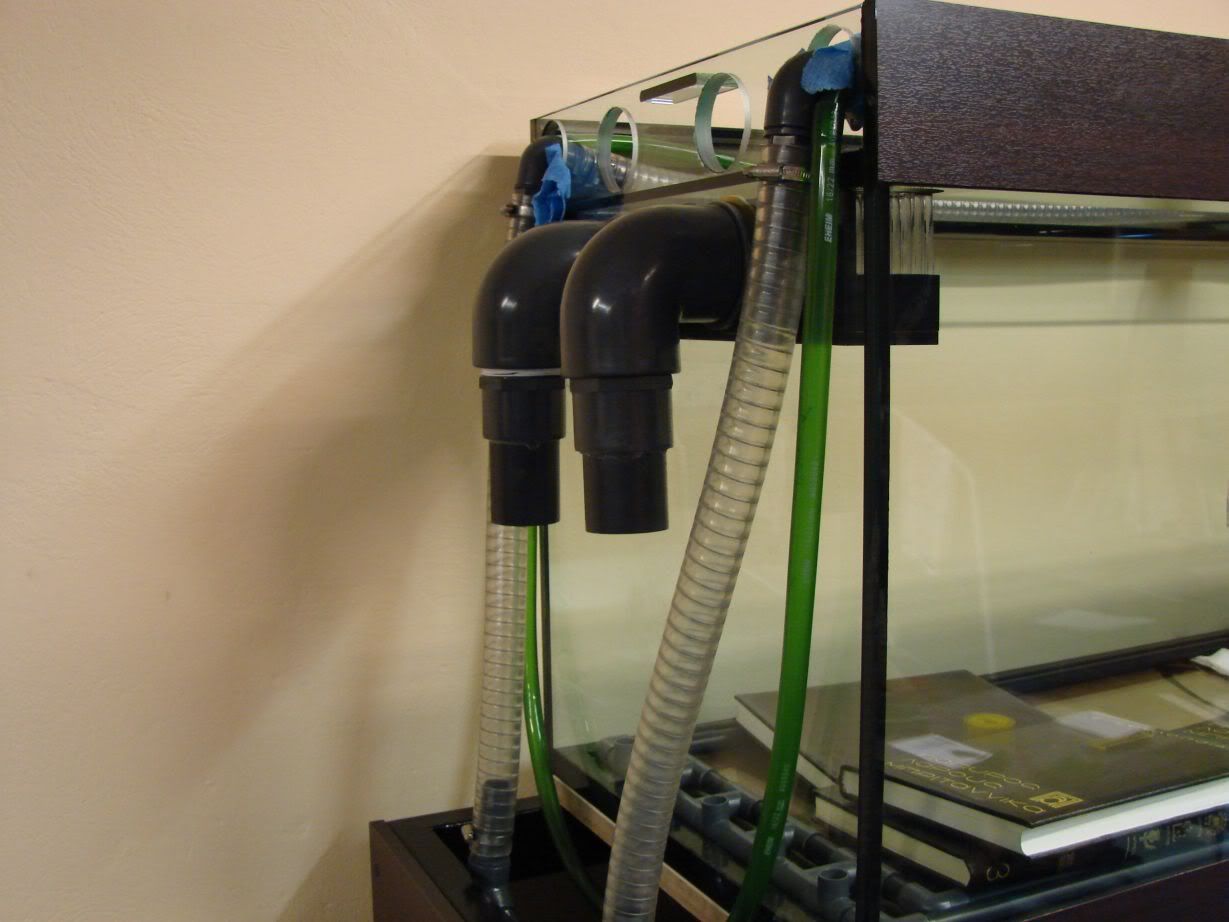
...and run the whole lenght of the aquarium again to release their water there through a spraybar and two simple outakes...
A close up on the return outtakes...
I hope you liked it!!!
Good news,I have just managed to connect with my new internet provider...And i thought i would do an update for you!!!
The bad news is that i am still far from done
On the up side now,i have installed the sump pumps(well,the big one,to completely install the small one i am missing a hose clamp...)and have glued the pvc network together and to the bottom of the tank.I have also siliconed most of the slate i planned to put to cover part of the tank's bottom...I have bought and added the holing tank's pumps and have fully installed one of them(for the other i am missing the tubing i told you about...)
The Lifeguard FB600 filter i told you before came on time but i was unable to run it on my tank because it was missing the barb elbows...I didnt knew they were sold separately and didnt ordered them and the Greek distributor doesnt carry them...He in fact said that he has 2 years to sell such a filter
I have also siliconed together the ''feet'' of the stale building and have also grinded them to the shape...Now it remains for me to cut the back pieces for the building and smoothen them and also to build a base for the buiding as the pvc pipes mess with its positioning...Also,i have glued in 2 pairs all bottom parts of one of the two slate caves i will make so as to be able to do the internal grinding i want and then glue it all together and with the top.
What i will do now soon is to cut the last remaining slate piece i will use to cover the tank's bottom and then after i let it completely dry for some days(about a week,will it be enough when you glue a 30x30cm piece on the bottom and putting enough silicone on the center to cover all the area underneath it after sitting and hopping on it?)i will wash the tank and put the large wood in and then glue the slate building on it as the wood determines its positioning...Same with the other caves...
Now listen my complete bad luck,i was bored to go shopping the past weekend and worked all Friday afternoon and Saturday with the slates and other things for the tank and the result was to finish almost all my silicone on Friday and my diamond wheel to loose its diamond covering on its cutting edge while cutting the last slate piece for the bottom
Anyway,its time to stop tiring you with words and let the photos speak for themselves
The Lifeguard filter in its travelling packing
A photo of the bags with equipment i have in my room waiting some months now to install them on the 2meter tank...
The holding tank as its now...
I finally took the big wood out and thought i would take a new photo of how the ''wood tangle'' in the room is now
The tank with the pvc network just partially siliconed to the bottom and with encyclopedias to keep the pipes where i wanted the be...You can also see in these photos the returns from the sump...
The box of the Tunze Master electronic 1073.090 pump i have as a main pump for the sump...This is its original box and not just an external shipping box.
The box of the Eheim uinversal 1262 pump i have as a second pump for the sump...
The sump pumps partially installed and with sump fittings in place...
Following the returns on their way up...
A 1 1/2inch Helisteel food safe tube runs the full lenth of the tank stand...
...being supported above the sump...
...and then its flow is spread through a T...
... to two 1 1/4inch Helisteel food safe tubes that enter the aquarium through two holes specially made for them...
...and run the whole lenght of the aquarium again to release their water there through a spraybar and two simple outakes...
A close up on the return outtakes...
I hope you liked it!!!
-
MatsP

- Posts: 21038
- Joined: 06 Oct 2004, 13:58
- My articles: 4
- My images: 28
- My cats species list: 117 (i:33, k:0)
- My aquaria list: 12 (i:10)
- My BLogs: 4 (i:0, p:97)
- Spotted: 187
- Location 1: North of Cambridge
- Location 2: England.
-
Kostas
- Posts: 791
- Joined: 23 Apr 2003, 10:57
- I've donated: $256.00!
- My images: 19
- My cats species list: 14 (i:0, k:0)
- My aquaria list: 3 (i:3)
- Spotted: 6
- Location 1: Greece,Athens
- Location 2: Greece,Athens
- Interests: Fishkeeping,diving,skiing,r/c modeling,growing Palm trees,ferns and tropical plants
- Contact:
Thank you very much for your comments Mats
The truth is i dont know when i will be ready to add water in I will try to work many hours on the aquarium this weekend but because the work left has to do with siliconing slates together and then,after they cure, grinding them to shape,i will probably not be able to do many things just because i will have to wait for some pieces to cure Anyway,i 'll do my best to finish as many things as i can this weekend and will make sure to have plenty of resources availiable this time
Thank you Its just that i cant rush the job(and dont like rushing aquarium related jobs as i want to carefully plan everything in advance )and do it as good as i want it...
Will take new photos and upload them soon to see how it looks like now
The truth is i dont know when i will be ready to add water in
Thank you
Will take new photos and upload them soon to see how it looks like now
-
Kostas
- Posts: 791
- Joined: 23 Apr 2003, 10:57
- I've donated: $256.00!
- My images: 19
- My cats species list: 14 (i:0, k:0)
- My aquaria list: 3 (i:3)
- Spotted: 6
- Location 1: Greece,Athens
- Location 2: Greece,Athens
- Interests: Fishkeeping,diving,skiing,r/c modeling,growing Palm trees,ferns and tropical plants
- Contact:
-
racoll
- Posts: 5256
- Joined: 26 Jan 2004, 12:18
- My articles: 6
- My images: 181
- My catfish: 2
- My cats species list: 2 (i:0, k:0)
- My aquaria list: 1 (i:0)
- Spotted: 238
- Location 1: Bristol
- Location 2: UK
-
Kostas
- Posts: 791
- Joined: 23 Apr 2003, 10:57
- I've donated: $256.00!
- My images: 19
- My cats species list: 14 (i:0, k:0)
- My aquaria list: 3 (i:3)
- Spotted: 6
- Location 1: Greece,Athens
- Location 2: Greece,Athens
- Interests: Fishkeeping,diving,skiing,r/c modeling,growing Palm trees,ferns and tropical plants
- Contact:
Re: 2 meter Orinoco basin tank setting up...
After quite some time with no updates,i found some time and decided to make on for you
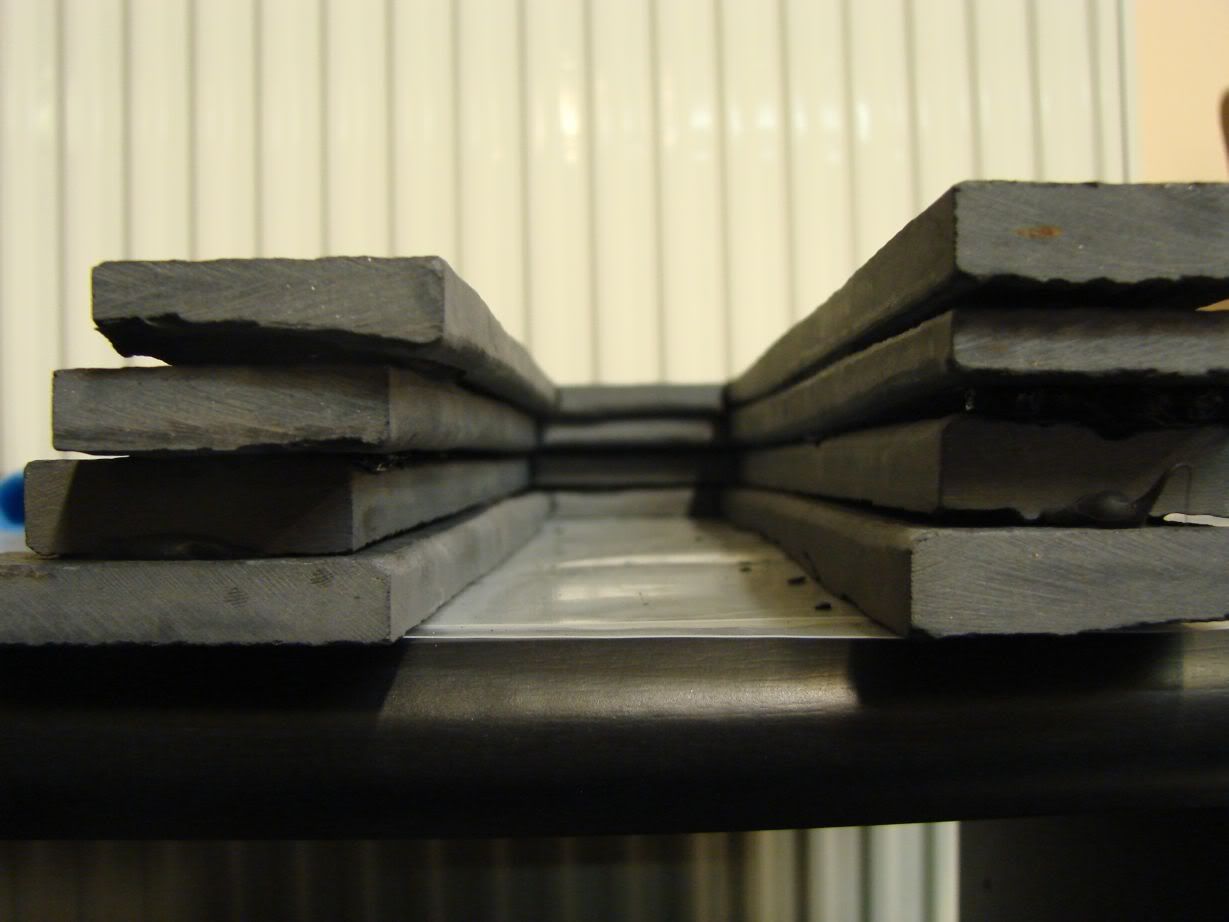
During the past time i have completely installed the second sump pump,i have glued all major slate pieces to the tank's bottom and have made what i think is a good natural looking ending to them(unfortunately it seems that i didnt took any photos of it...and i thought i had and many of it:dontknow:)...Of course it still remains to conceil the joining places by gluing extreemly thin slate pieces on them and grinding them to shape...
I have completely glued the ''feet'' and back of one of the two single caves and have finished the internal smoothening of that cave...Now it remains to shape the exterior by grinding it and glue the top and grind again...The other cave has its pieces still unglued because i need a new diamond wheel to cut the back pieces to length and i cant seem to find it anywhere...I also need this wheel to cut the back pieces for the cave building too and thats the reason i have not and cant finish it yet:sick:
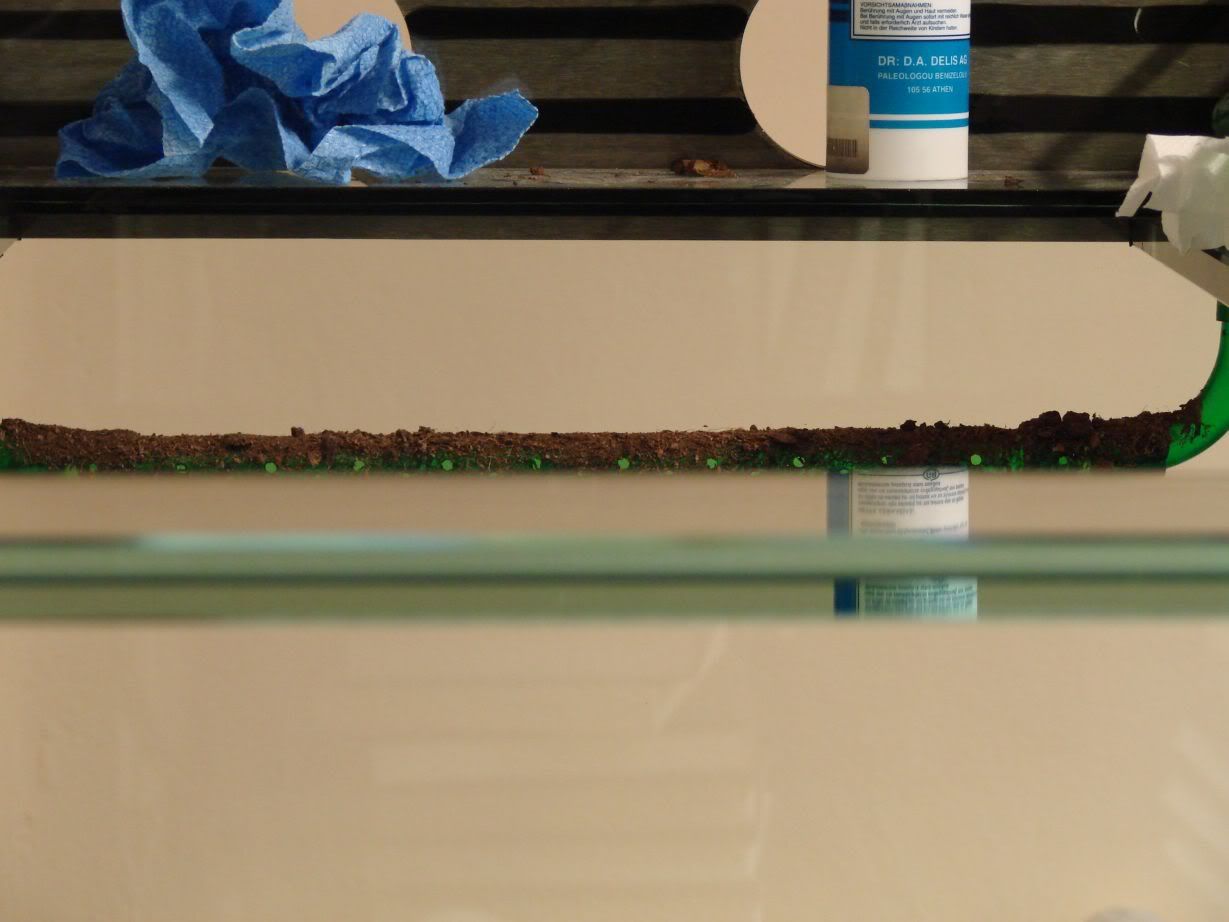
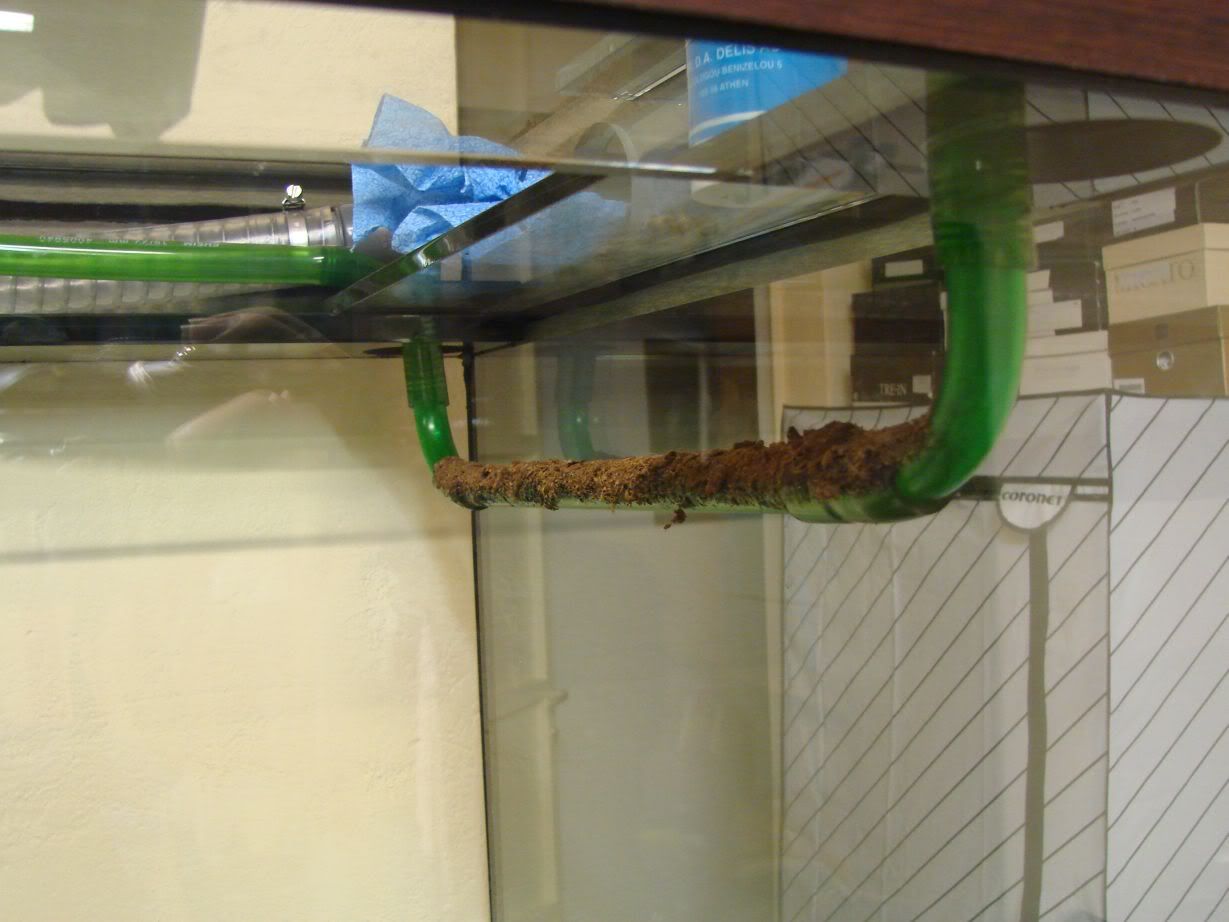
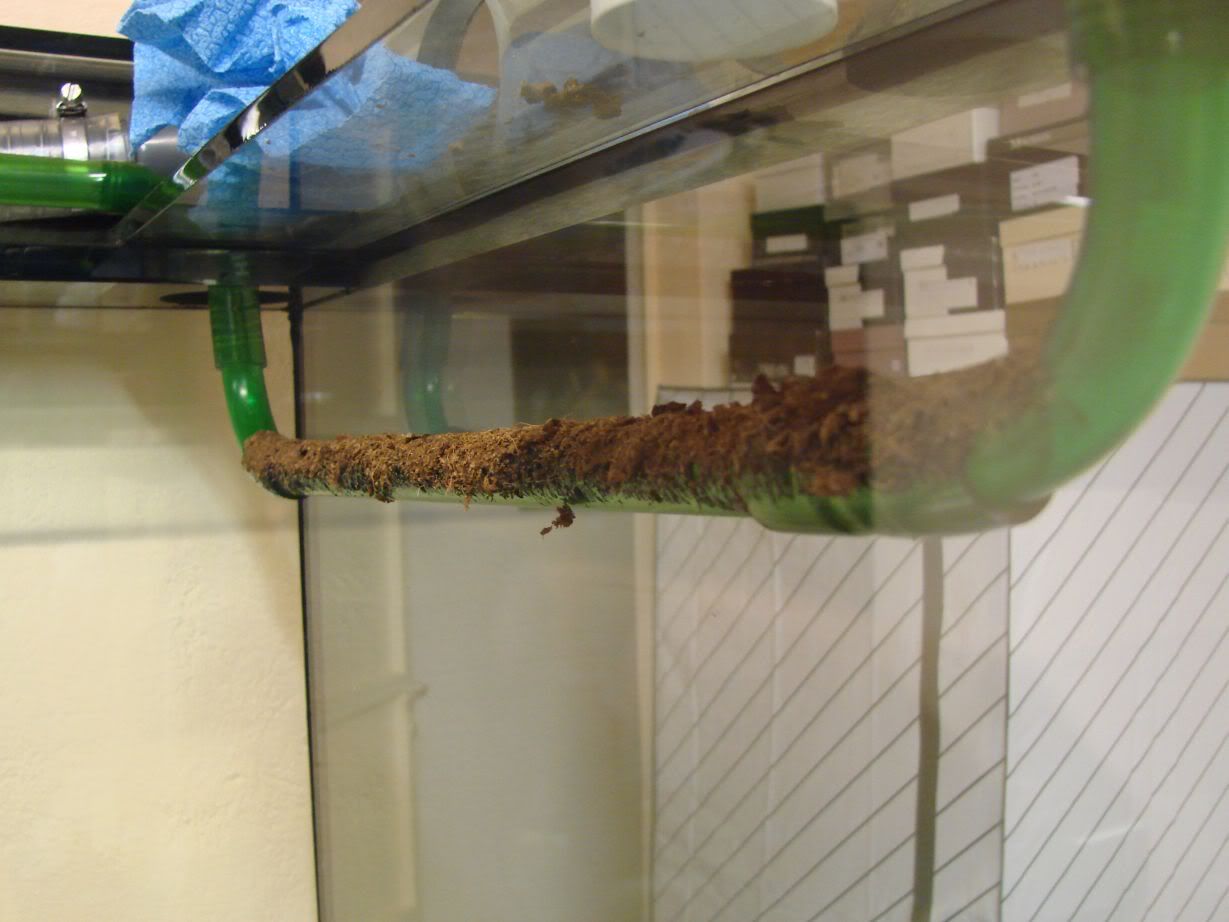
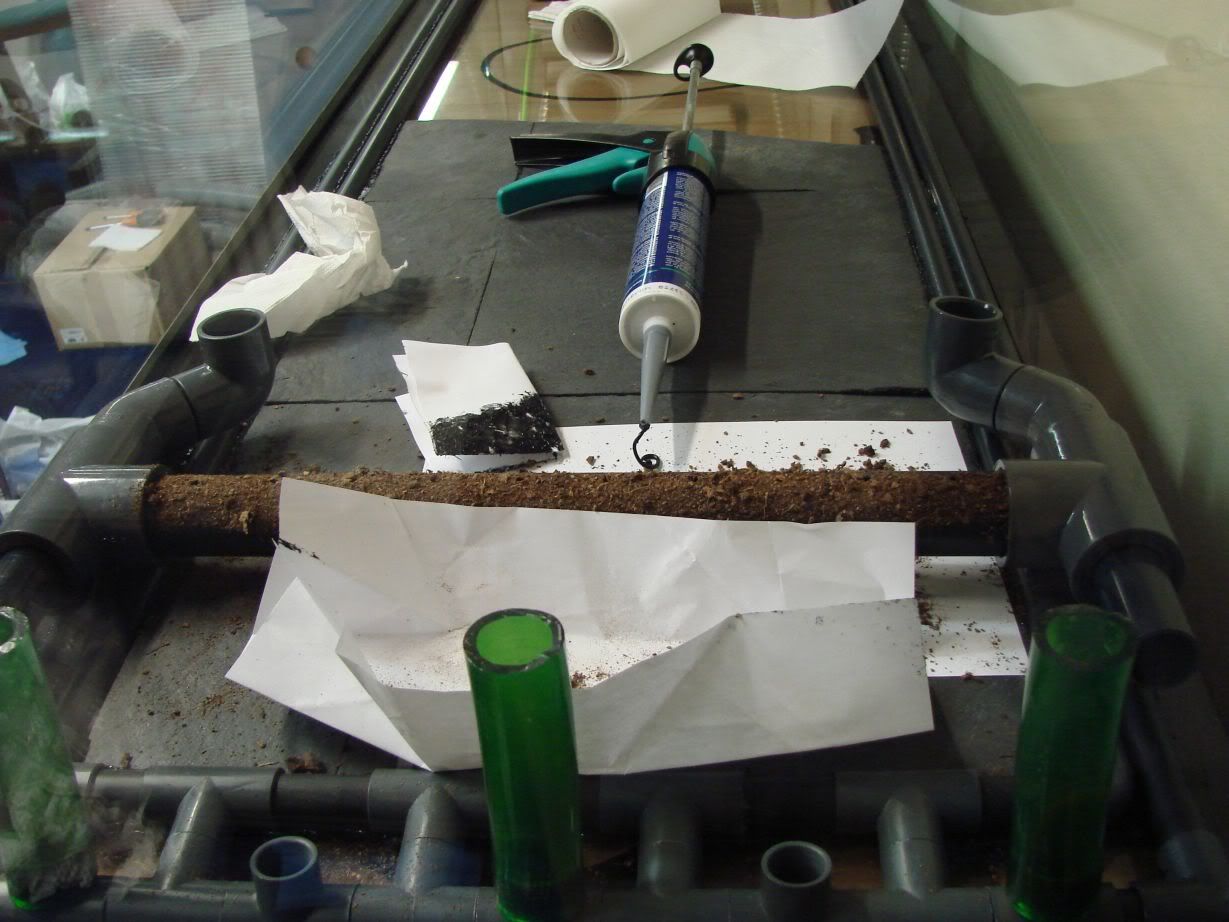
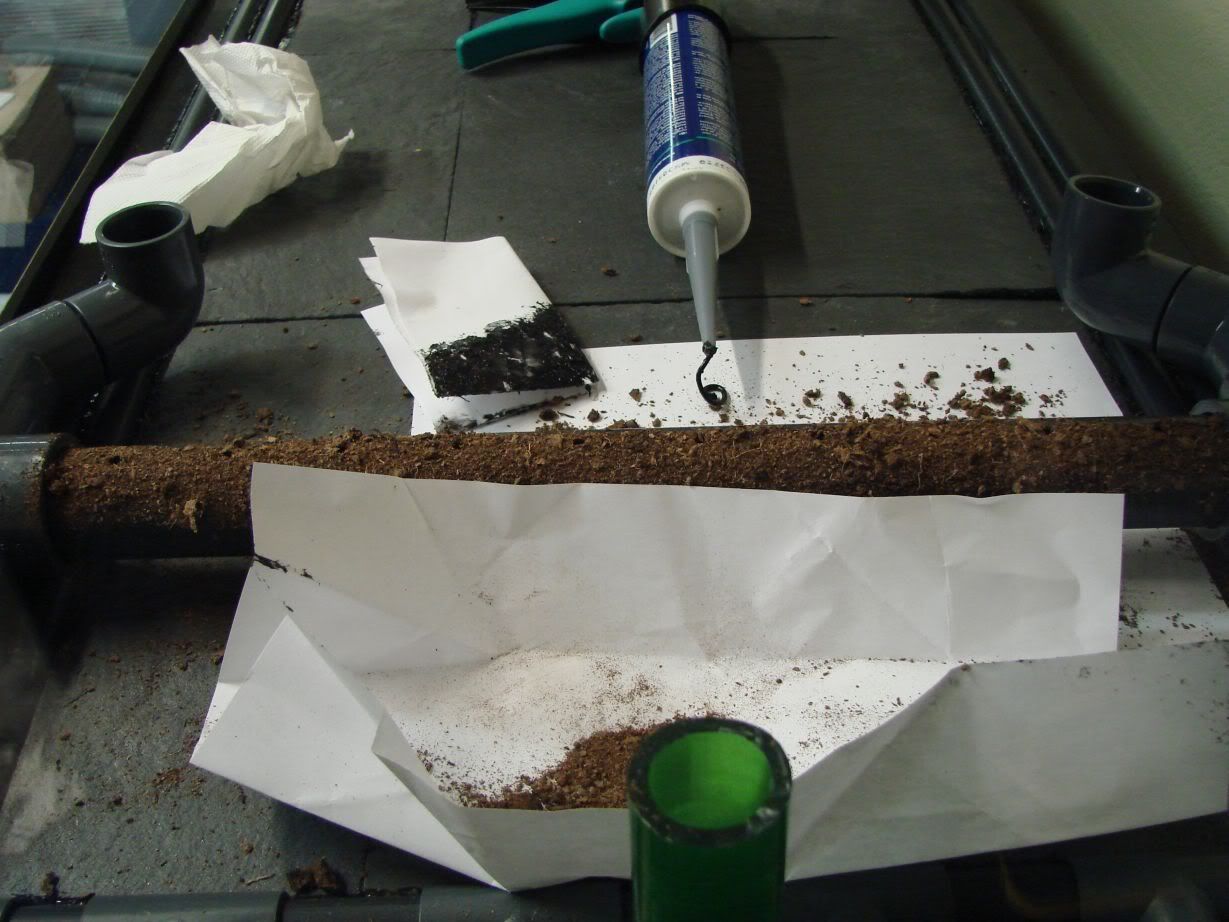
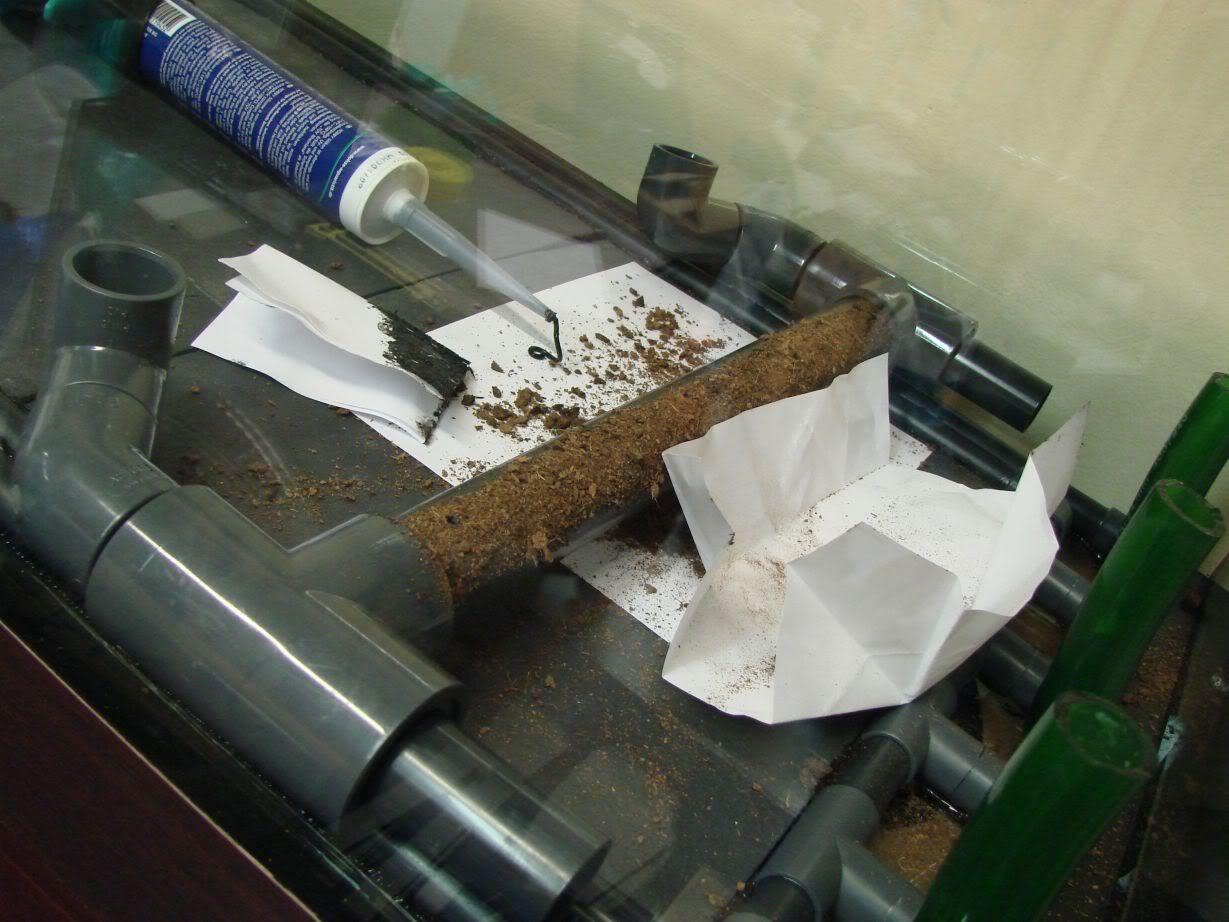
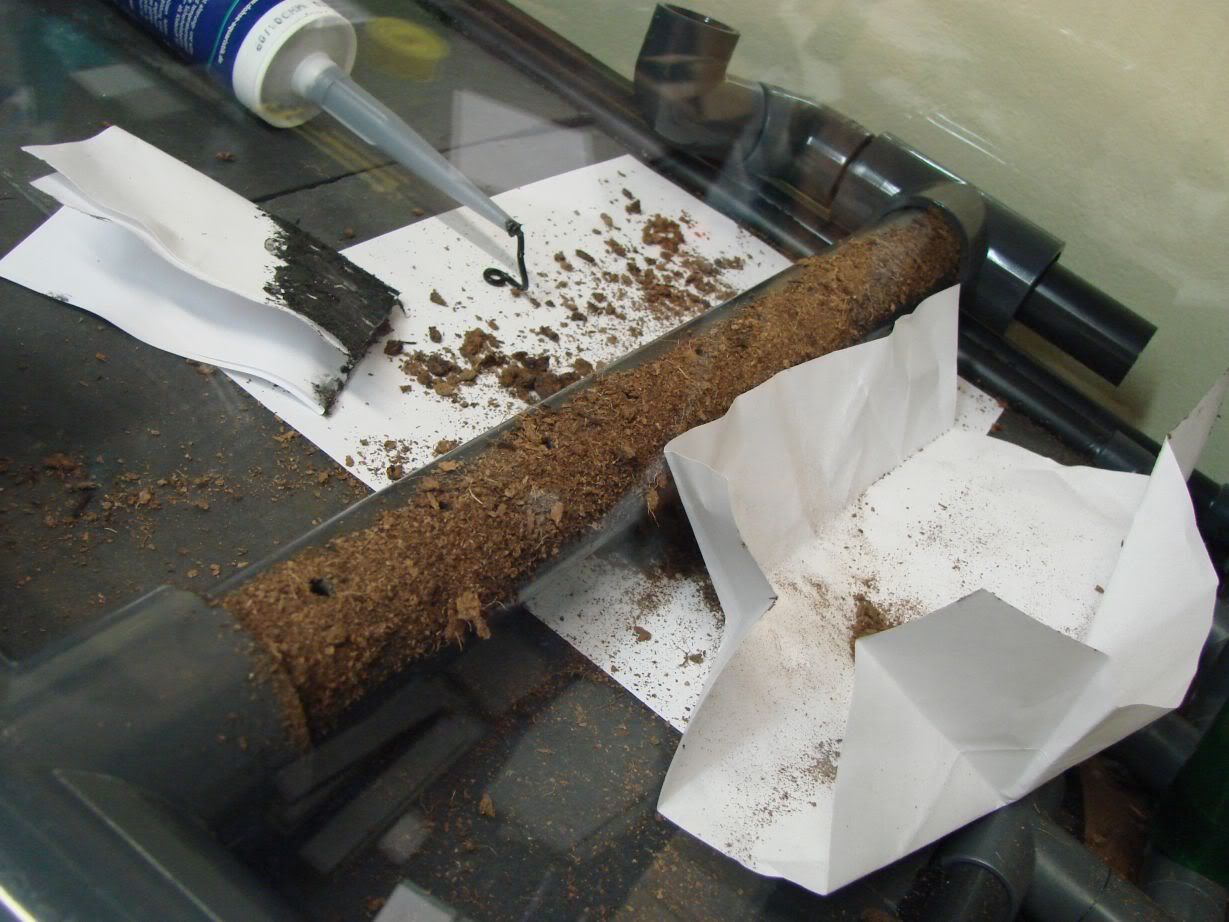
Something else i did and i am happy with myself for it,is that i started covering the return spraybars with peat and coco bedding to make them natural looking and to be able to grow S. American moss on them and to allow the small semiaquatic and terrestial plants i will be growing in the soil(pure peat and coco bedding) pocket that will be between the sump spraybars and the side glass,to expand so that it will look very natural...
But i think i said too much,lets proceed to the photos you all have been waiting for!!!:hi:
Here are the sump pumps fully installed...I have placed a soft sheet that is made to be put under the aquarium to protect it,single under the big pump and double under the small one so that they are level(because the hose is thick and short and so it doesnt let them sit as they should...)and also to minimize any vibration transfer from the pumps to the aquarium...
Here a photo of the aquarium as it is now...Its kinda overstocked dont you think?:D
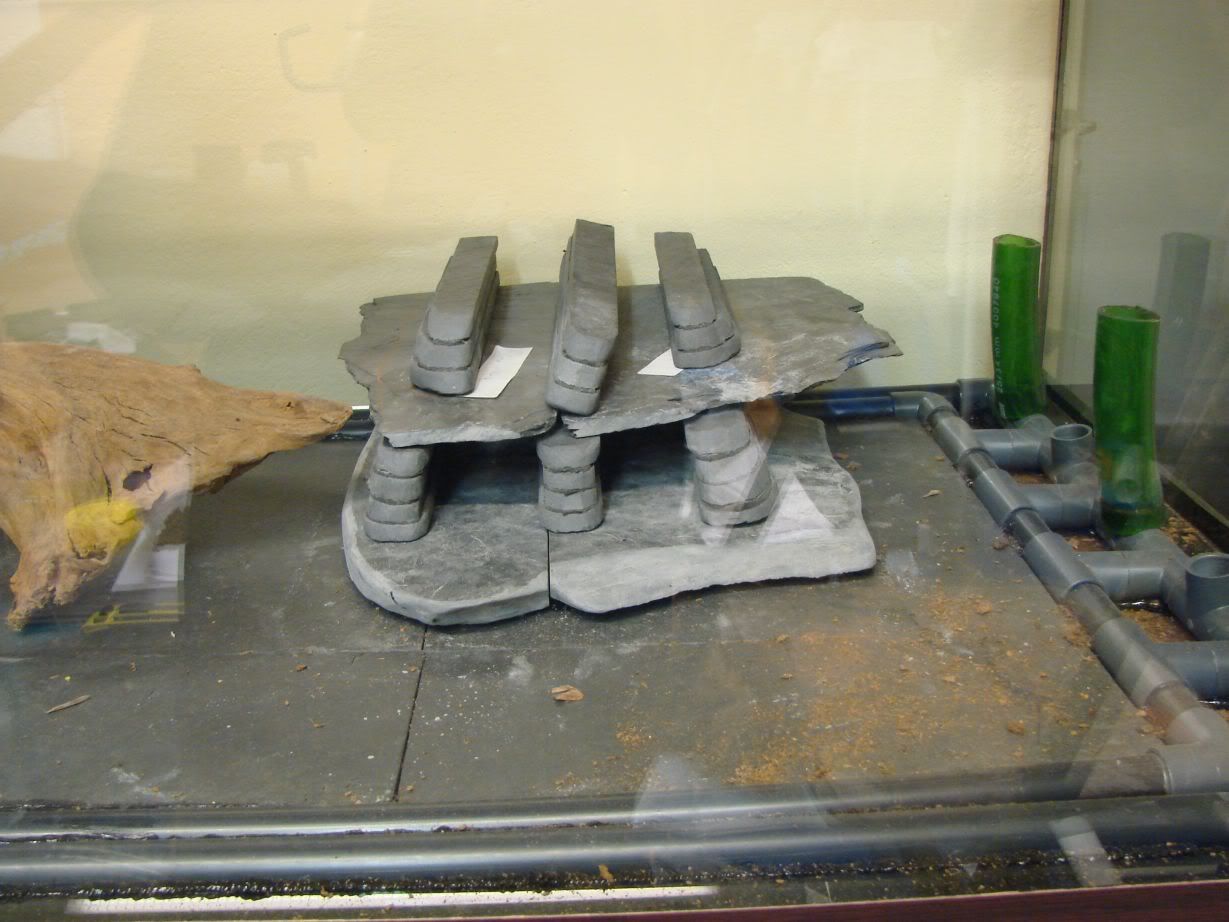
And now some photos of the caves:
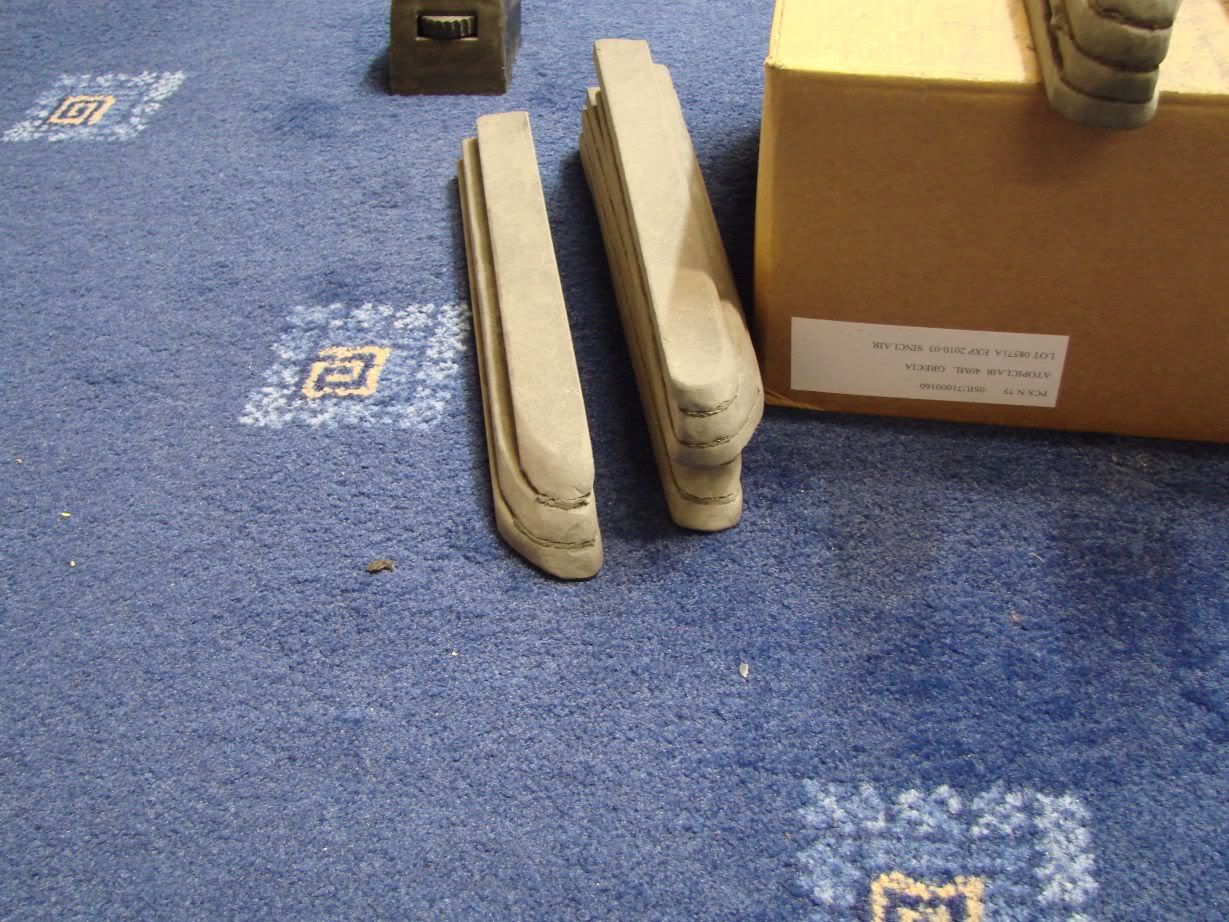
The cave building's base ''legs'' almost ready...They still need a detail grinding on their front and a lot of grinding at their sides(the outer ones...the insides of the cave building are ready) to be as i want them but you take an idea of what i am trying to construct...
And now the legs of the upper level of the cave building...These are more ready,needing only the outer side grinding which will be done when the whole building is ready and glued together...

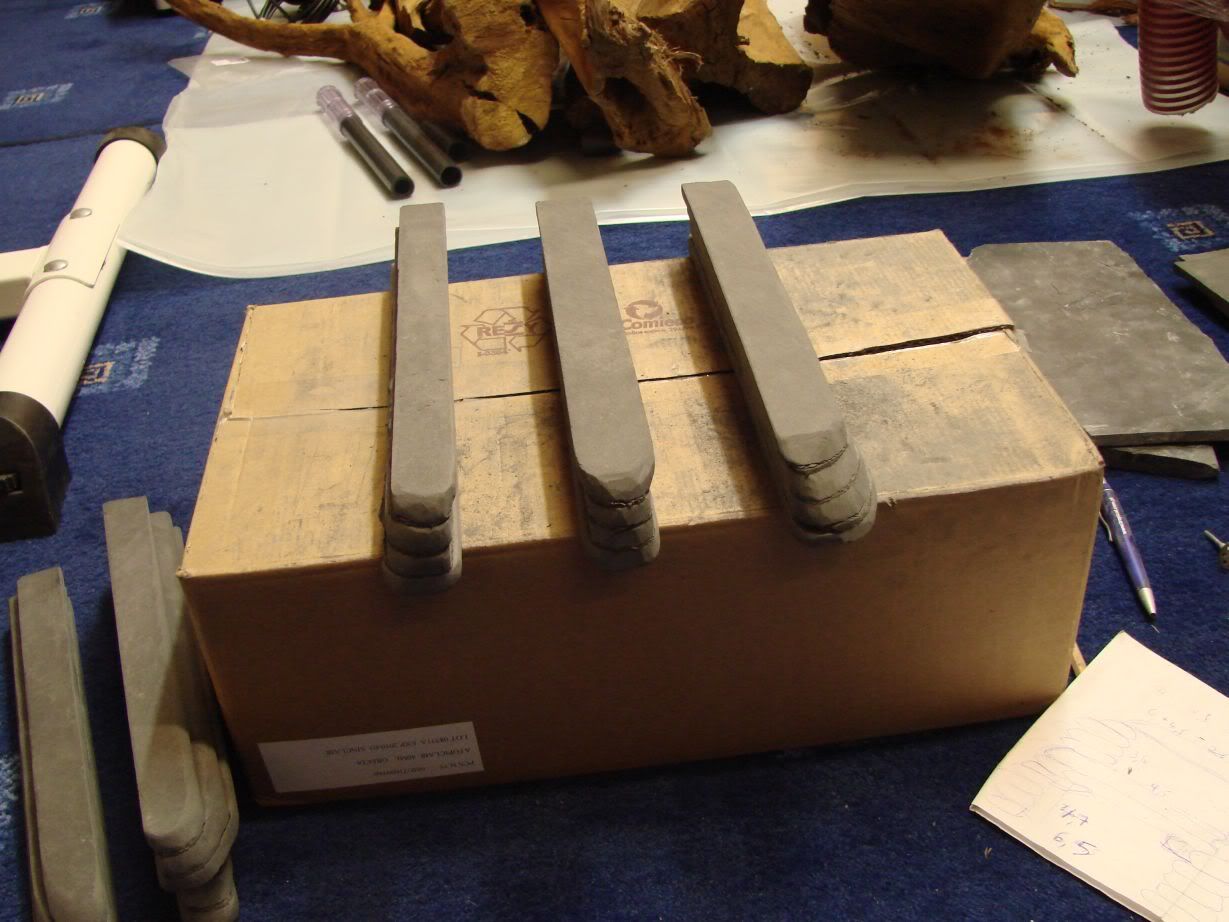
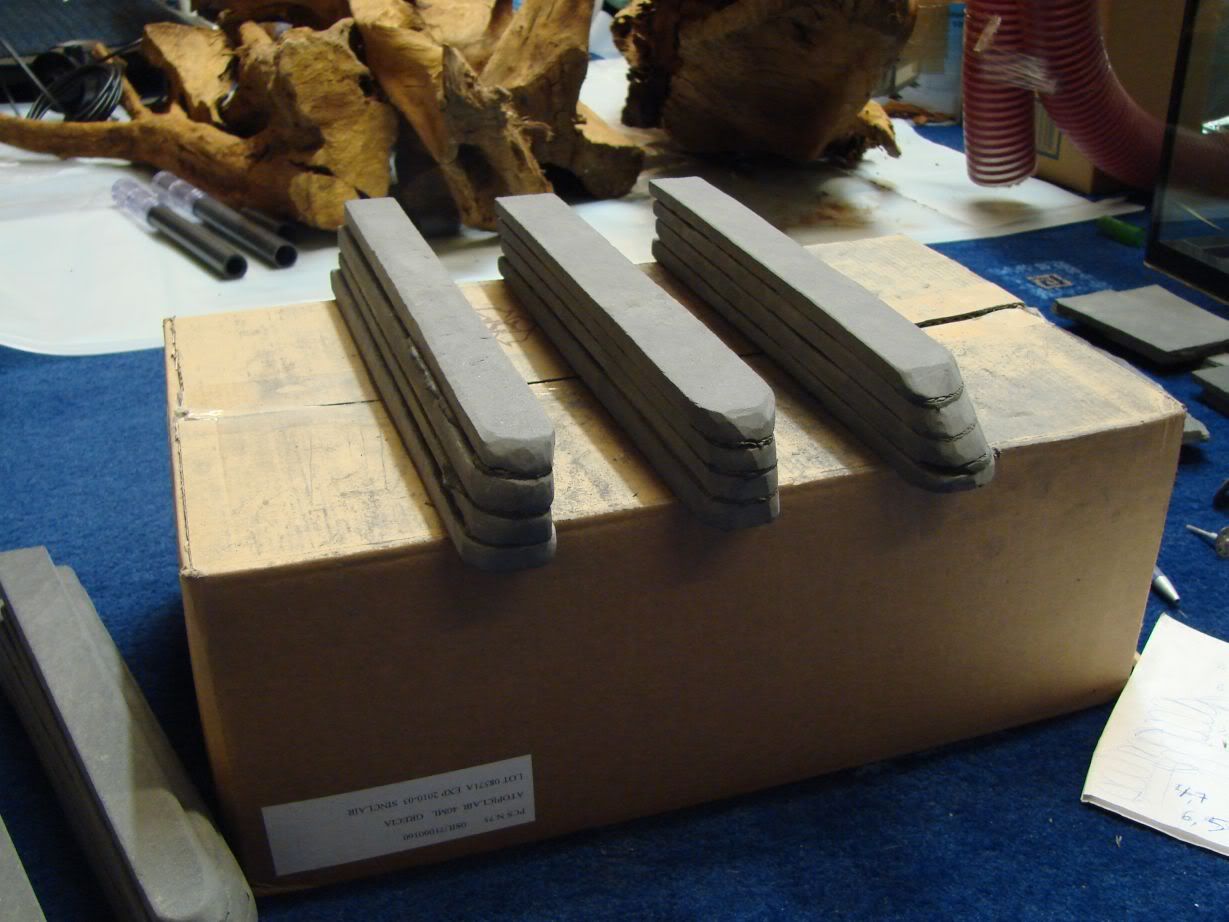
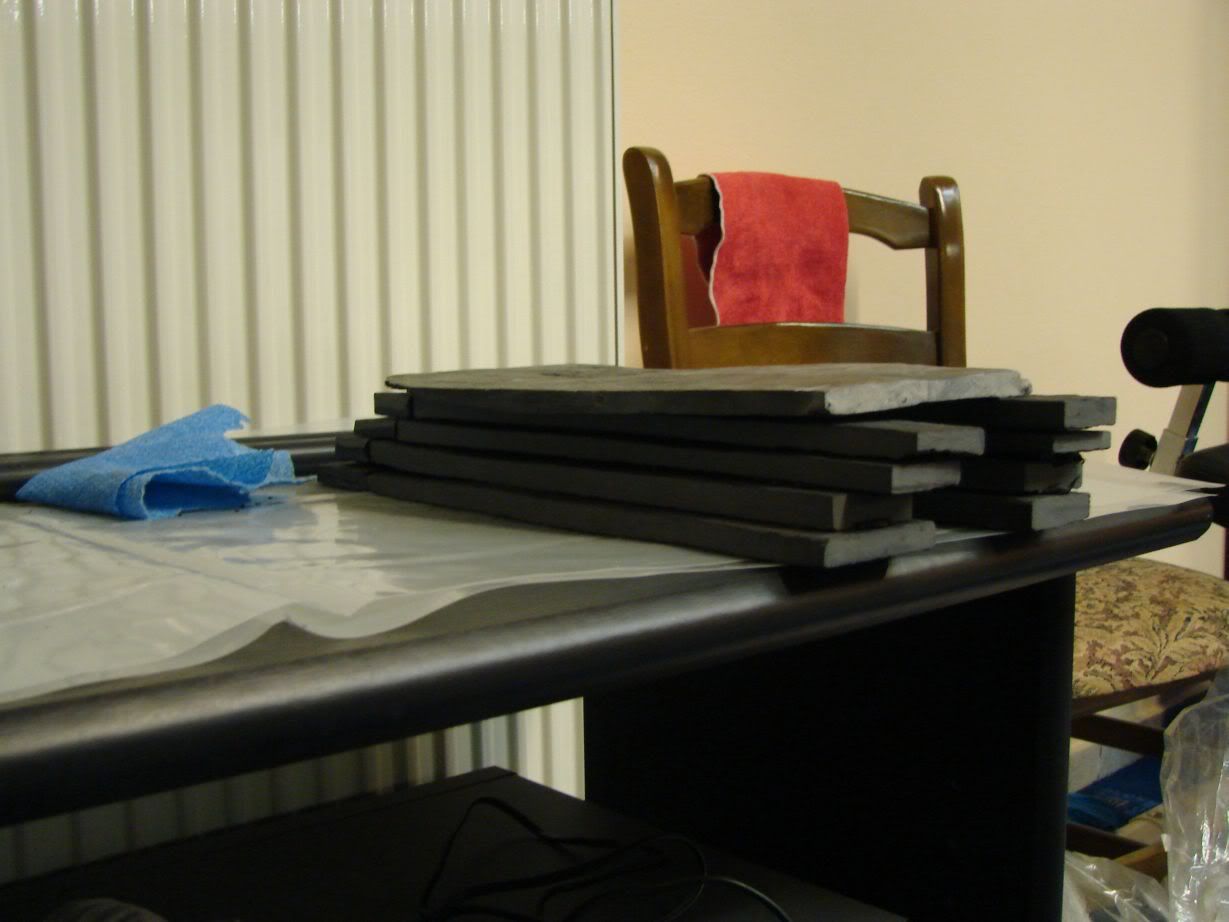
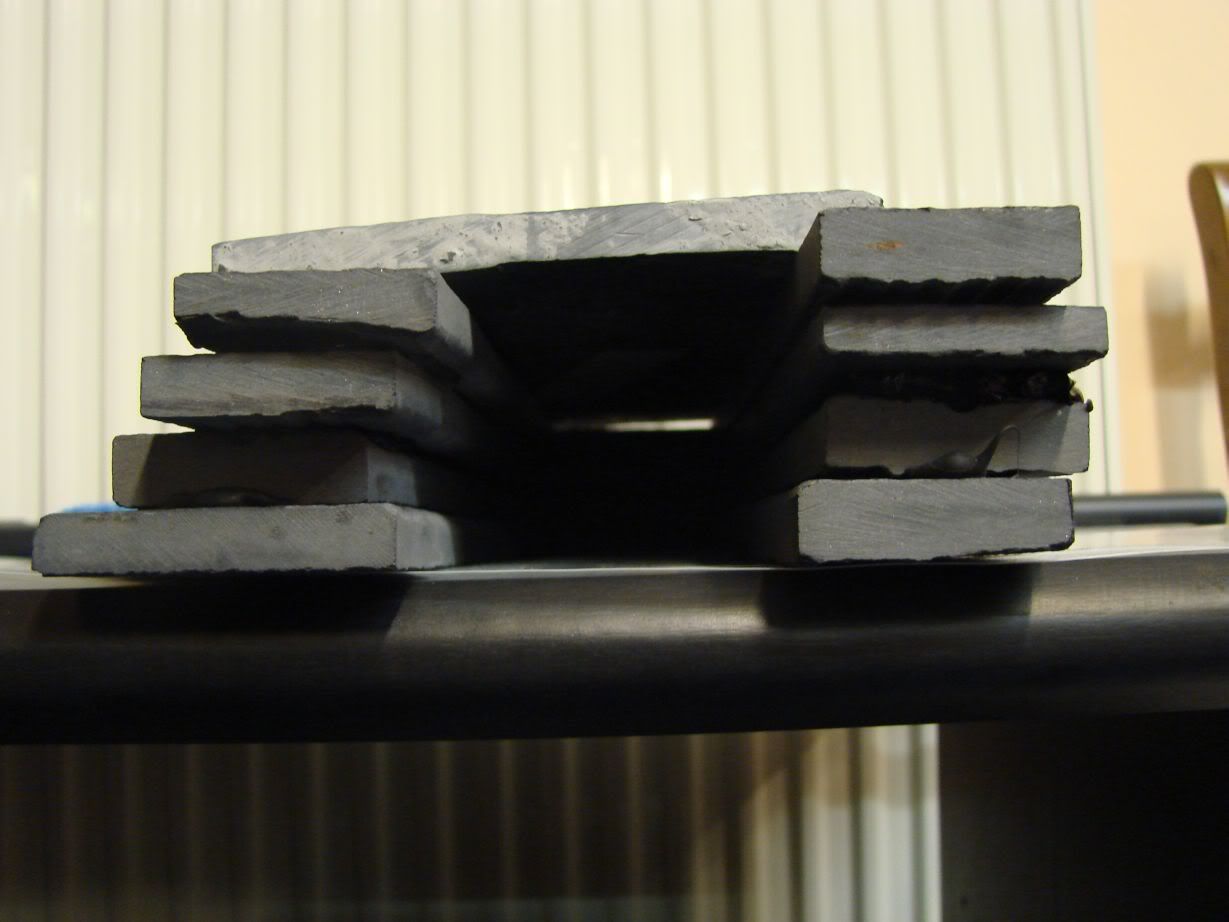
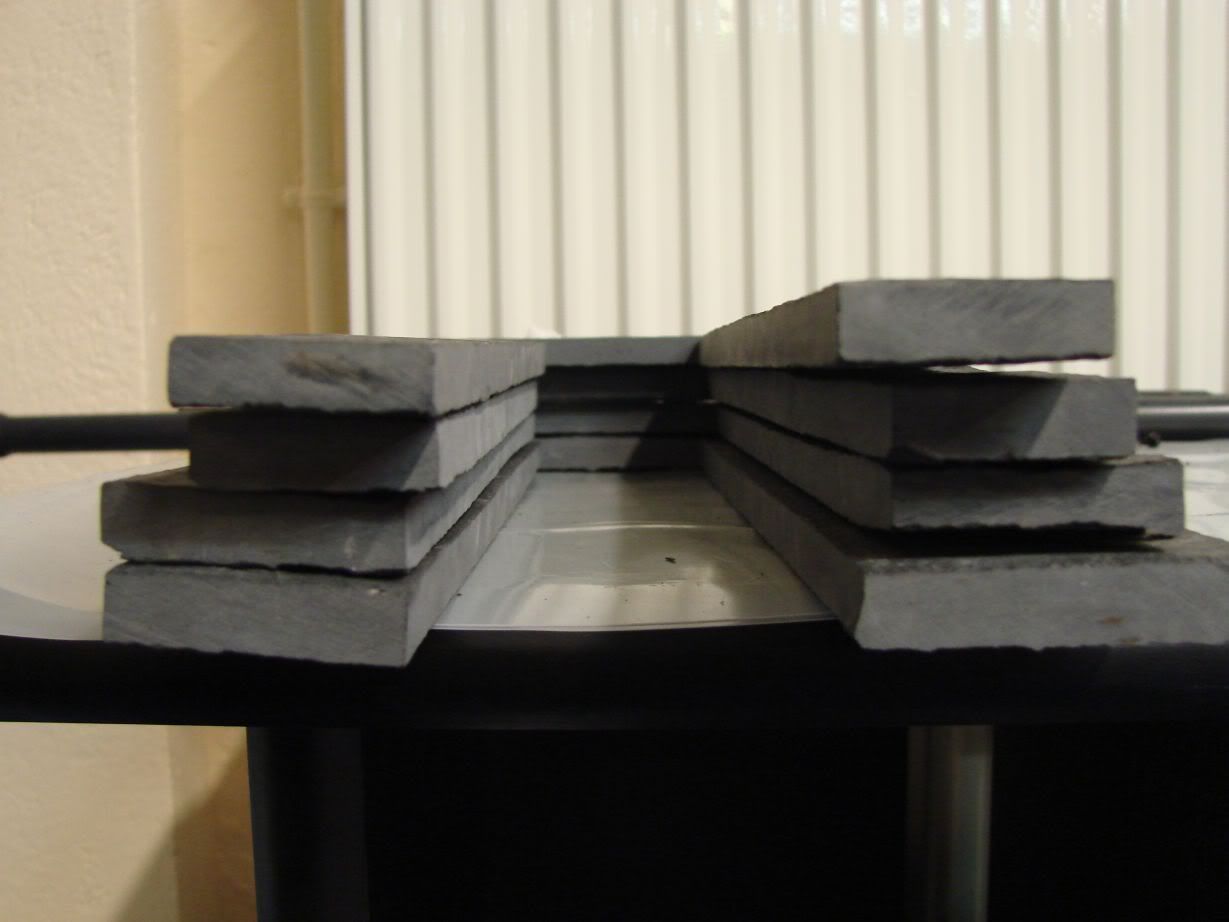
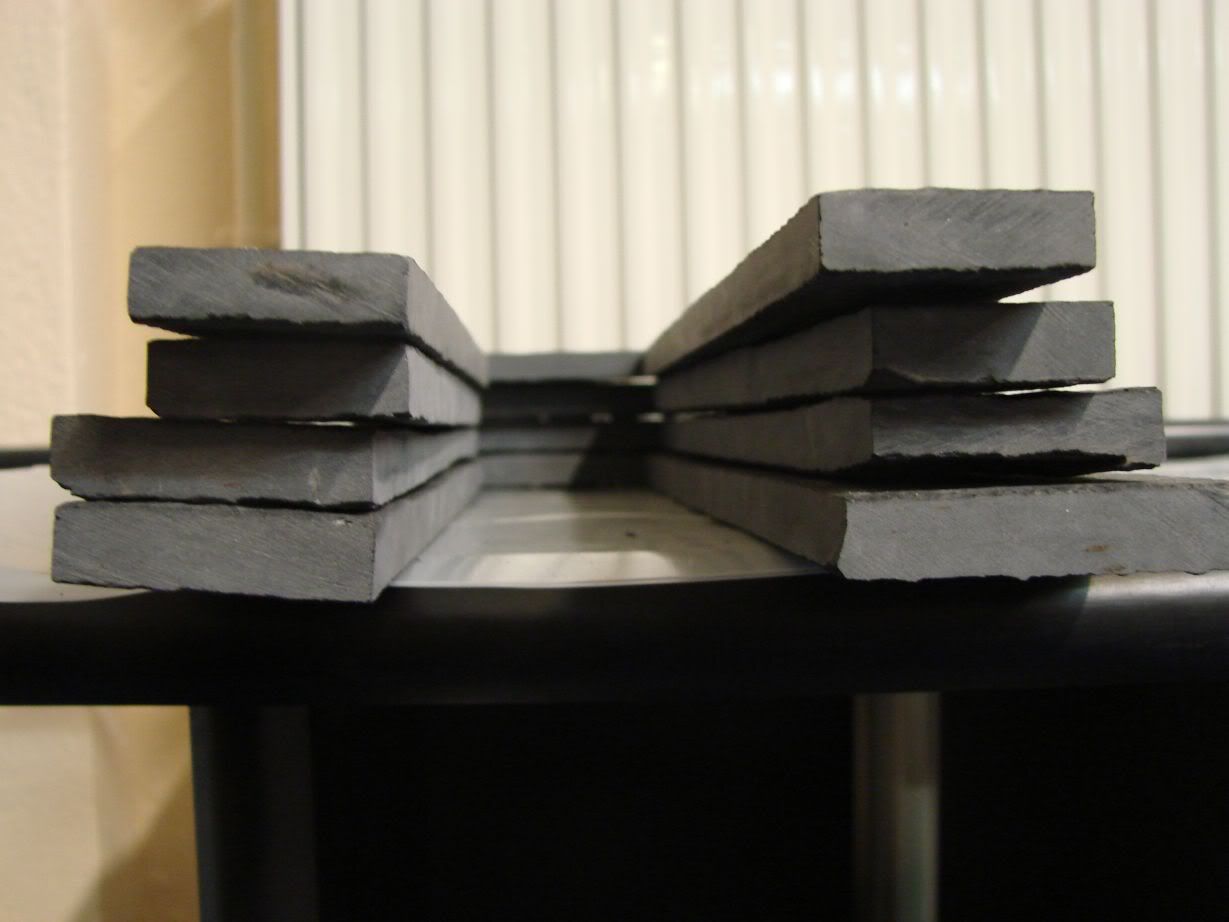
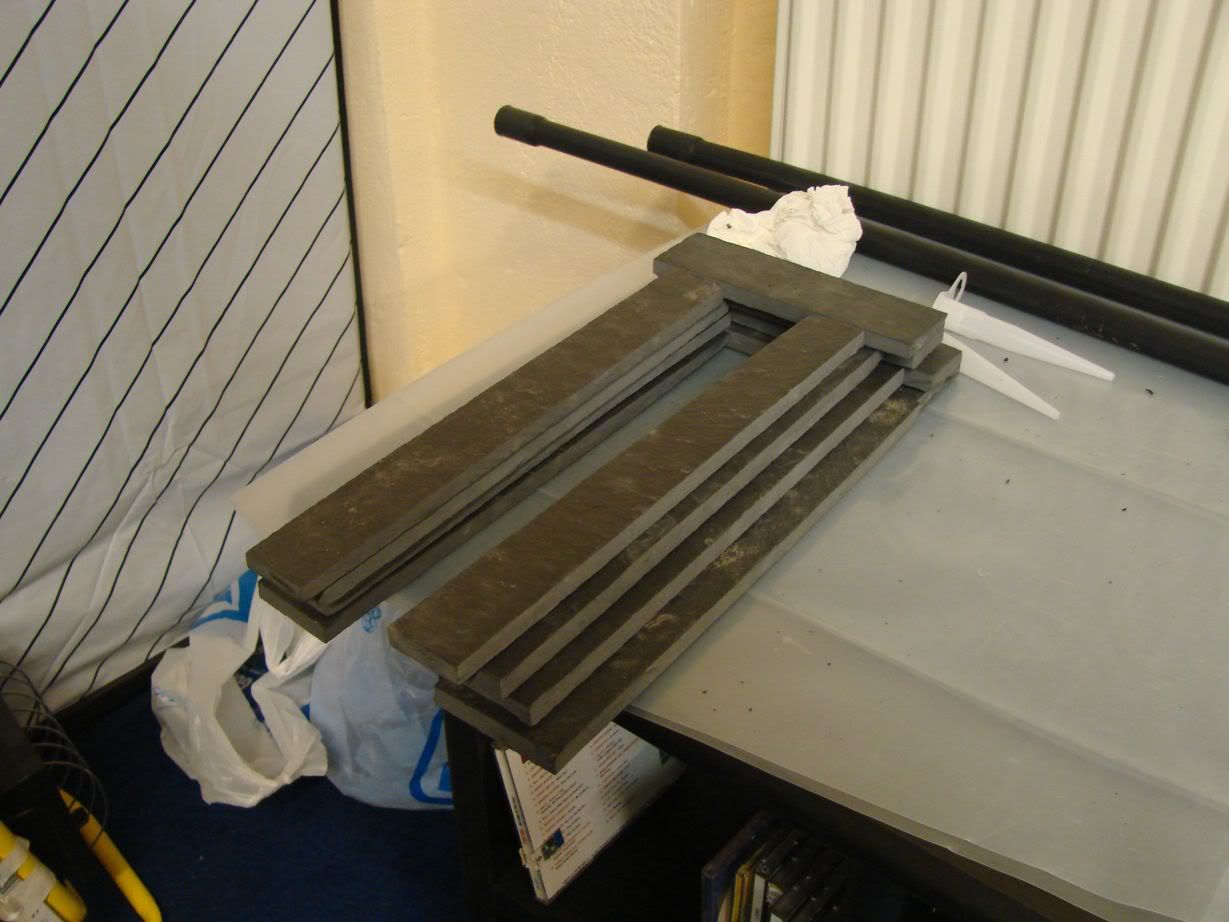
Here are some pieces pieces like the ones i used to make the legs...I cutted the 30x30cm slate flooring tiles i bought to 2,5cm,3cm,3,5cm and 4cm wide pieces by 30 long...Making combining pieces with different width and seeing how they look more natural,i made the legs i showed you and the cave you will see...In this photo you can also see the top piecesof the single caves...

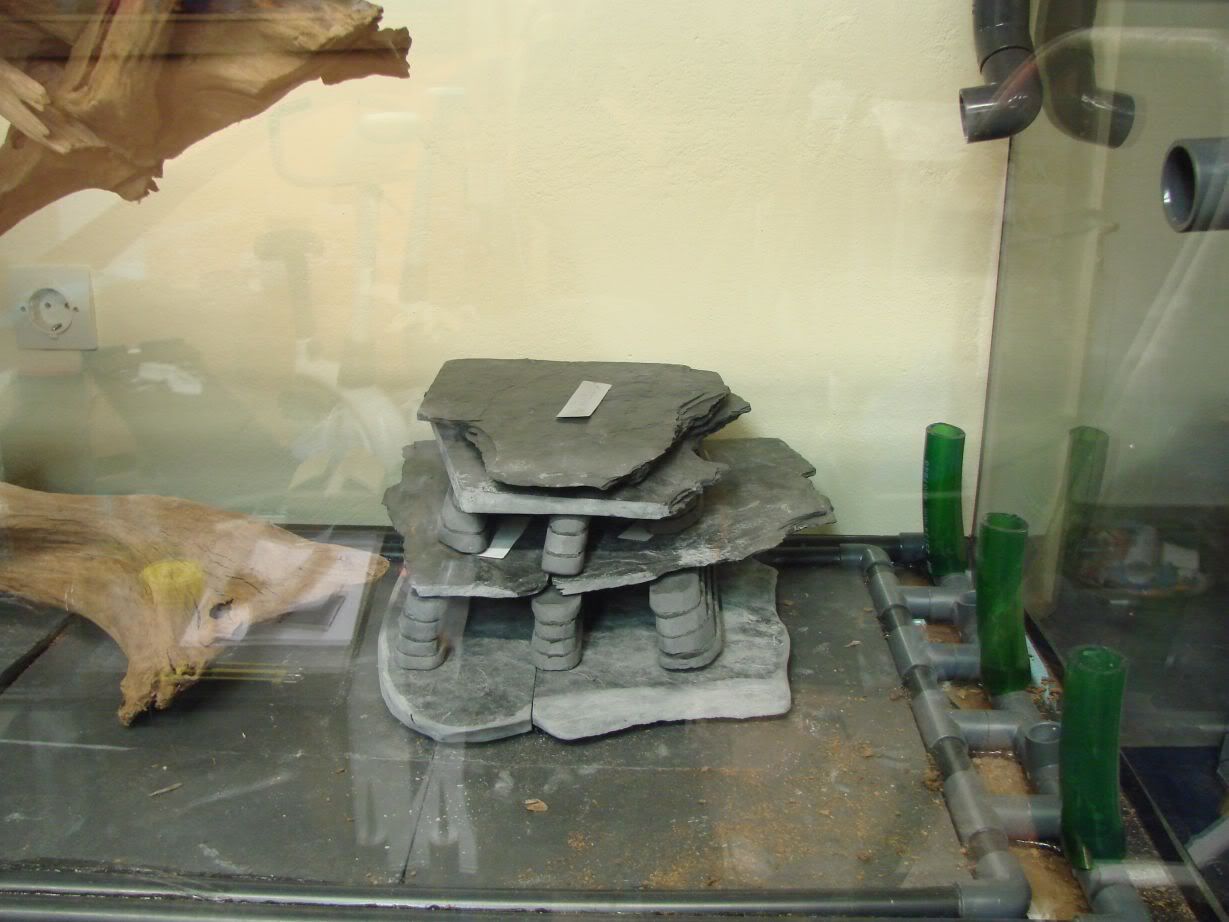
Here are some photos of the almost ready single cave...
Without top cave front view...
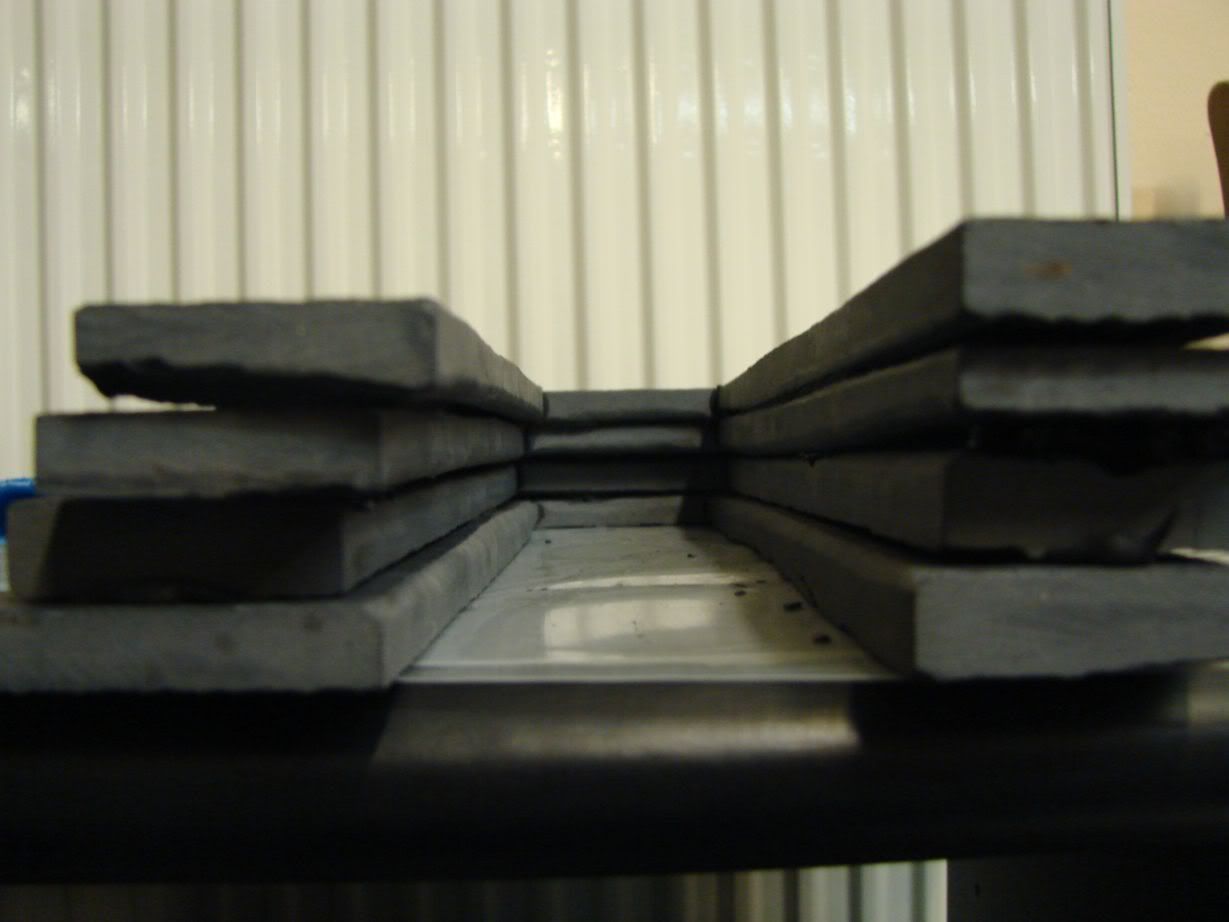
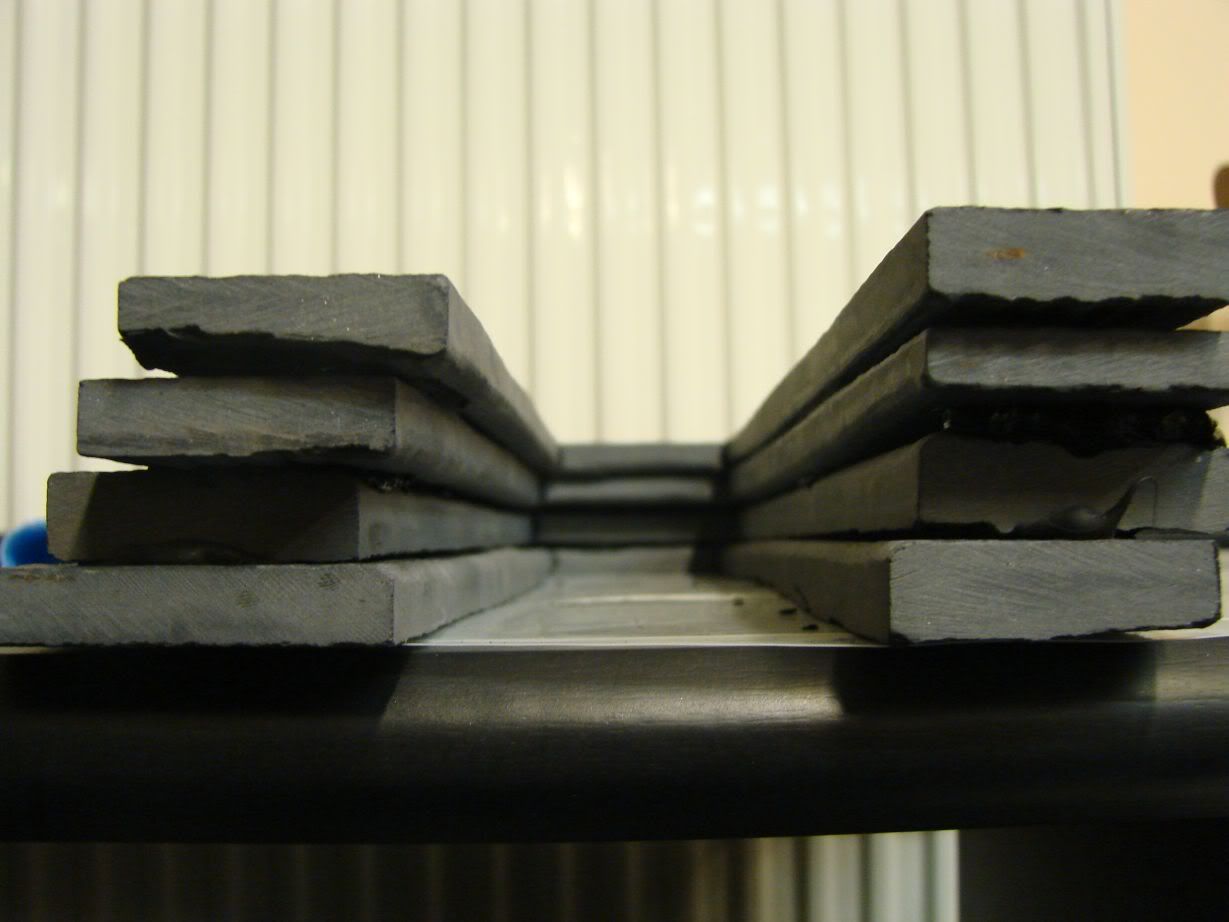
And look from side and above...
And now with its top piece on...
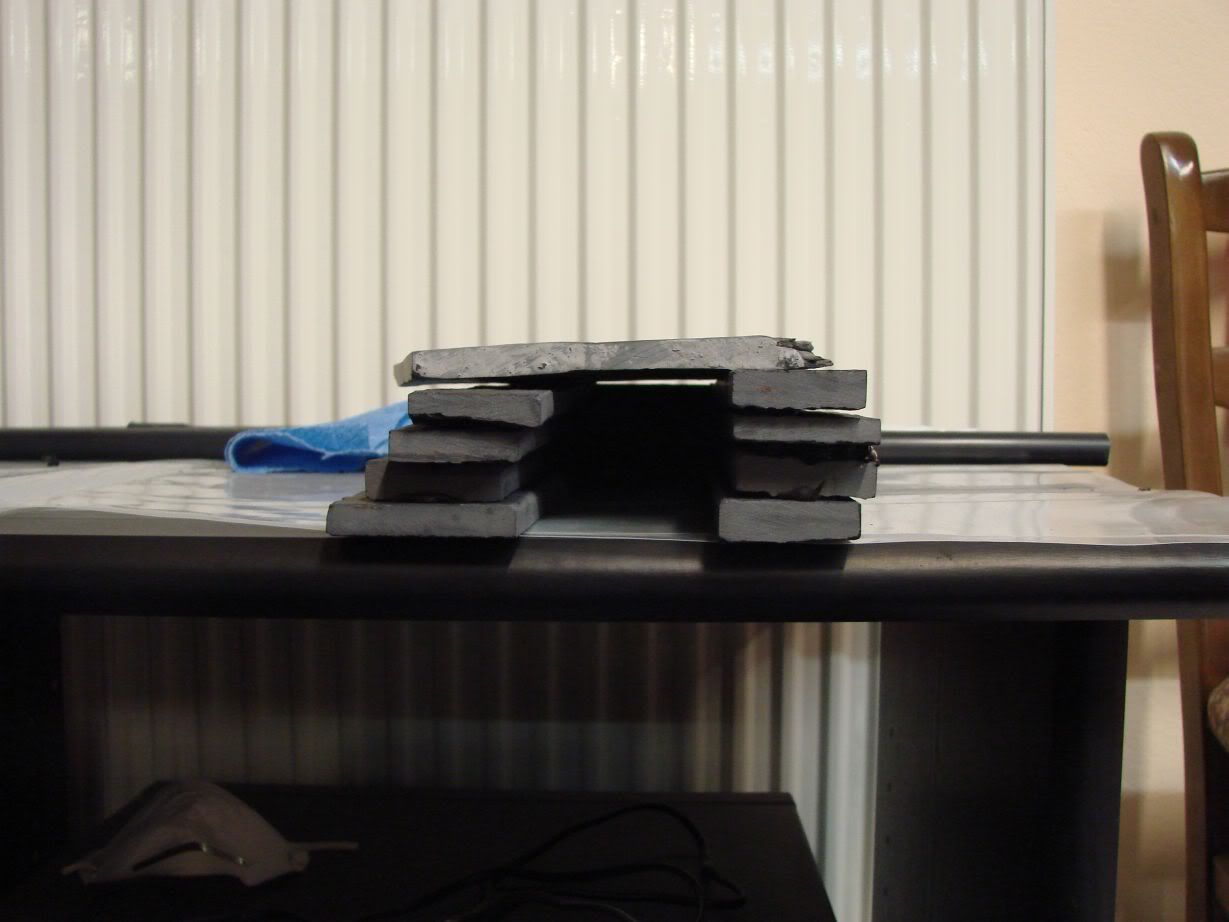
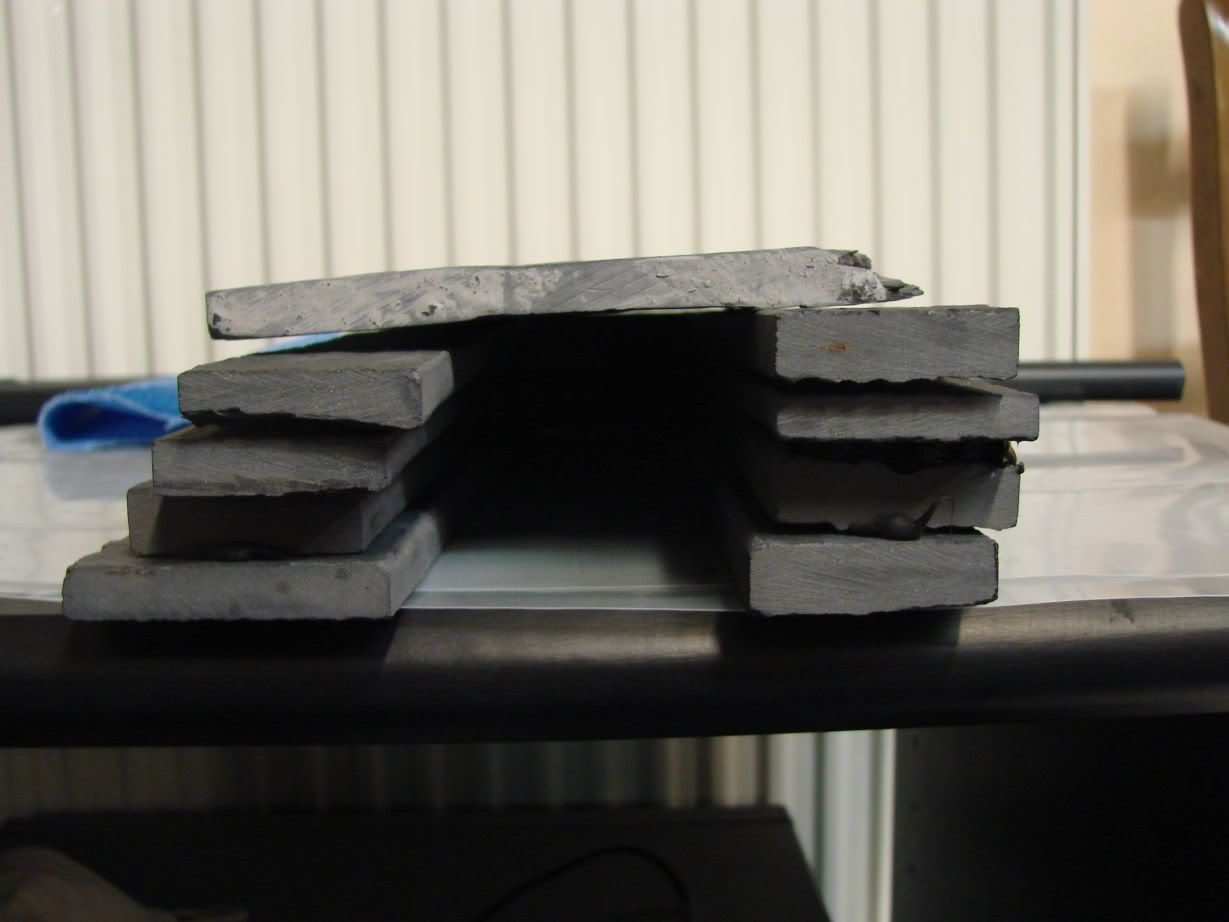
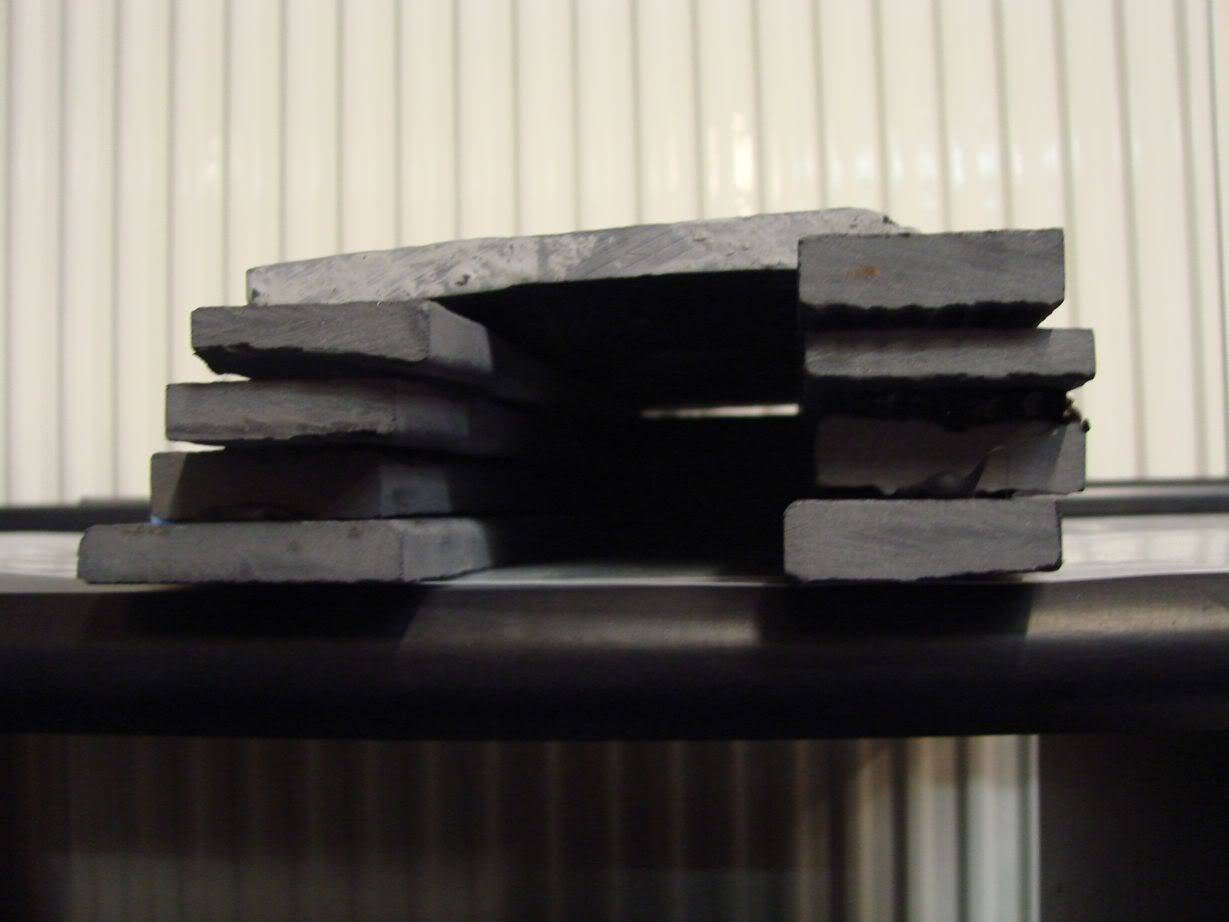
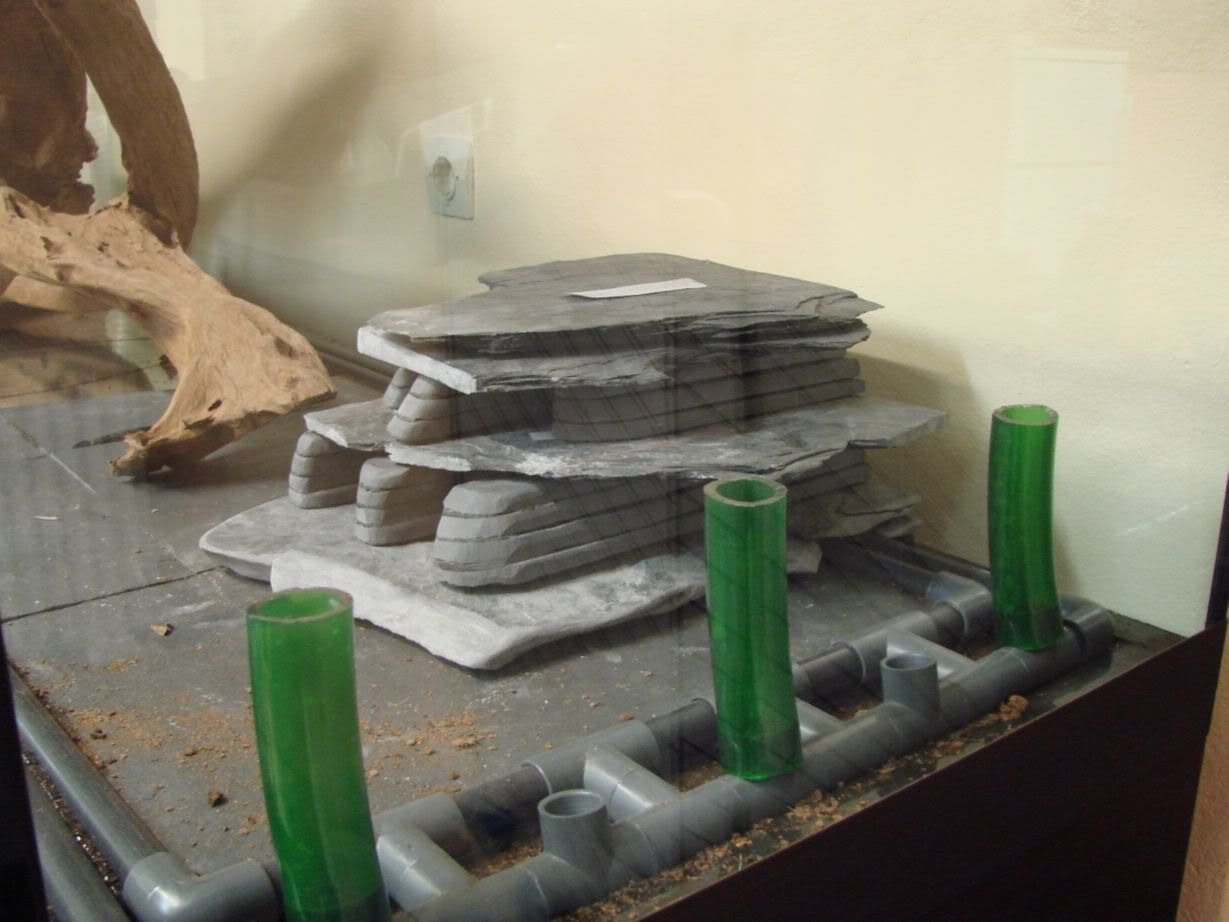
The other single cave unglued but with its pieces correctly positioned and without the top piece...
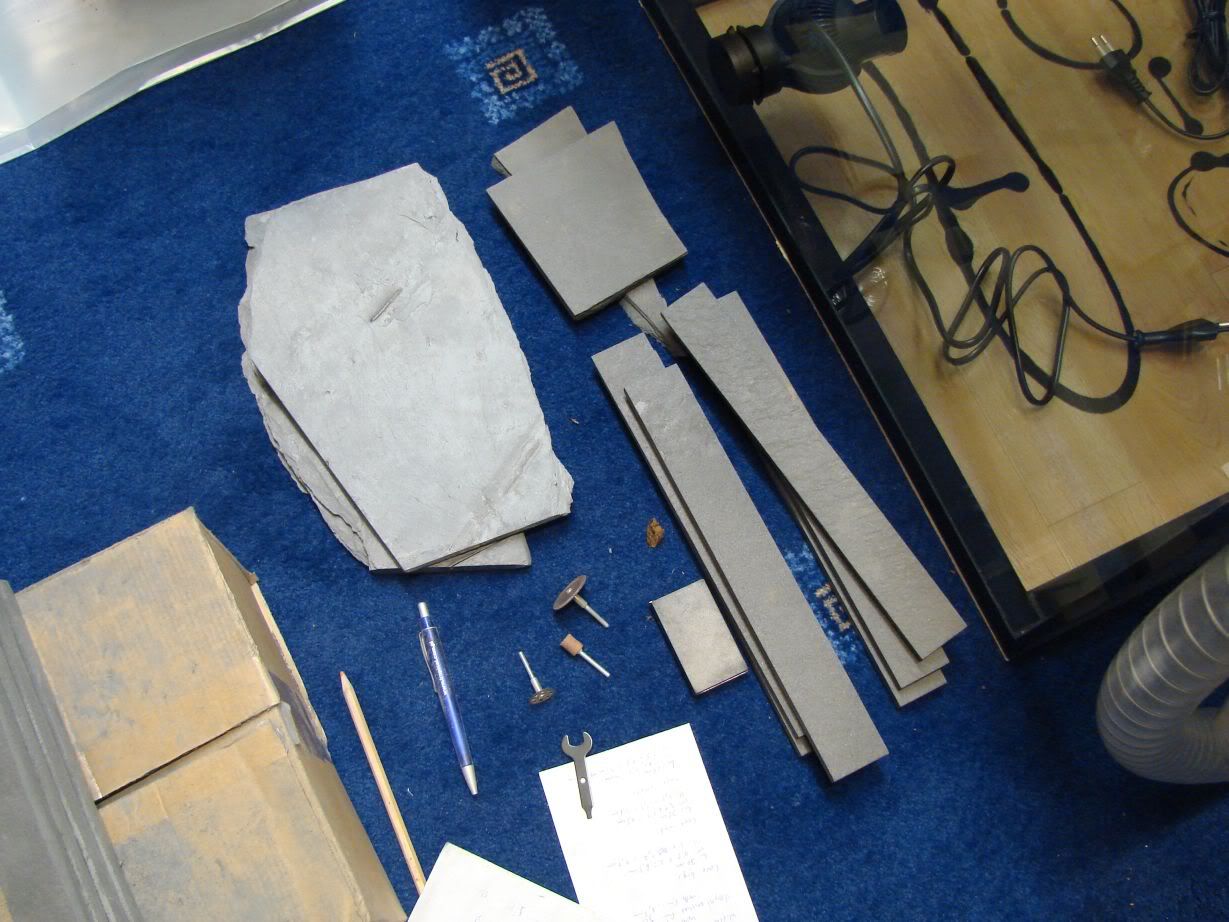
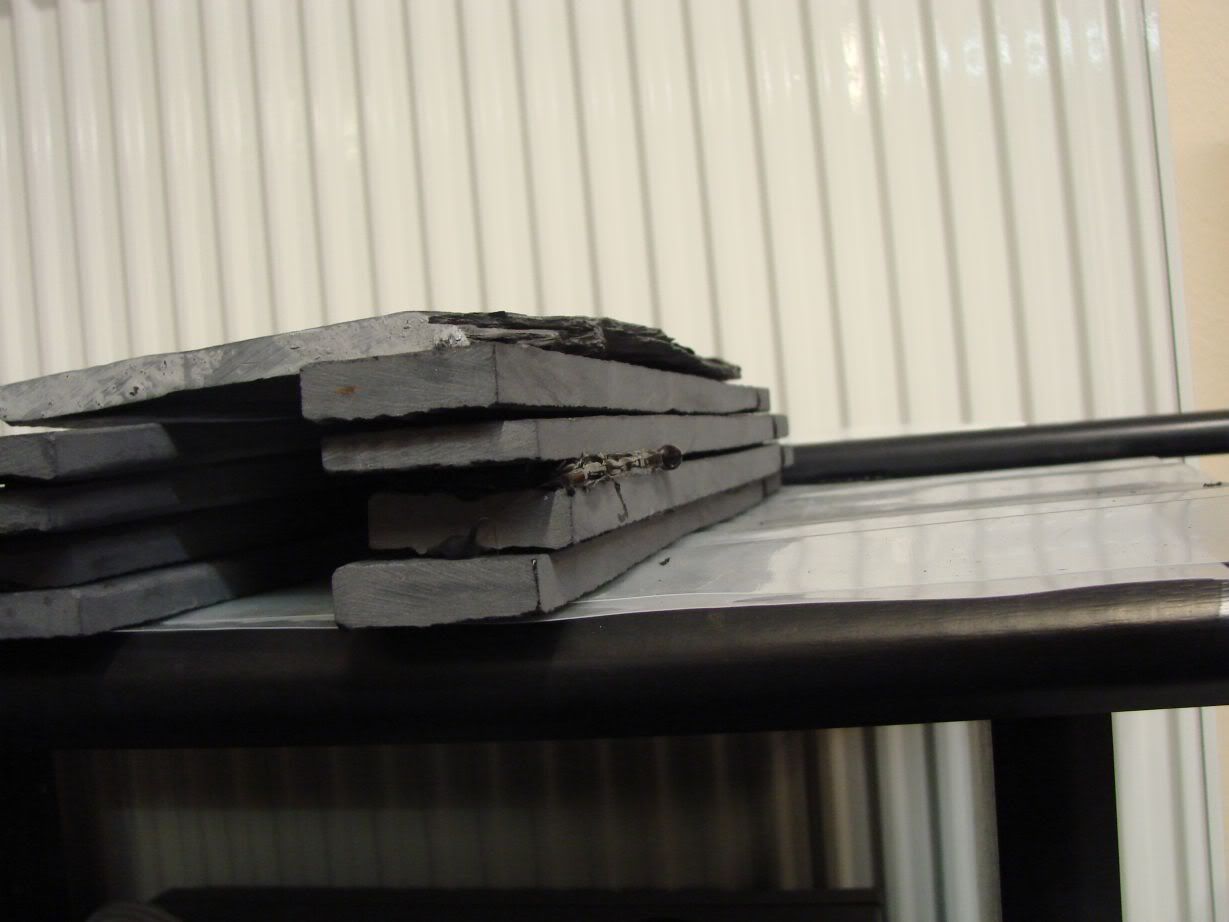
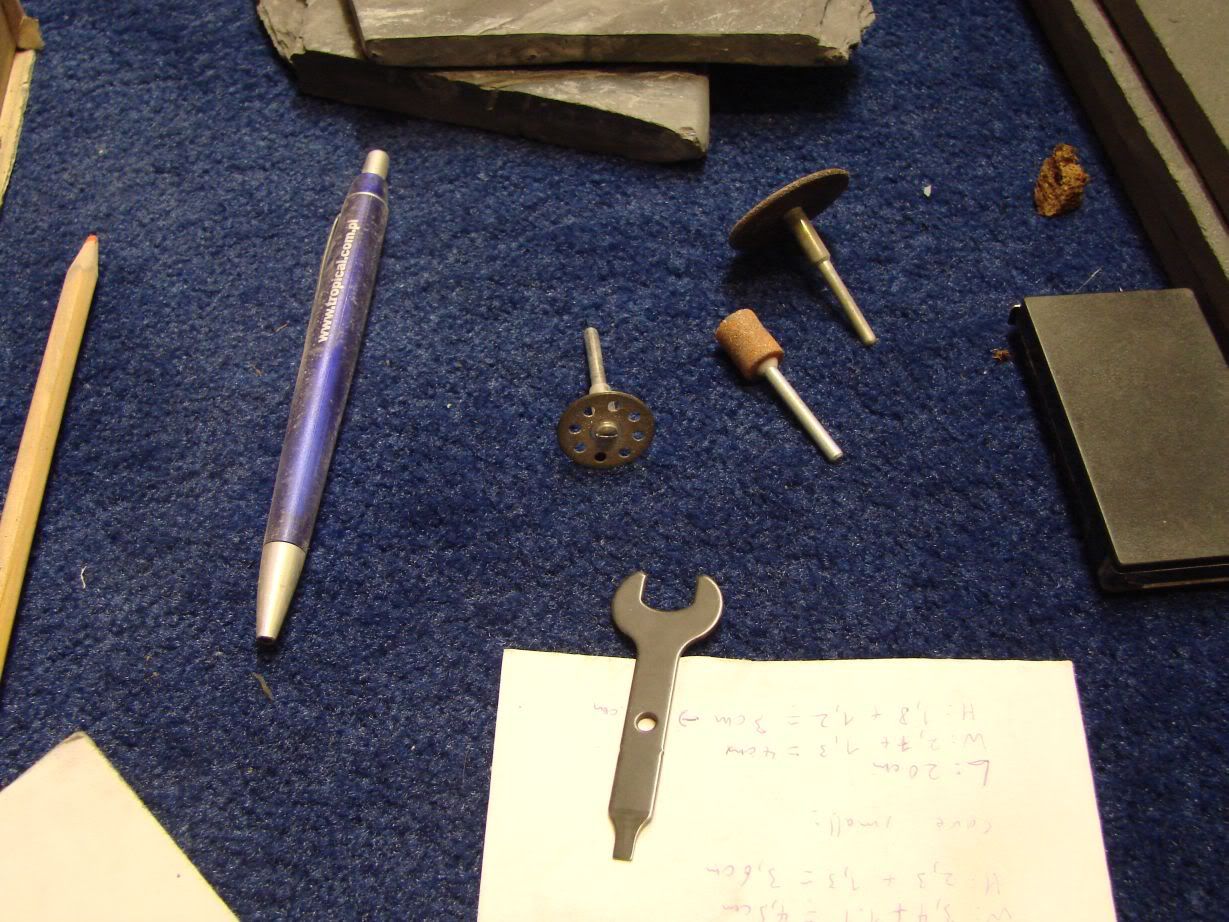
My destroyed diamond wheel(its the wheel with the holes)...Now it can only do grinding job...but thats something it does quite fast and thats why i keep it...Its perfect for when you want to eat away a lot of the material as it does that in a matter of seconds and not hours like the grinding stones...
And now...some photos of the covering of the spraybars with peat and coco bedding...Its still incomplete and needs quite some work to finish it...Its not the actual dressing that is time consuming,its the making of the mixture of peat and coco bedding that take all the time and its not easy to make it fine particles by hand...
The working place...
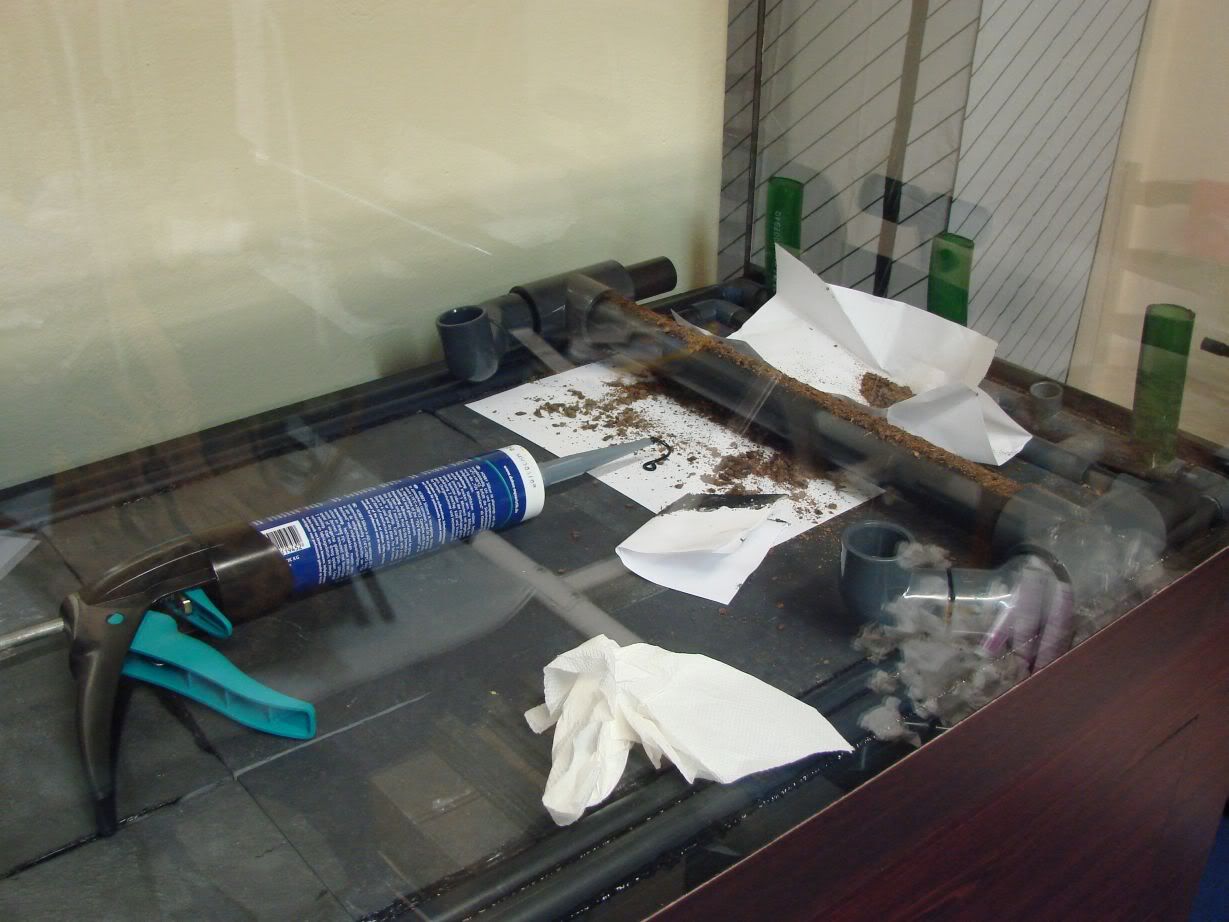
And the result of that days work...
I hope you liked it!!!:hi:
-
Haavard Stoere
- Posts: 1128
- Joined: 27 Jan 2005, 22:56
- My articles: 3
- My images: 65
- My cats species list: 22 (i:0, k:0)
- My aquaria list: 10 (i:9)
- Spotted: 16
- Location 1: Norway, Stavanger
Re: 2 meter Orinoco basin tank setting up...
Hi Costas Nice to see the tank developing. It will be a great setup
Instead of gluing peat to the tubes you should maybee try using long fibred peat and fishing line. Alternatively coconut fibres and fishing line.
Instead of gluing peat to the tubes you should maybee try using long fibred peat and fishing line. Alternatively coconut fibres and fishing line.

-
Kostas
- Posts: 791
- Joined: 23 Apr 2003, 10:57
- I've donated: $256.00!
- My images: 19
- My cats species list: 14 (i:0, k:0)
- My aquaria list: 3 (i:3)
- Spotted: 6
- Location 1: Greece,Athens
- Location 2: Greece,Athens
- Interests: Fishkeeping,diving,skiing,r/c modeling,growing Palm trees,ferns and tropical plants
- Contact:
Re: 2 meter Orinoco basin tank setting up...
Thank you very much for your comments and suggestions Haavard
I am very happy you like it!!!
I really hope it that!
Is the long fibbered peat you say what we call "Peat moss"?If yes,it rots easily and wouldnt last long...So it wouldnt provide a good substrate to grow live moss on...Coconut fibres is a very good idea though,i dont know how i missed these from my mixture... I will try to find them before i continue...
About using fishing line instead of silicone,i think that this is very good if you want something you can take off whenever you want but for permanent,i think that silicone will be better as i think it will provide a better ''substrate'' for moss to grow on,even if/when peat and coconut rots away as it will have the texture and tiny holes of the material that was glued on it...So i think that even then,silicone by itself will be enough to support moss to grow on the tubes,while fishing line wont then(of course i can change the material any time i want with fishing line...but even then,fishing line wont provide a stable place for moss to grow on in my opinion...
I am very happy you like it!!!
I really hope it that!
Is the long fibbered peat you say what we call "Peat moss"?If yes,it rots easily and wouldnt last long...So it wouldnt provide a good substrate to grow live moss on...Coconut fibres is a very good idea though,i dont know how i missed these from my mixture...
About using fishing line instead of silicone,i think that this is very good if you want something you can take off whenever you want but for permanent,i think that silicone will be better as i think it will provide a better ''substrate'' for moss to grow on,even if/when peat and coconut rots away as it will have the texture and tiny holes of the material that was glued on it...So i think that even then,silicone by itself will be enough to support moss to grow on the tubes,while fishing line wont then(of course i can change the material any time i want with fishing line...but even then,fishing line wont provide a stable place for moss to grow on in my opinion...
-
Seedy

- Posts: 180
- Joined: 27 Apr 2006, 08:32
- Location 1: Tulsa OK USA
- Interests: Scuba, Sport/Defense Shooting (handgun), Fishing and Cichlids
- Contact:
Re: 2 meter Orinoco basin tank setting up...
Kostas,
If I remember correctly, this tank is for your Panaque's, correct? I would not expect ANY thing to last too long on any surface in that tank. Consider how quickly they will shred that silicone over the pipe. I'm not sure your plant material will even have time to rot.
Another concern, what happens if the Panaque decides s/he likes the taste of the material you mix with the silicone. Will it be able to safely pass the silicone with the plant material if it feeds on it?
-
WhitePine

- Posts: 354
- Joined: 07 Feb 2004, 07:54
- I've donated: $51.00!
- Location 1: Washington State
Re: 2 meter Orinoco basin tank setting up...
I think you should use a little sandpaper(60 grit) on the plastic and then secure the moss to the plastic with either fishing line or better yet, cotton thread. The thread will rot a way and leave the moss which by then will have anchored itself to the roughed up plastic if the panaque hasn't got to it by then.
Cheers, Whitepine
River Tank with Rio HF 20 (1290 gph), Eheim 2236.
- Apon boivinianus, Bolbitis, Crypt balansae, Microsorum Windelov, Vallisneria americana, Crinum calamistratum, Nymphaea zenkerii, Anubias barterii.
River Tank with Rio HF 20 (1290 gph), Eheim 2236.
- Apon boivinianus, Bolbitis, Crypt balansae, Microsorum Windelov, Vallisneria americana, Crinum calamistratum, Nymphaea zenkerii, Anubias barterii.
-
Kostas
- Posts: 791
- Joined: 23 Apr 2003, 10:57
- I've donated: $256.00!
- My images: 19
- My cats species list: 14 (i:0, k:0)
- My aquaria list: 3 (i:3)
- Spotted: 6
- Location 1: Greece,Athens
- Location 2: Greece,Athens
- Interests: Fishkeeping,diving,skiing,r/c modeling,growing Palm trees,ferns and tropical plants
- Contact:
Re: 2 meter Orinoco basin tank setting up...
Thank you very much for your replys Seedy and WhitePine
Yes,this tank will house a trio of Panaque L190 too...
I appreciate your concern very much but have thought all about that too! These pipes will be out of the water Only the large diametre one will be about half submermed and i have not/will not cover its submerged part with silicone exactly for the reason you say,Panaque will surely like the coir and peat i am using and would surely graze it with unknown results on its health...So this will be only for the parts of the tubing that will be out of water
I wouldnt plan growing moss on the spraybar if it was to be submerged...Panaque would surely displace it...
Can moss attach itself to just rough plastic surface?Have you done that WhitePine?
Yes,this tank will house a trio of Panaque L190 too...
I appreciate your concern very much but have thought all about that too!
I wouldnt plan growing moss on the spraybar if it was to be submerged...Panaque would surely displace it...
Can moss attach itself to just rough plastic surface?Have you done that WhitePine?
-
Seedy
- Posts: 180
- Joined: 27 Apr 2006, 08:32
- Location 1: Tulsa OK USA
- Interests: Scuba, Sport/Defense Shooting (handgun), Fishing and Cichlids
- Contact:
Re: 2 meter Orinoco basin tank setting up...
Kostas, Keep up the good work, hopefully you will get the time to finish it soon as I'm sure I'm not the only one who wants to see it filled with fish! 
-
apistomaster

- Posts: 4735
- Joined: 10 Jun 2006, 14:26
- I've donated: $90.00!
- My articles: 1
- My cats species list: 12 (i:0, k:0)
- My Wishlist: 1
- Location 1: Clarkston, WA, USA
- Location 2: Clarkston, WA, USA
- Interests: Aquaculture and flyfishing
Re: 2 meter Orinoco basin tank setting up...
Hi Kostas,
The guys are right about the problems encountered when trying to attach peat to a smooth surface. It doesn't last even if you weren't keeping Panaque sp. It just decays, clogs the filters then leaves unsightly pipes covered with silicone.
Maybe if you silicone a layer of sand and tied the mosses in place it would work and look better.
I tried something similar but attached cork board to the interior glass surfaces and eventually most of the cork came loose in small bits over time and also clogged filter intakes. FWIW.
Avid Trout fly fisherman. ·´¯`·...¸><)))º>
-
Kostas
- Posts: 791
- Joined: 23 Apr 2003, 10:57
- I've donated: $256.00!
- My images: 19
- My cats species list: 14 (i:0, k:0)
- My aquaria list: 3 (i:3)
- Spotted: 6
- Location 1: Greece,Athens
- Location 2: Greece,Athens
- Interests: Fishkeeping,diving,skiing,r/c modeling,growing Palm trees,ferns and tropical plants
- Contact:
Re: 2 meter Orinoco basin tank setting up...
Thanks Seedy,i will do my best!
Thank you very much for your advise apistomaster
I know that it may eventually decay,although these pipes will be out of water so this will delay more, but peat and coconut fibers last long before this is done,even underwater...Also,when they are gone,they will leave textured silicone which will still hold the moss and soil particles and so i think it will continue to look natural even when the materials i am gluing are gone As for filter cloging,these things wont clog my filter!No,no,i have the specialists!!!Panaque L190!!!!
I think sand would stand out a lot there and wouldnt look very natural till moss attaches itself and grows a bit...Also,sand,that high up in the tank isnt very natural while peat dressed pipes look a bit like an overhanging piece of wood with moss and plants growing on it
That thing with the cork bark is something i always wanted to do too...Did you used cork board or corck bark?I ask because cork board is made of small pieces of cork bark glued together while cork bark is the all natural material and i think it wouldnt do that...I dont have any personal experience with that but its something i always wanted to try in my planted tank to create a natural moss/fern wall...Thank you very much for sharing you experience with it!!! Now i will have to research it much more before i decide to do it...
Thank you very much for your advise apistomaster
I know that it may eventually decay,although these pipes will be out of water so this will delay more, but peat and coconut fibers last long before this is done,even underwater...Also,when they are gone,they will leave textured silicone which will still hold the moss and soil particles and so i think it will continue to look natural even when the materials i am gluing are gone
I think sand would stand out a lot there and wouldnt look very natural till moss attaches itself and grows a bit...Also,sand,that high up in the tank isnt very natural while peat dressed pipes look a bit like an overhanging piece of wood with moss and plants growing on it
That thing with the cork bark is something i always wanted to do too...Did you used cork board or corck bark?I ask because cork board is made of small pieces of cork bark glued together while cork bark is the all natural material and i think it wouldnt do that...I dont have any personal experience with that but its something i always wanted to try in my planted tank to create a natural moss/fern wall...Thank you very much for sharing you experience with it!!!
-
apistomaster
- Posts: 4735
- Joined: 10 Jun 2006, 14:26
- I've donated: $90.00!
- My articles: 1
- My cats species list: 12 (i:0, k:0)
- My Wishlist: 1
- Location 1: Clarkston, WA, USA
- Location 2: Clarkston, WA, USA
- Interests: Aquaculture and flyfishing
Re: 2 meter Orinoco basin tank setting up...
Kostas,
I did use the cork bark pieces panels because it is all I could find in my town. I wish I could have found the other material, it would have worked much better, I think. It did look really nice while it lasted. Since it was an experiment I only used a 20 gallon long. The water was heavily stained from the tannins and lignins that leached and that aspect never got any better. I had it set up for a year and a half.
The only pleco was an Ancistrus sp 3 but even it abraded the cork quite a bit. A Panaque would have demolished it in a month.
Avid Trout fly fisherman. ·´¯`·...¸><)))º>
-
Kostas
- Posts: 791
- Joined: 23 Apr 2003, 10:57
- I've donated: $256.00!
- My images: 19
- My cats species list: 14 (i:0, k:0)
- My aquaria list: 3 (i:3)
- Spotted: 6
- Location 1: Greece,Athens
- Location 2: Greece,Athens
- Interests: Fishkeeping,diving,skiing,r/c modeling,growing Palm trees,ferns and tropical plants
- Contact:
Re: 2 meter Orinoco basin tank setting up...
That explains why it fell apart...So this allows some possibilities my idea to work although from your experience i can say that cork bark may detach from the glass after some months due to the outer glued surface of it rotting away which will be a problem...Did you noticed the outer part of it rotting?Did the silicon glued pieces of the panel(i.e. the back pieces) detached themselves or only the glued together pieces started floating away?
About the Panaque,you bet! I was planning to put it in my planted tank which doesnt contain any of the large Panaque,only an L104(soon to be a trio)...So it could last enough for the fern and moss to cover it...
About the Panaque,you bet!
Last edited by Kostas on 28 Jan 2008, 17:53, edited 1 time in total.
-
apistomaster
- Posts: 4735
- Joined: 10 Jun 2006, 14:26
- I've donated: $90.00!
- My articles: 1
- My cats species list: 12 (i:0, k:0)
- My Wishlist: 1
- Location 1: Clarkston, WA, USA
- Location 2: Clarkston, WA, USA
- Interests: Aquaculture and flyfishing
Re: 2 meter Orinoco basin tank setting up...
Kostas,
I experienced both modes of failure with the cork. It left broad areas of dirty looking areas of exposed silicone which I used liberally.
I experienced both modes of failure with the cork. It left broad areas of dirty looking areas of exposed silicone which I used liberally.
Avid Trout fly fisherman. ·´¯`·...¸><)))º>
-
Kostas
- Posts: 791
- Joined: 23 Apr 2003, 10:57
- I've donated: $256.00!
- My images: 19
- My cats species list: 14 (i:0, k:0)
- My aquaria list: 3 (i:3)
- Spotted: 6
- Location 1: Greece,Athens
- Location 2: Greece,Athens
- Interests: Fishkeeping,diving,skiing,r/c modeling,growing Palm trees,ferns and tropical plants
- Contact:
Re: 2 meter Orinoco basin tank setting up...
Thank you very much apistomaster!
It seems this is another problem i have to overcome if i gonna use it...It could probably be overcome with a few holes(not see through holes...The inner 1+cm wont be drilled for aesthetical reasons...) so that silicone plugs hold the bark in place even after the surface rots...But lets leave it to when i take on the project of changing my other 1 meter tank...It want be soon...
It seems this is another problem i have to overcome if i gonna use it...It could probably be overcome with a few holes(not see through holes...The inner 1+cm wont be drilled for aesthetical reasons...) so that silicone plugs hold the bark in place even after the surface rots...But lets leave it to when i take on the project of changing my other 1 meter tank...It want be soon...
-
grokefish

- Posts: 1554
- Joined: 13 Apr 2006, 19:28
- My images: 3
- My aquaria list: 1 (i:0)
- Spotted: 2
- Location 1: The Vandart Aquarium South Wales
- Interests: Life the universe and everything
Re: 2 meter Orinoco basin tank setting up...
Whats happening Kostas?
Matt
Matt
One more bucket of water and the farce is complete.
-
Kostas
- Posts: 791
- Joined: 23 Apr 2003, 10:57
- I've donated: $256.00!
- My images: 19
- My cats species list: 14 (i:0, k:0)
- My aquaria list: 3 (i:3)
- Spotted: 6
- Location 1: Greece,Athens
- Location 2: Greece,Athens
- Interests: Fishkeeping,diving,skiing,r/c modeling,growing Palm trees,ferns and tropical plants
- Contact:
Re: 2 meter Orinoco basin tank setting up...
Thank you very much for your interest Matt
Good news,last night i finished the tank and on Saturday i am gonna fill it for the first time!!!!I will thoroughly wash it and siphon any little nasty that escaped the vaccuming i did yesterday and will also clean the woods...I will fill it and start all the equipment to check if it works properly and as i planned i will leave it filled till Monday when i will do a last emptying and will fill it again to start cycling I will speed up the cycling proccess by adding 3 mature super dirty sponges from my Panaque-Leporacanthicus tank as well as half of the Bio chem stars from the same tank...I will also add Stress zyme,Bactozyme and another bacteria product and will feed the tank with the food i would feed 4 15cm Hemiancistrus subviridis or maybe a bit more and will be feeding this daily...I hope the tank will have cycled in a week....What do you think?
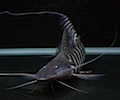
I cant wait to put my Hemiancistrus in there!!!
I will take photos of the empty tank today... The filling proccess will of course be closely monitored...and captured!!!
Good news,last night i finished the tank and on Saturday i am gonna fill it for the first time!!!!I will thoroughly wash it and siphon any little nasty that escaped the vaccuming i did yesterday and will also clean the woods...I will fill it and start all the equipment to check if it works properly and as i planned i will leave it filled till Monday when i will do a last emptying and will fill it again to start cycling
I cant wait to put my Hemiancistrus in there!!!
I will take photos of the empty tank today...
-
taksan
- Posts: 341
- Joined: 24 Mar 2005, 14:03
- My images: 3
- My cats species list: 7 (i:0, k:0)
- Spotted: 1
- Location 1: Australia and Uk
- Location 2: Sydney and Surrey
Re: 2 meter Orinoco basin tank setting up...
I love watching these big DIY tank project threads. I wish I had the patience to do a big tank project myself but whenever I get another big tank I seem to just get it drilled paint the background black and stick a few big eheims on it. I'm sure it will be well worth the time you've spent Kostas and it will look great.
-
Haavard Stoere
- Posts: 1128
- Joined: 27 Jan 2005, 22:56
- My articles: 3
- My images: 65
- My cats species list: 22 (i:0, k:0)
- My aquaria list: 10 (i:9)
- Spotted: 16
- Location 1: Norway, Stavanger
Re: 2 meter Orinoco basin tank setting up...
I am really looking forward to the picture updates. I am sure the filling will be without problems. The tank looks much more solid than average
-
grokefish
- Posts: 1554
- Joined: 13 Apr 2006, 19:28
- My images: 3
- My aquaria list: 1 (i:0)
- Spotted: 2
- Location 1: The Vandart Aquarium South Wales
- Interests: Life the universe and everything
Re: 2 meter Orinoco basin tank setting up...
Yes I think I am nearly as excited as you Kostas
More pictures, please!!!!!!!
Matt
More pictures, please!!!!!!!
Matt
One more bucket of water and the farce is complete.
-
Kostas
- Posts: 791
- Joined: 23 Apr 2003, 10:57
- I've donated: $256.00!
- My images: 19
- My cats species list: 14 (i:0, k:0)
- My aquaria list: 3 (i:3)
- Spotted: 6
- Location 1: Greece,Athens
- Location 2: Greece,Athens
- Interests: Fishkeeping,diving,skiing,r/c modeling,growing Palm trees,ferns and tropical plants
- Contact:
Re: 2 meter Orinoco basin tank setting up...
Thank you very much for your kind comments
taksan,
I am glad you like it!!! I decided to do something like that because this is my first and only big tank and wanted to make it as better and natural looking as i can... I hope the result to be worth it as you say...
Thank you very much Haavard!!! I hope everything goes straightforward with the filling...I am really happy you find my tank more solid than average Gives me courage...
I am glad to hear that Matt
I found some time and thought i would do you an update
The past days i cutted the slate building's back pieces,cutted the slate tops to length and smoothend them as well as any other piece of the building i hadnt already make smooth...The backs of the slate building are in layers too,as the rest of the cave...I cutted small 1-2cm wide pieces,varying depending on the place they were meant to be placed...The backs of the upper level are as follows:top back pieces are 2cm wide,the middle pieces are 1cm wide and the bottom pieces are 1,5cm wide...The backs of the ground level are 2cm, 1,8cm, 1cm and 1,5cm,top to ''ground''....
I glued the building together at two ''parts'',i first glued the first layer without its tops so that i still had access to the inside of the caves to correct anything i had missed(i.e. i hadnt smoothend the base well at first and i wanted to be able to do it...)or if i made any mess with the silicone...After a day,i finished any detail left on the first layer and proceeded to the upper layer,this time gluing the tops as well after making sure that everything is ready and fine in the insides...
After that,i continued and finished the dressing of the spraybars with the peat/coco bedding mixture...They look much much better now and expect them to make a beautyfull part of the aquarium once i grow moss and other semiaquatic plants on them...
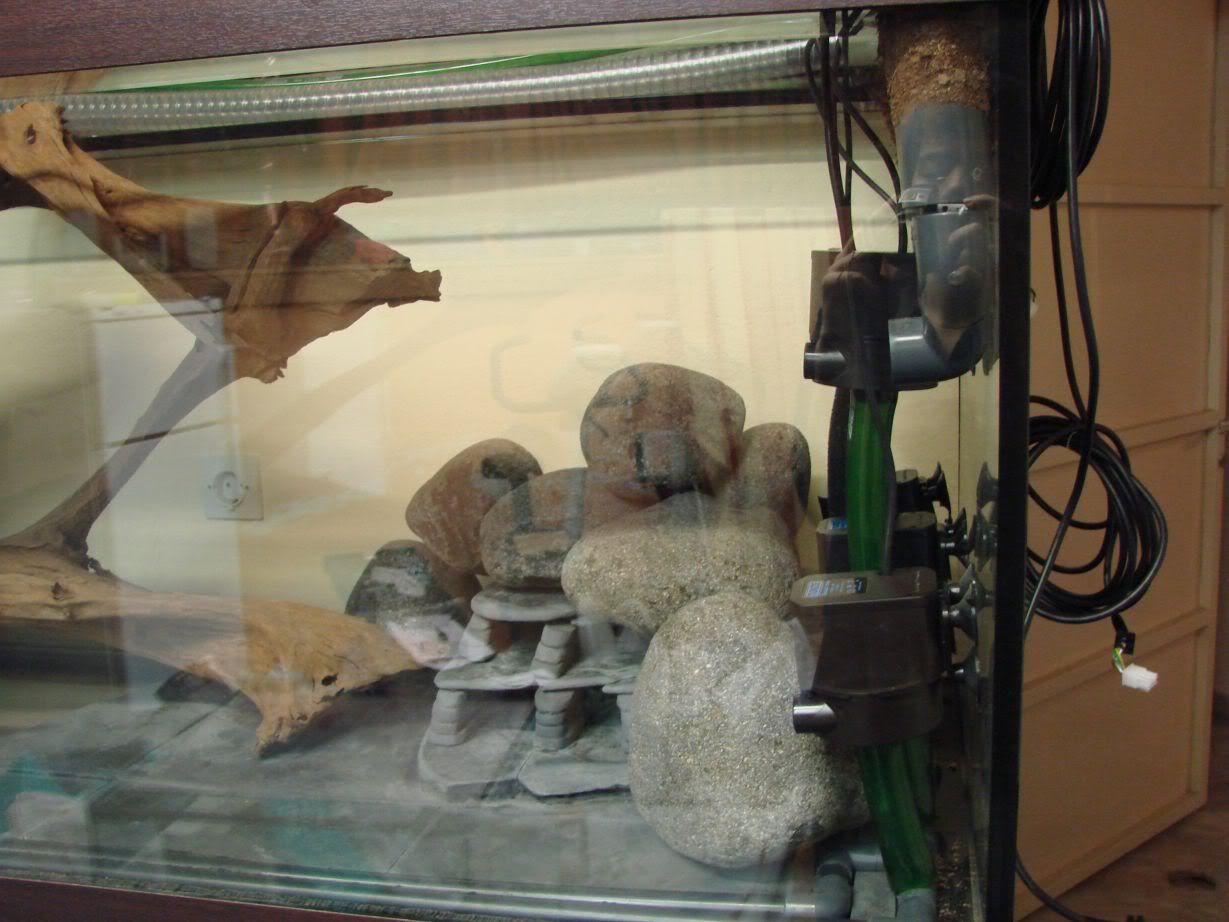
Next job was to install the Tunze Turbelle electronic 7400/2 powerheads at thire predetermined positions...I unplugged their cables from their drivers so as to be able to pass the cable through the holes of the tank rims...(still havent passed them though as i want to first pass their cables through powerhead sponge prefilters on which i will grow moss to cover them...).I connected the powerheads to the pvc network glued to the bottom of the tank via 25/34mm flexible tubing.The tubbing will also be covered by sponge prefilters on which i will grow moss on hopping that it will make the tank look more natural...
The intakes of the pvc network are consisted of 1)a section of 20mm pvc,2)25/28mm Tunze bushing,3)a section of 3/4inch pvc,4)25/28mm Tunze bushing and the strainer that goes with the 7400/2's...I am currently missing some of the bushings i need and so in the begining the intakes will work without the first bushing...Its not realy absolutely neccessary but adds to the stability and lets you alter the angle of the intake a bit...
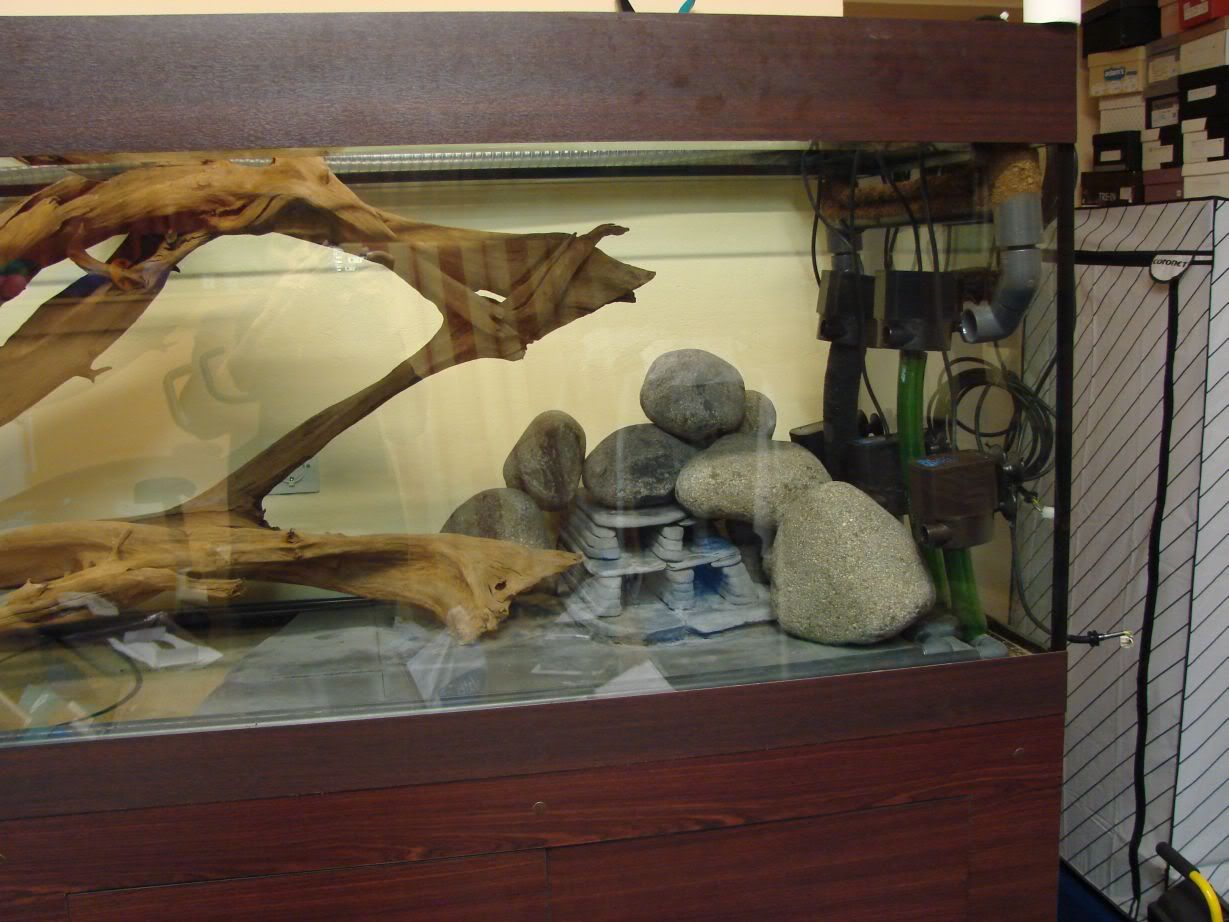
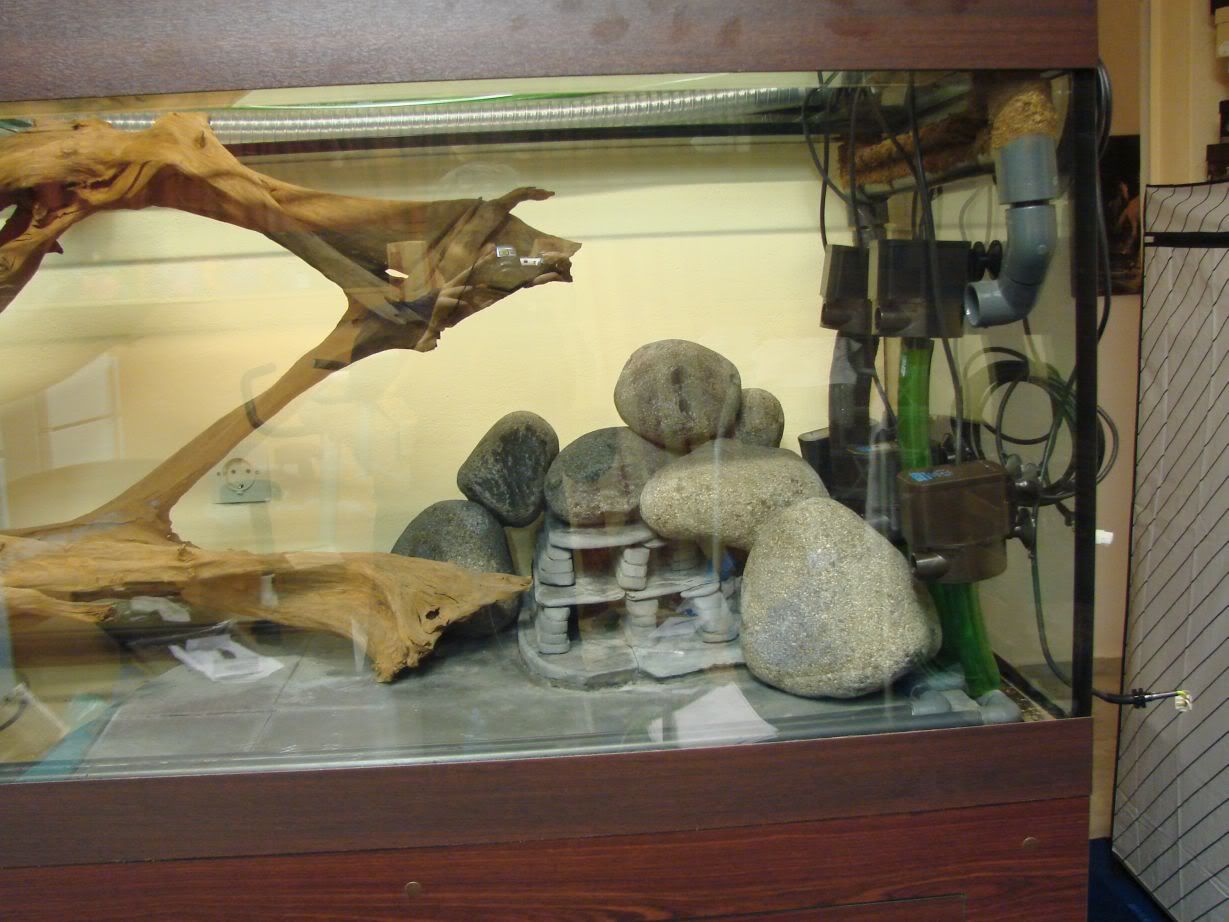
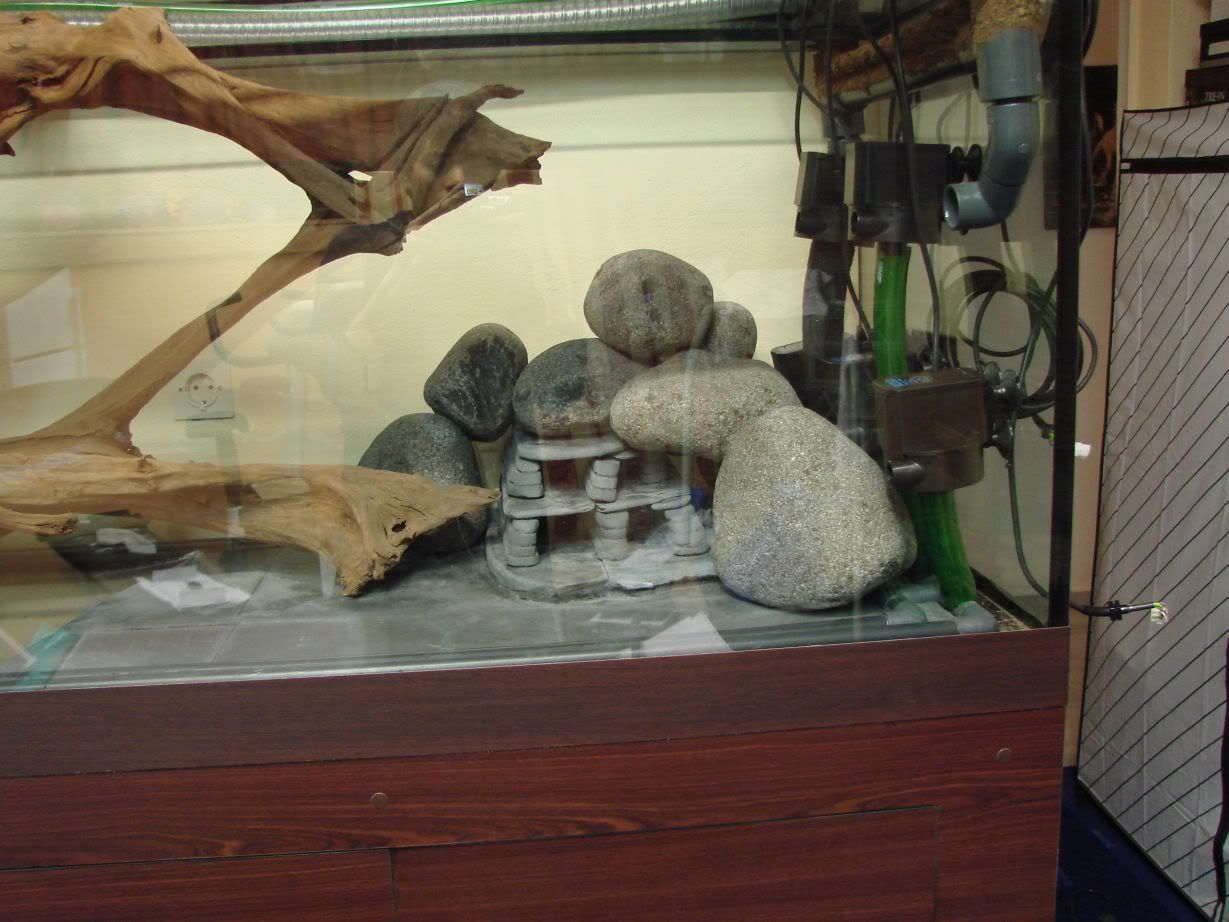
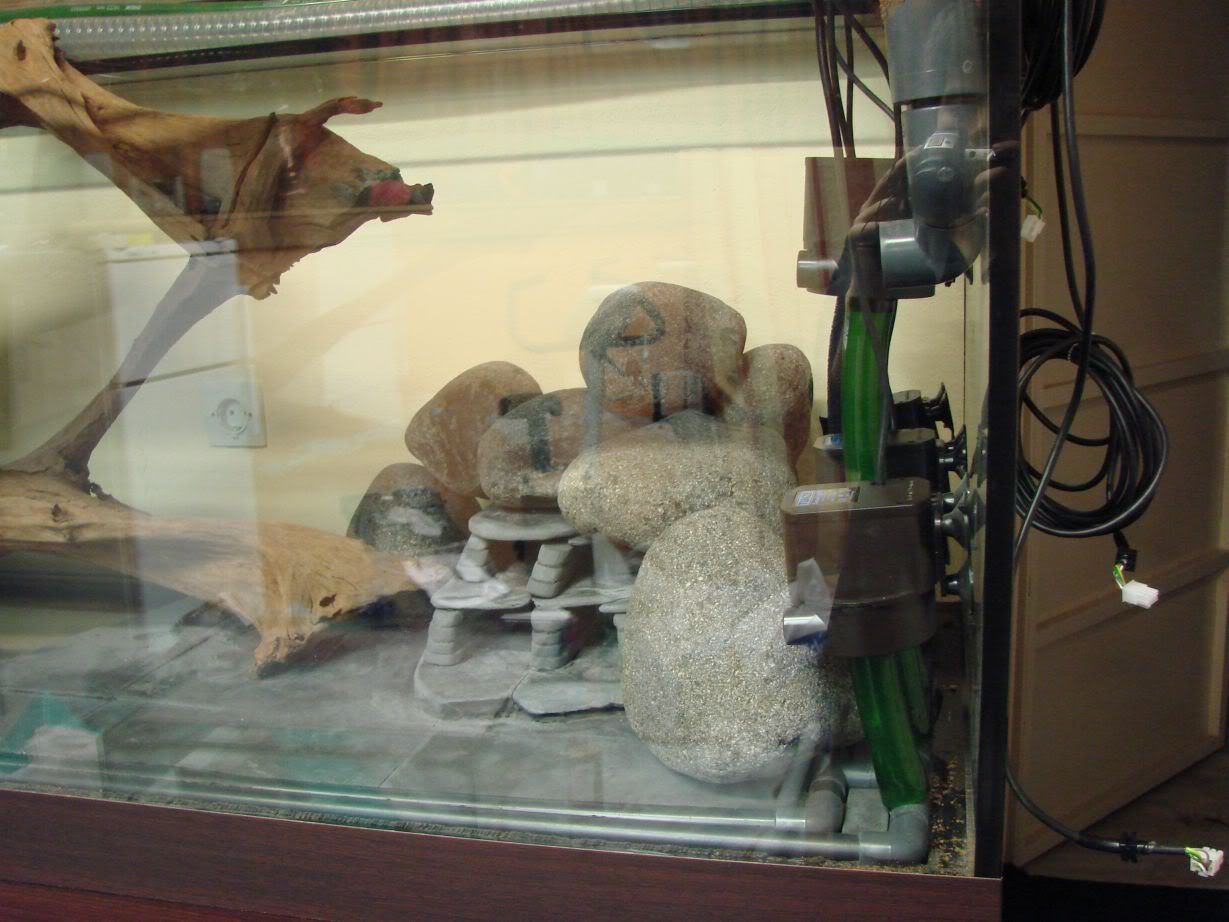
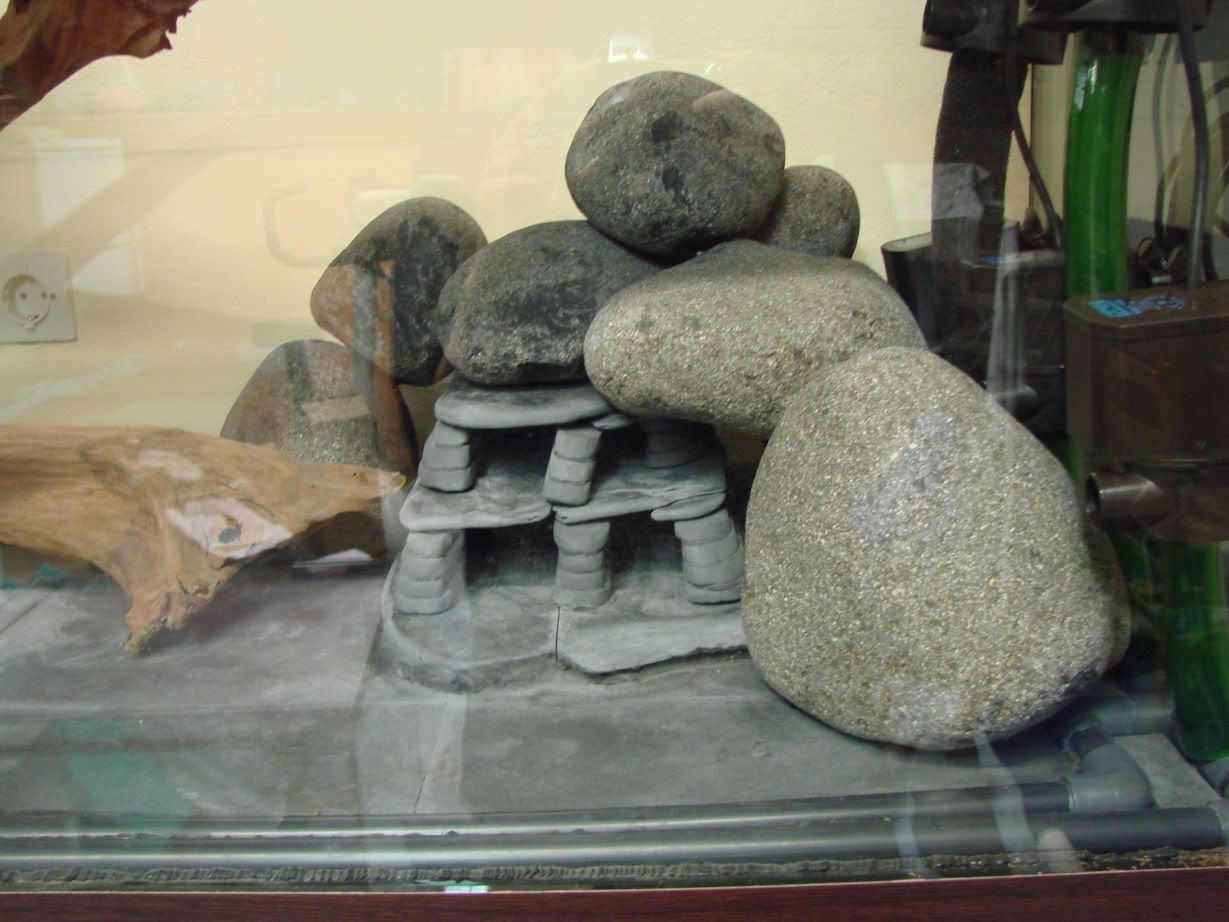
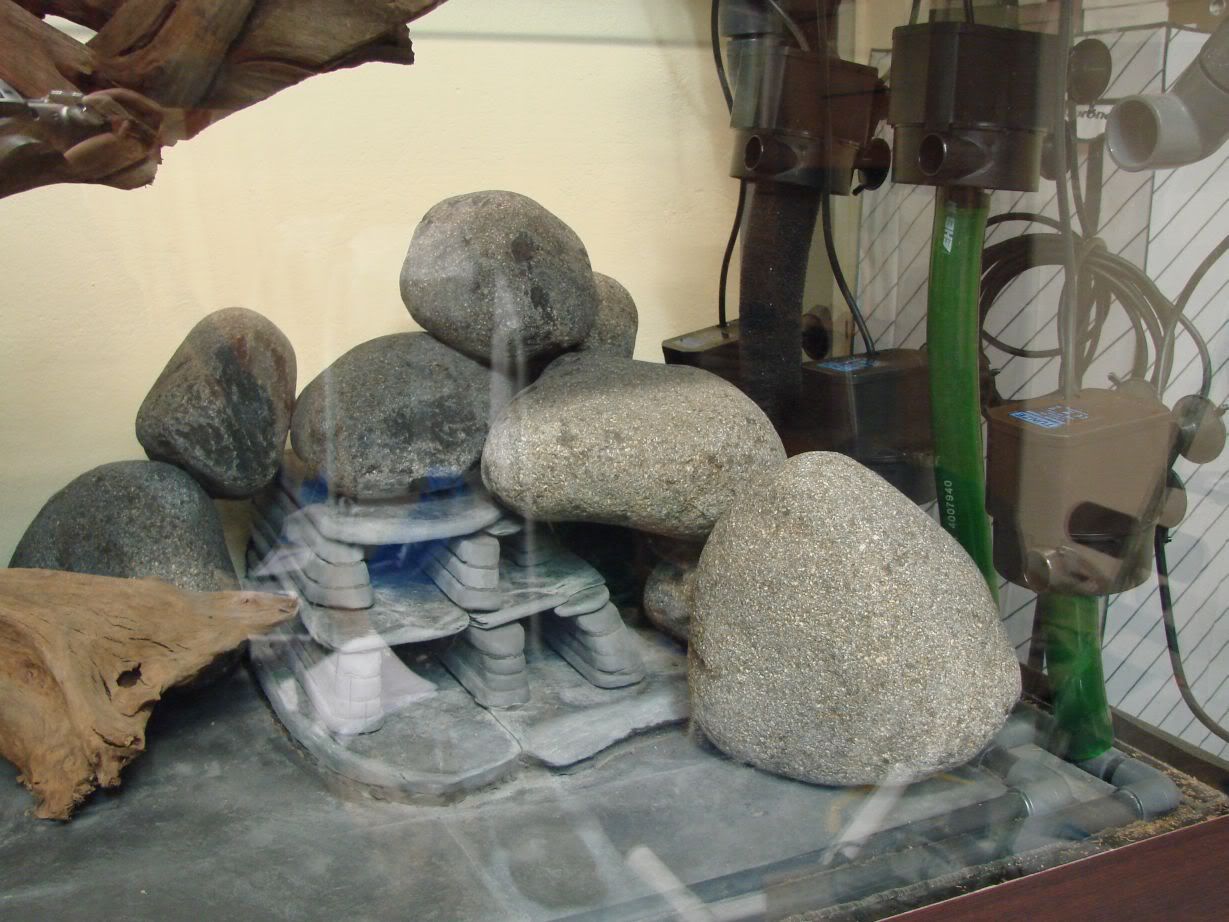
After i finished these,it was finally time to add the rounded basalt rocks...After quite some time trying different combinations,i finally found one that i liked...I used most of the pieces i had,probably more that 60kg of basalt...I found the combination i liked gradually,i first found a part of it and glued it in place...Then i was feeling that something was missing...So next day,here i was again,in the aquarium adding more stones... I added 3 more stones and secured another stone that i had missed the previous day...This final day,was this Sunday,and it was the last day i used silicone in my tank!!!!:dance:So,tomorrow i fill!!!!!!!!!!!!!!!!!!!!!!!!Nothing can stop me from doing that!!!!!!!!
(well,hopefully.... )
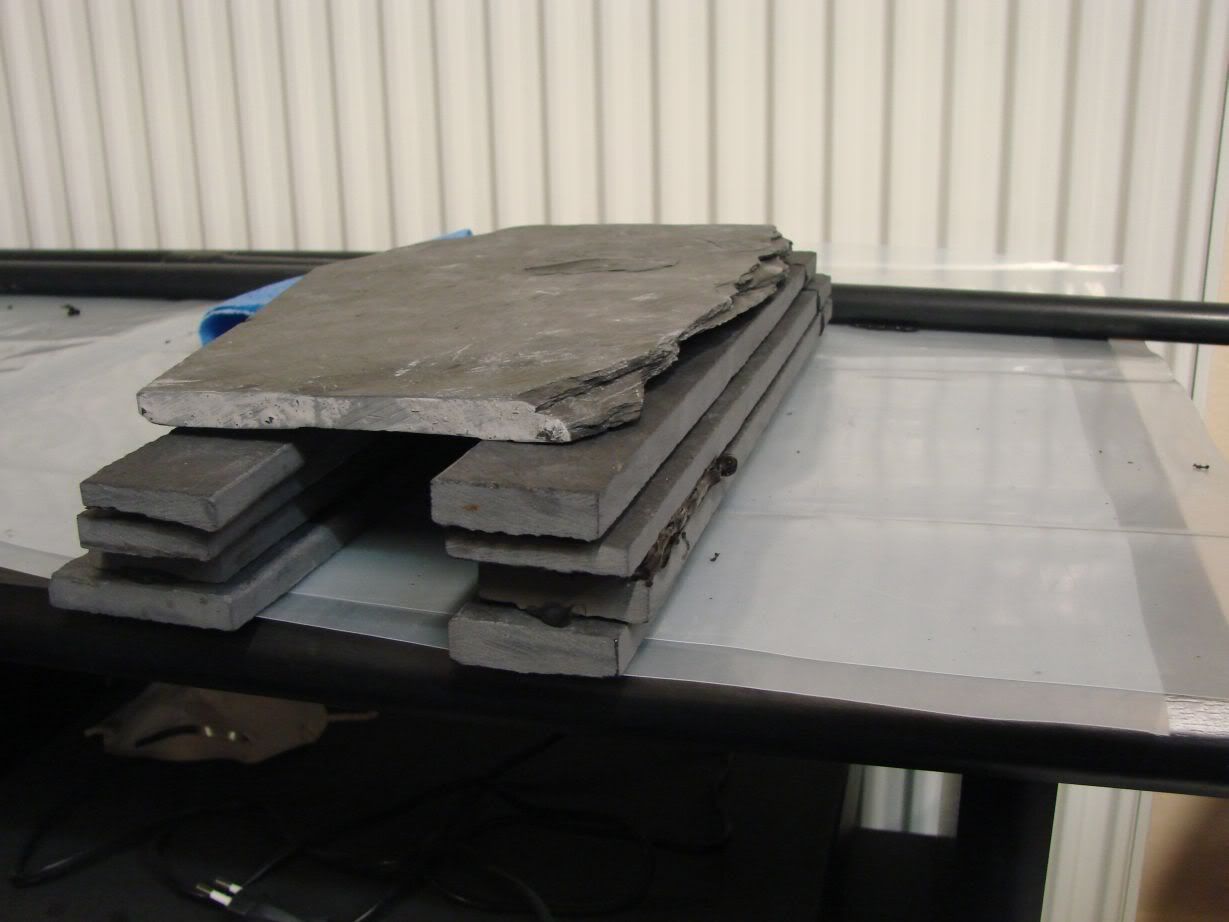
Here are some photos of the slate building test fitted,without the backs and before cutting the tops to correct length...
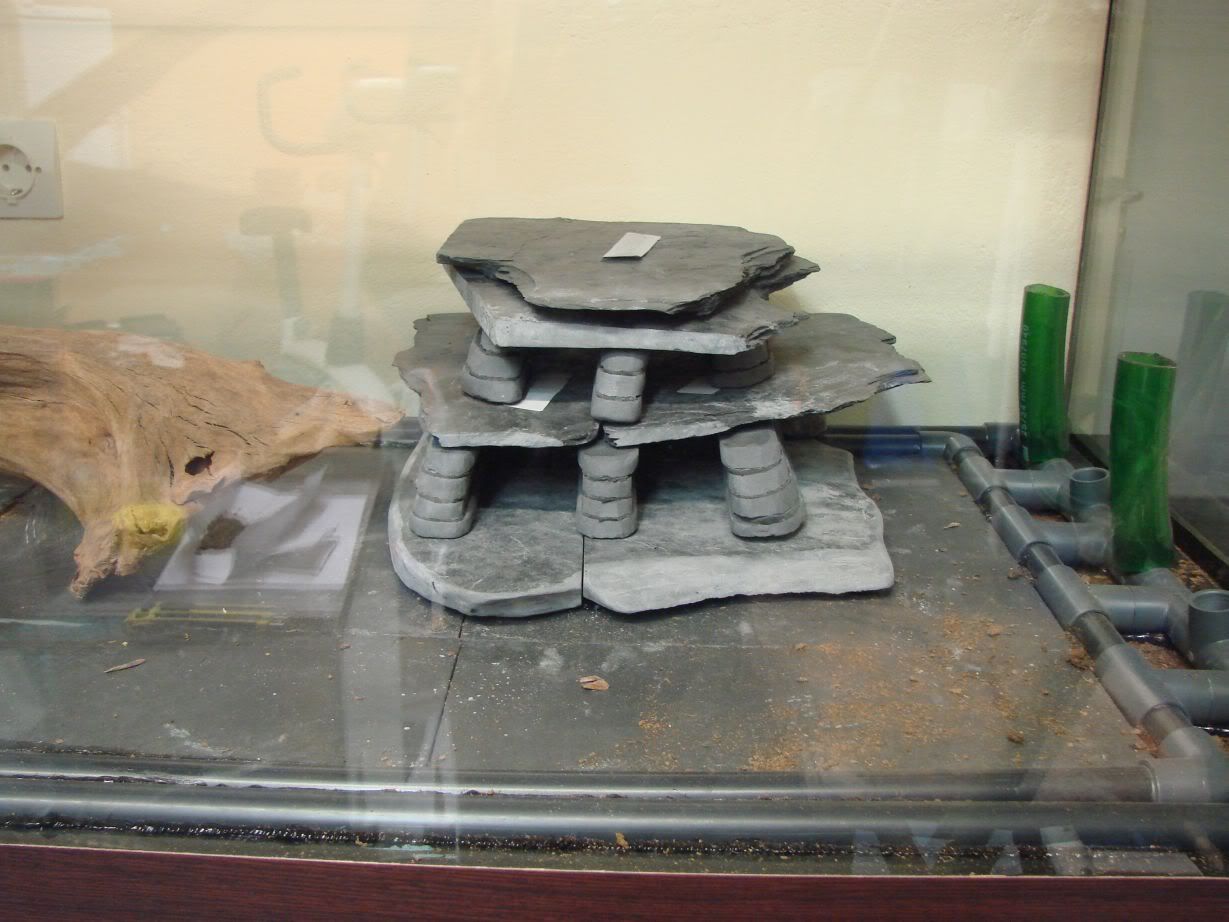
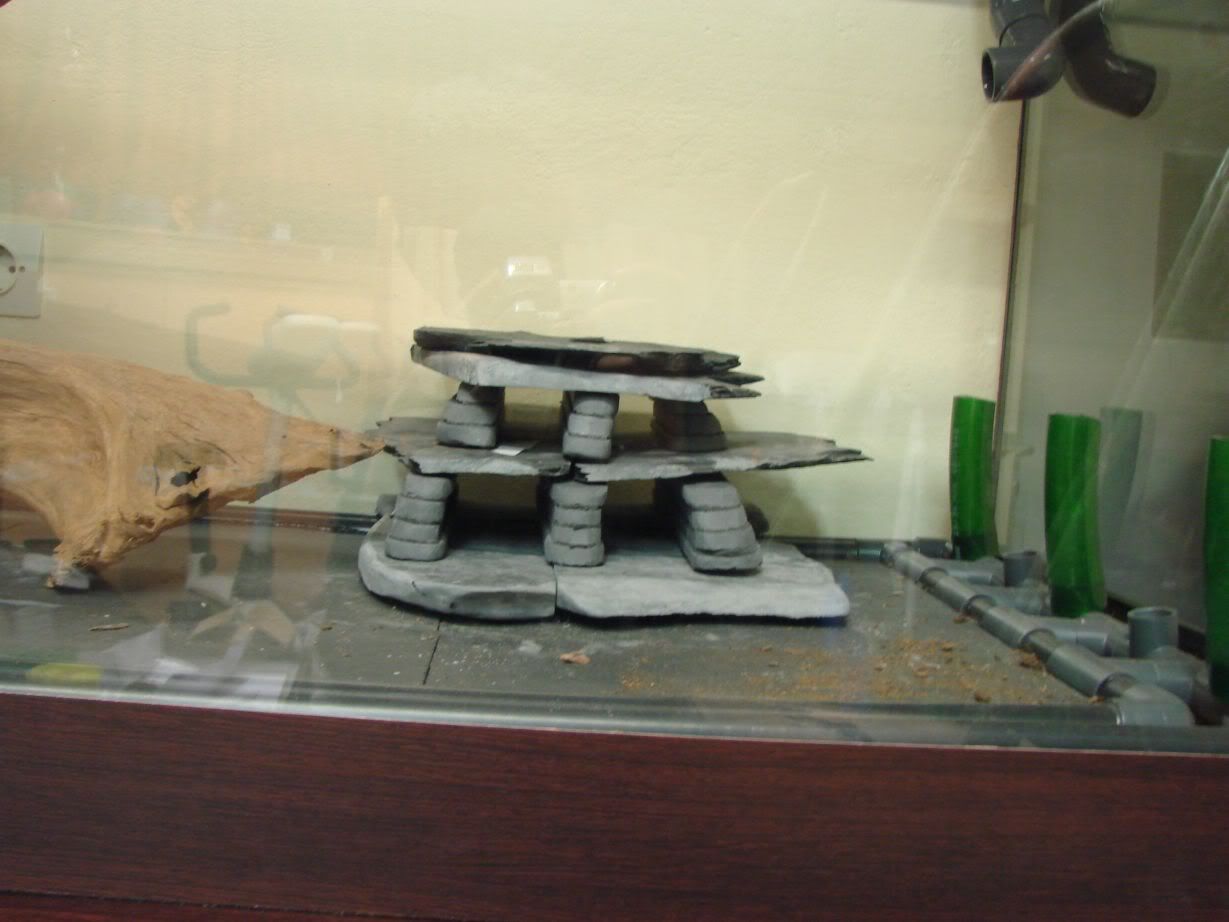
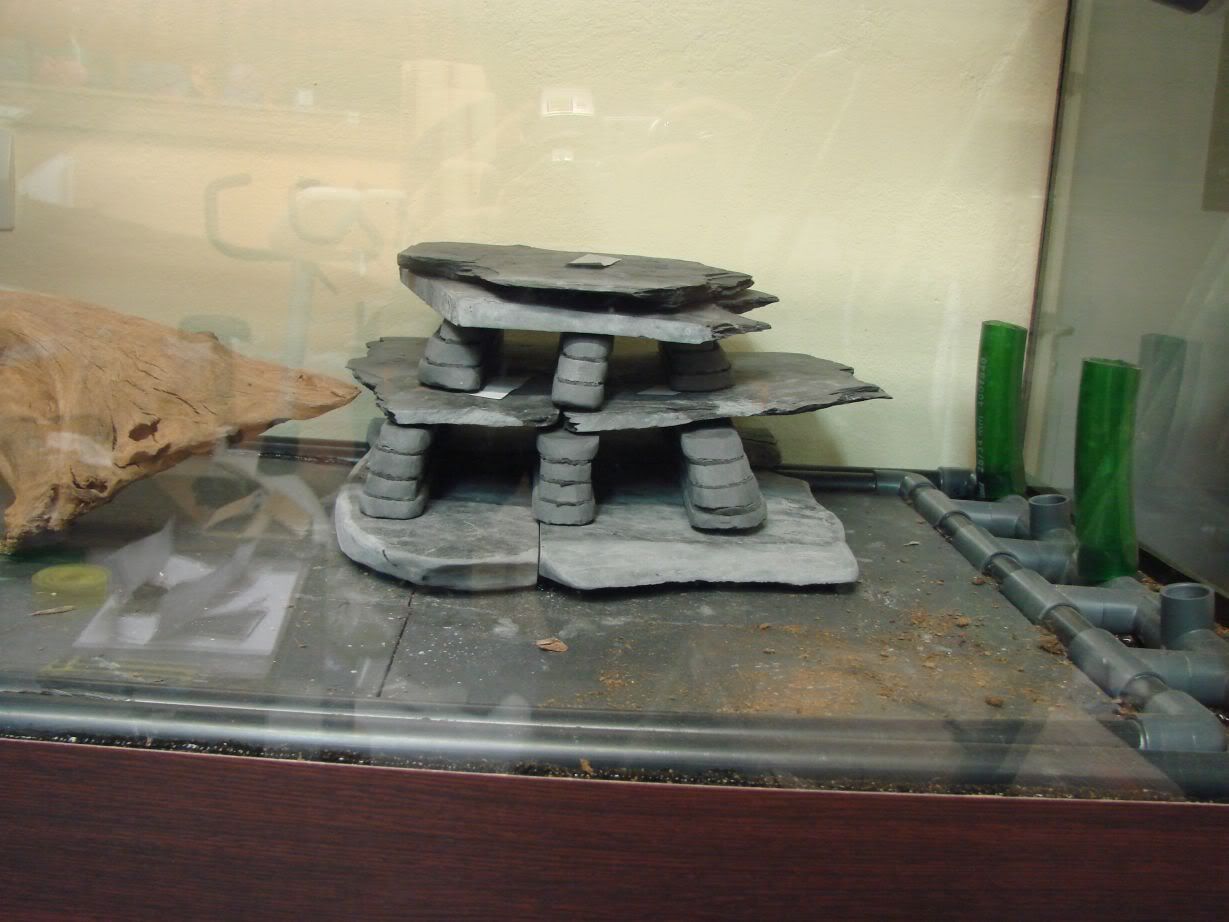
Whole tank shot at that point...

Here are a few photos of the finished rock aquascape...:hi:The final aquascape is not finished as i still need to enter the tank to finish a few things with the powerheads(basically to dress the powerhead tubes and cables with the sponge prefilters as i buy them as ia am short of sponges right now...I have ordered though and hopefully i will have them tomorrow...
Here you go!!!

I have taken lots more pictures at other angles and of other things too but my connection is so slow today that i couldnt stand uploading more I will post the rest of the pictures as soon as i upload them
Hope you liked it!!!
taksan,
I am glad you like it!!!
Thank you very much Haavard!!!
I am glad to hear that Matt
I found some time and thought i would do you an update
The past days i cutted the slate building's back pieces,cutted the slate tops to length and smoothend them as well as any other piece of the building i hadnt already make smooth...The backs of the slate building are in layers too,as the rest of the cave...I cutted small 1-2cm wide pieces,varying depending on the place they were meant to be placed...The backs of the upper level are as follows:top back pieces are 2cm wide,the middle pieces are 1cm wide and the bottom pieces are 1,5cm wide...The backs of the ground level are 2cm, 1,8cm, 1cm and 1,5cm,top to ''ground''....
I glued the building together at two ''parts'',i first glued the first layer without its tops so that i still had access to the inside of the caves to correct anything i had missed(i.e. i hadnt smoothend the base well at first and i wanted to be able to do it...)or if i made any mess with the silicone...After a day,i finished any detail left on the first layer and proceeded to the upper layer,this time gluing the tops as well after making sure that everything is ready and fine in the insides...
After that,i continued and finished the dressing of the spraybars with the peat/coco bedding mixture...They look much much better now and expect them to make a beautyfull part of the aquarium once i grow moss and other semiaquatic plants on them...
Next job was to install the Tunze Turbelle electronic 7400/2 powerheads at thire predetermined positions...I unplugged their cables from their drivers so as to be able to pass the cable through the holes of the tank rims...(still havent passed them though as i want to first pass their cables through powerhead sponge prefilters on which i will grow moss to cover them...).I connected the powerheads to the pvc network glued to the bottom of the tank via 25/34mm flexible tubing.The tubbing will also be covered by sponge prefilters on which i will grow moss on hopping that it will make the tank look more natural...
The intakes of the pvc network are consisted of 1)a section of 20mm pvc,2)25/28mm Tunze bushing,3)a section of 3/4inch pvc,4)25/28mm Tunze bushing and the strainer that goes with the 7400/2's...I am currently missing some of the bushings i need and so in the begining the intakes will work without the first bushing...Its not realy absolutely neccessary but adds to the stability and lets you alter the angle of the intake a bit...
After i finished these,it was finally time to add the rounded basalt rocks...After quite some time trying different combinations,i finally found one that i liked...I used most of the pieces i had,probably more that 60kg of basalt...I found the combination i liked gradually,i first found a part of it and glued it in place...Then i was feeling that something was missing...So next day,here i was again,in the aquarium adding more stones...
(well,hopefully....
Here are some photos of the slate building test fitted,without the backs and before cutting the tops to correct length...
Whole tank shot at that point...
Here are a few photos of the finished rock aquascape...:hi:The final aquascape is not finished as i still need to enter the tank to finish a few things with the powerheads(basically to dress the powerhead tubes and cables with the sponge prefilters as i buy them as ia am short of sponges right now...I have ordered though and hopefully i will have them tomorrow...
Here you go!!!
I have taken lots more pictures at other angles and of other things too but my connection is so slow today that i couldnt stand uploading more
Hope you liked it!!!
-
SOBERKITTY

- Posts: 164
- Joined: 09 Feb 2008, 02:00
- My cats species list: 3 (i:0, k:0)
- Spotted: 2
- Location 1: Atlanta, GA
- Location 2: Atlanta GA, USA
- Interests: Fish, all animals really. I collect Dragons. Love reading all kinds of books. Sci-Fi, Philosophy, and theology, History and Social Science. Have 2 cats. Love to watch movies and TV. Being Sober and staying that way. My daughter of course.
Re: 2 meter Orinoco basin tank setting up...
I love the whole "condo cave" setup. You should make more and market them. You might even make up some cost of the tank. I know I'd pay around 40 or 45 usd for one like that.
-Tiffany
29 gallon tank and 2 gallon tank
29 gallon tank and 2 gallon tank